Alright, so Halloween is basically knocking on your door, and your kiddos are probably already vibrating with sugar excitement, right? You want to conjure up something spooktacular, something delicious, but also something that *doesn’t* require you to sell your soul for an entire day in the kitchen. Girlfriend, I hear you. This isn’t about impressing the judges on a baking show; it’s about making awesome memories (and a seriously yummy treat) without the stress. We’re talking about a Halloween cake for kids that’s so easy, it’s almost cheating. Almost.
Why This Recipe is Awesome
Let’s be real: you’re busy. Your kids are demanding. You probably have a thousand other things to do. This recipe is your secret weapon. Why? Because it’s **idiot-proof**. Seriously, even if your culinary skills are usually limited to microwaving leftovers, you’ll nail this. It uses a box mix (don’t judge, it’s our little secret!), minimal decorating fuss, and it screams “I totally spent hours on this!” when in reality, you were probably binging something on Netflix. Plus, it’s ridiculously fun to make *with* the kids, especially the decorating part – perfect for getting those little monsters involved without a huge mess (well, a *manageable* mess, anyway).
Ingredients You’ll Need
- 1 box cake mix: Any flavor your little ghouls desire! Chocolate, vanilla, even red velvet for a bloody vibe.
- Ingredients listed on cake mix box: Usually eggs, oil, and water. Follow those instructions, folks, they know what they’re doing.
- 2 tubs (16 oz each) pre-made frosting: Again, chocolate or vanilla work perfectly. Or go wild with green or orange!
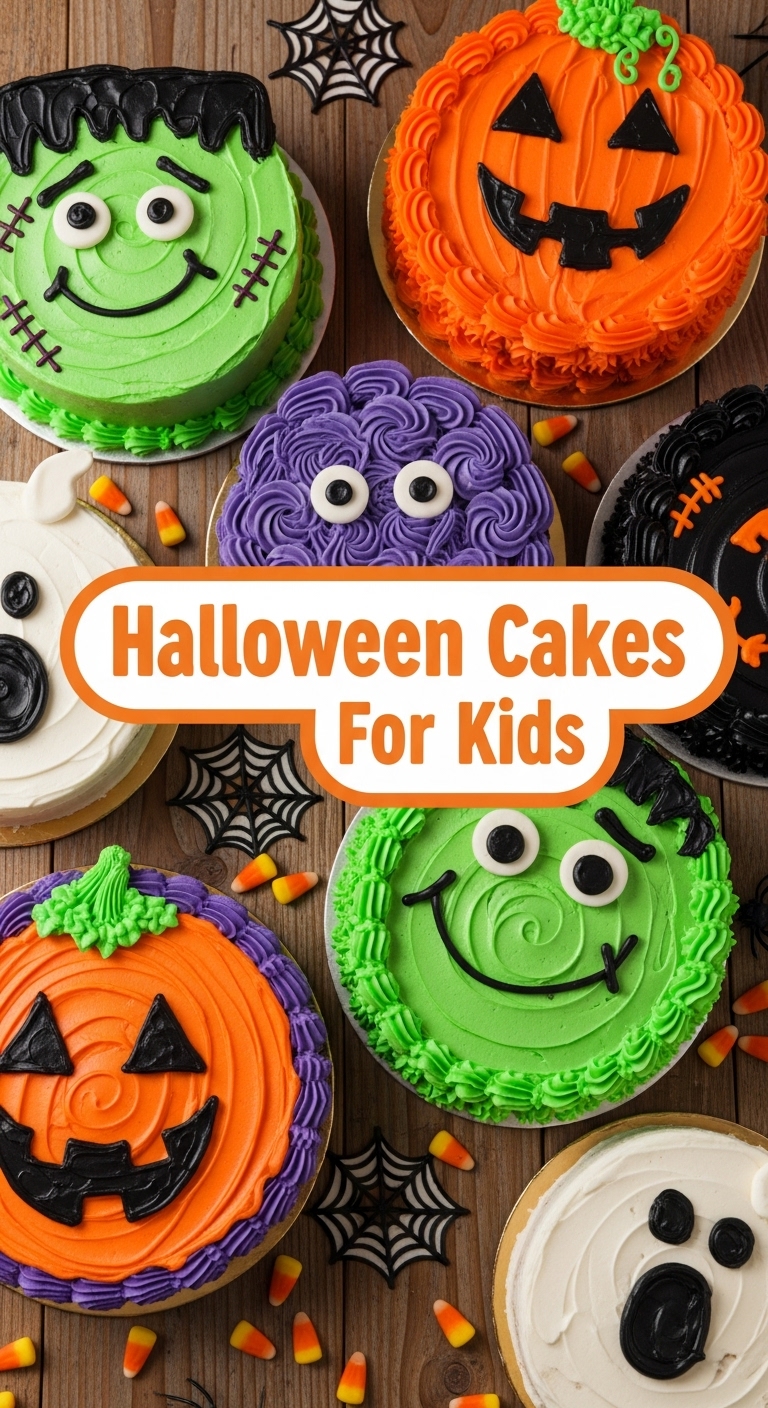
- Black gel food coloring: For spooky spiderwebs or creepy eyes. A small tube is plenty.
- Assorted Halloween candies: Think gummy worms, candy corn, M&Ms, sprinkles, chocolate eyeballs, small licorice laces. Whatever makes you happy (and looks ghoulish!).
- Parchment paper: Your new best friend for easy cleanup. Trust me.
Step-by-Step Instructions
- **Bake the Cake:** Preheat your oven to the temperature specified on your cake mix box. Prep two 8-inch round cake pans by greasing and flouring them, or lining with parchment paper circles. Mix the cake batter according to the box directions – don’t overmix, unless you like tough cakes (and who does?).
- **Pour & Bake:** Divide the batter evenly between your two prepared pans. Pop them into the preheated oven and bake for the time recommended on the box, or until a toothpick inserted into the center comes out clean. Be patient, it’s worth it!
- **Cool Down:** Once baked, let the cakes cool in their pans for about 10-15 minutes. Then, gently invert them onto a wire rack to cool completely. This part is crucial; trying to frost a warm cake is a recipe for a frosting avalanche, and nobody wants that.
- **Assemble the Cake:** Once fully cooled (and I mean *fully*!), place one cake layer on your serving plate or cake stand. Spread a generous layer of frosting on top. Carefully place the second cake layer on top of the first. Now, use an offset spatula or knife to frost the entire cake – top and sides. Don’t stress about perfection; rustic and spooky is the vibe!
- **Get Spooky with the Spiderweb (Option 1):** If you’re doing a spiderweb, set aside about 1/4 cup of frosting in a small bowl. Add a few drops of black gel food coloring and mix until it’s a dark, eerie black. Transfer the black frosting to a small piping bag (or a Ziploc bag with a tiny corner snipped off). Pipe concentric circles on top of your cake. Then, drag a toothpick from the center out to the edge in straight lines to create the web effect. Repeat around the whole cake.
- **Monster Face Time (Option 2):** For a monster face, use your black frosting for eyes (big dots!) and a jagged mouth. Use gummy worms for hair or squiggly eyebrows. M&Ms can be pupils, and candy corn can be sharp teeth. Let your imagination run wild!
- **Decorate Like a Pro (or a Kid):** Now for the fun part! Scatter your assorted Halloween candies around the base, on top, or sticking out of the sides. Gummy worms crawling out? Yes! Candy corn fence? Absolutely! This is where the kids can really go to town.
Common Mistakes to Avoid
- Not fully cooling your cakes: This is a cardinal sin. You’ll end up with a sliding, melting mess. Seriously, wait.
- Overmixing the batter: You want just combined. Overmixing develops too much gluten, making your cake tough and dry. We’re aiming for moist and delicious, not cardboard.
- Thinking you can get away with just one tub of frosting: Rookie mistake. You need two, especially if you’re layering and decorating. Don’t skimp!
- Trying to be *too* perfect: This is a kid’s Halloween cake! Embrace the slightly messy, wonderfully whimsical, slightly-off-center charm. It’s part of the fun!
Alternatives & Substitutions
Feeling a little rebellious? I love that! Here are some ideas to shake things up:
- Cake Flavor: Don’t just stick to chocolate or vanilla. A spice cake mix with cream cheese frosting could be amazing and autumnal. Or a lemon cake for a surprisingly tart “ghostly” treat!
- Frosting Fun: Instead of traditional tubs, whip up a simple homemade buttercream if you’re feeling fancy. Or grab different colored frostings – orange, green, purple – to make a truly vibrant (and slightly unsettling) monster cake.
- Decoration Mania: No gummy worms? No problem! Use pretzel sticks for “bones,” crushed Oreos for “dirt,” or even mini marshmallows for “ghosts.” **FYI**, almost anything goes with Halloween candy!
- Cupcakes instead of a cake: If the idea of a whole cake feels like too much, make cupcakes! The decorating possibilities are endless and individual portions are always a hit.
FAQ (Frequently Asked Questions)
- Can I use margarine instead of butter (if the box calls for butter)? Well, technically yes, but why hurt your soul like that? Butter generally gives a richer flavor and better texture. But if margarine is all you’ve got, it’ll work in a pinch. Just don’t tell anyone I said so.
- My cake stuck to the pan! What went wrong? Ah, the dreaded stick! Did you grease AND flour your pan thoroughly? Or use parchment paper? Sometimes a pan isn’t properly prepped. Next time, be extra diligent with the non-stick spray and flour combo!
- How long can I store this spooky masterpiece? Covered loosely at room temperature, it’ll last 2-3 days. In the fridge, maybe 4-5. But honestly, with kids around, will it even last 24 hours? Doubtful, IMO.
- Can I make this ahead of time? Absolutely! Bake the cake layers a day or two in advance, wrap them tightly in plastic wrap, and store at room temp. Frost and decorate closer to party time for ultimate freshness and less “dry cake” drama.
- My spiderweb lines look terrible! Help! Relax! It’s supposed to be spooky, not perfect! Spiders aren’t known for their perfectly straight lines, are they? If it’s really bothering you, just embrace the “abstract art” look, or cover it with more candy. No one will know!
Final Thoughts
So there you have it, fellow kitchen warrior! A Halloween cake for the ages, made with love, a tiny bit of pre-made magic, and zero stress. You’ve just whipped up something amazing that’s going to bring smiles (and sticky fingers) to all the little monsters in your life. Now go impress someone—or yourself—with your new culinary skills. You’ve earned it! And maybe save a slice for yourself before the candy vultures descend. Just sayin’.


