
So you’re craving something tasty but too lazy to spend forever in the kitchen, huh? Same. 🙂 We’ve all been there. You want that juicy, flavorful chicken goodness without the culinary acrobatics. Enter the magical world of grilled chicken breast on foil. It’s like a little flavor party for your chicken, all tucked away in a neat little packet. No fuss, no muss, just pure, unadulterated deliciousness. Let’s do this!
Why This Recipe is Awesome
Seriously, this is the lazy cook’s best friend. It’s practically idiot-proof, even I didn’t mess it up (and that’s saying something). The foil packet traps all those amazing juices and flavors, ensuring your chicken is incredibly moist and tender. Plus, cleanup? A dream! You just toss the foil. BOOM. You’re basically a kitchen wizard who also values their free time. It’s a win-win-win.
Ingredients You’ll Need
- Chicken Breasts: Boneless, skinless. The usual suspects. About 4-6 of them, depending on how hungry your squad is.
- Olive Oil: The good stuff. Or, you know, whatever you have lurking in the pantry. Just a couple of tablespoons.
- Your Favorite Seasonings: This is where the magic happens! Think garlic powder, onion powder, paprika, salt, pepper. Maybe some dried herbs like rosemary or thyme. Go wild!
- Optional Veggies: If you’re feeling fancy (or just want to pretend you’re healthy), chop up some bell peppers, onions, zucchini, or broccoli. They’ll steam up nicely in the packet.
- Lemon: A squeeze of fresh lemon juice over the top before sealing is pure sunshine.
Step-by-Step Instructions
- Preheat your grill: Get that bad boy nice and hot, around medium-high heat. We want sizzle, not sadness.
- Prep your foil: Grab large sheets of heavy-duty aluminum foil. Like, enough to make a cozy little tent for each chicken breast. Double layer it if you’re feeling extra cautious about leaks.
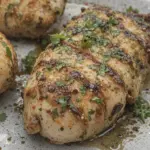
- Season the chicken: In a bowl, toss your chicken breasts with olive oil and all your chosen seasonings. Get them coated, like they’re about to go to a fancy dinner.
- Assemble the packets: Place each seasoned chicken breast on a piece of foil. If you’re using veggies, scatter them around the chicken. Drizzle a little more olive oil if you’re feeling generous. Squeeze some lemon juice on top!
- Seal ’em up: This is crucial! Crimp the edges of the foil tightly to create a sealed packet. You want all those yummy juices to stay IN the packet, not escape onto the grill. Think of it as a tiny, edible pressure cooker.
- Grill time: Carefully place the foil packets directly on the grill grates. Cook for about 18-25 minutes, flipping halfway through. The exact time depends on the thickness of your chicken, so keep an eye on it!
- Check for doneness: The chicken should be cooked through and no longer pink in the center. You can carefully open a packet to check (but watch out for steam – it’s hot!). Alternatively, use a meat thermometer; it should read 165°F (74°C).
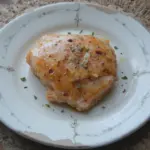
- Rest and serve: Let the packets rest for a few minutes before opening them. This lets the juices redistribute. Then, serve them up straight from the foil or plate them fancy-like. Your call!
Common Mistakes to Avoid
- Under-seasoning: Don’t be shy with the spices! Bland chicken is just sad chicken. Be bold!
- Not sealing the foil properly: This is a biggie. Leaky packets mean dry chicken and a messy grill. Double-check those crimps!
- Overcooking: Foil packets can cook quickly. Keep an eye on your grill time. Nobody likes rubbery chicken.
- Using regular foil when heavy-duty is recommended: If your foil tears, you’ll have a mess and uneven cooking. Just buy the good stuff, it’s worth it.
- Forgetting to let it rest: Patience, grasshopper! Resting is key to super moist chicken.
Alternatives & Substitutions
This recipe is pretty flexible, which is why we love it! Don’t have olive oil? Avocado oil or even melted butter will work in a pinch. No fresh lemon? A little splash of white wine or even chicken broth can add moisture. As for seasonings, the world is your oyster! Try a pre-made fajita seasoning blend or a homemade BBQ rub. If you’re not a fan of bell peppers, just skip ’em. This is your culinary adventure!
FAQ (Frequently Asked Questions)
Q: Can I do this in the oven instead of the grill?
A: Heck yeah! Bake at 400°F (200°C) for about 20-25 minutes, or until the chicken is cooked through. It’s just as easy!
Q: My foil packet burst open! What now?
A: Don’t panic! If it’s not too messy, just try to salvage what you can. The chicken might be a little drier, but you can still salvage the meal with a good sauce or by serving it with something moist. Learn from your mistakes, and seal tighter next time!
Q: Can I add potatoes to the packet?
A: You can, but they’ll need a head start! Chop them small and par-boil them for about 5 minutes before adding them to the packet with the chicken. Otherwise, they might not cook all the way through.
Q: What’s the best way to tell if the chicken is done without cutting into it?
A: A meat thermometer is your BFF here. Stick it into the thickest part of the chicken breast. If it reads 165°F (74°C), you’re golden. If not, give it a few more minutes.
Q: Can I marinate the chicken first?
A: Ooh, excellent idea! Marinating will add even more flavor. Just make sure your marinade isn’t too watery, or it might make sealing the packet a bit tricky.
Q: How long can I keep leftover foil-packet chicken?
A: Store it in an airtight container in the fridge for up to 3-4 days. Reheat gently to keep it from drying out.
Final Thoughts
There you have it! Grilled chicken breast on foil – the easiest, tastiest way to get dinner on the table with minimal effort. It’s perfect for busy weeknights, lazy weekends, or just when you don’t feel like doing a mountain of dishes. Now go impress someone—or yourself—with your new culinary skills. You’ve earned it!
