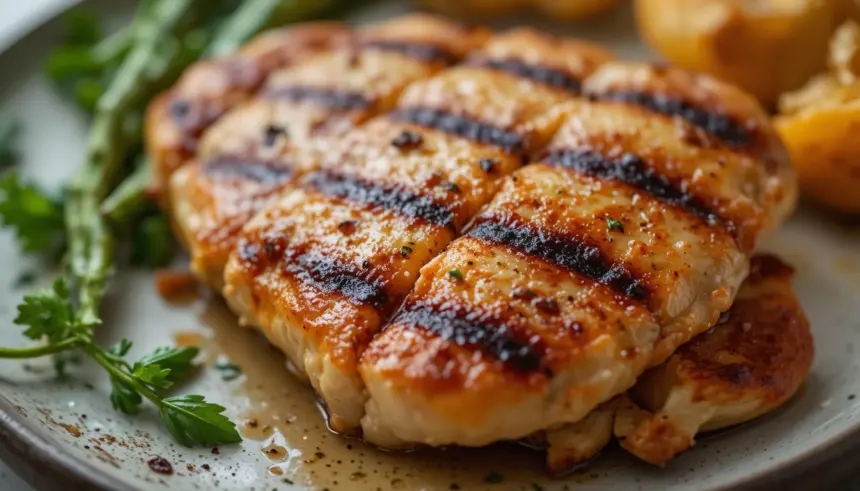
So you’re craving something tasty but too lazy to spend forever in the kitchen, huh? Same. And when I say “tasty,” I mean that perfectly grilled, juicy chicken breast that doesn’t taste like sad, dry cardboard. Let’s be honest, we’ve all been there. But fear not, my friend, because today, we’re conquering the grilled chicken breast beast. Get ready for some seriously good eats without the culinary drama!
Why This Recipe is Awesome (Like, Really Awesome)
Okay, so what makes this grilled chicken breast situation a game-changer? First off, it’s ridiculously simple. We’re talking minimal effort, maximum flavor. Seriously, it’s almost idiot-proof. I once forgot to thaw the chicken *completely* (don’t judge!), and it still turned out decent. That’s the magic of this method! Plus, it’s incredibly versatile. Marinade it, season it, slather it in sauce – it’s a blank canvas for your flavor adventures. And the best part? No soggy, flavorless chicken here. We’re talking that perfect char, that juicy interior… *chef’s kiss*.
Ingredients You’ll Need
- Chicken Breasts: Boneless, skinless, because who has time for that jazz? Aim for breasts that are roughly the same thickness so they cook evenly.
- Olive Oil: The magical elixir that helps things not stick and get all crispy.
- Salt: Because, duh. Don’t be shy.
- Black Pepper: Freshly ground is, IMO, superior. But you do you.
- Your Favorite Spices/Herbs: This is where the fun starts! Think paprika, garlic powder, onion powder, dried oregano, thyme, rosemary… get creative! I’m partial to a good garlic-herb blend.
- Optional: A squeeze of lemon juice: For a little zing.
Step-by-Step Instructions
- Prep your chicken: Pat those chicken breasts dry with paper towels. This is a crucial step for getting a good sear. Seriously, don’t skip it.
- Season like you mean it: Drizzle the chicken with olive oil. Then, go wild with your salt, pepper, and spices. Rub it all in like you’re giving your chicken a tiny spa treatment. Make sure they’re coated evenly!
- Preheat your grill: Get that grill nice and hot. We’re talking medium-high heat, folks. A hot grill is your best friend for achieving that perfect char and preventing sticking.
- Grill time! Place the seasoned chicken breasts on the hot grill. **Cook for about 5-7 minutes per side**, depending on the thickness. Resist the urge to poke and prod them every two seconds. Let them do their thing!
- Check for doneness: The chicken should be opaque all the way through and reach an internal temperature of **165°F (74°C)**. A meat thermometer is your best friend here.
- Rest is best: Once cooked, remove the chicken from the grill and let it **rest for at least 5 minutes** on a cutting board. This allows the juices to redistribute, ensuring maximum juiciness. Don’t cut into it immediately, or you’ll lose all that goodness!
Common Mistakes to Avoid
- Overcrowding the grill: Give those chicken breasts some breathing room! If they’re too close, they’ll steam instead of sear, and nobody wants that.
- Flipping too early: Let that chicken develop a nice crust before attempting to flip it. If it’s sticking, it’s not ready.
- Not resting the chicken: This is a cardinal sin, people! Seriously, just wait those few minutes. Your taste buds will thank you.
- Overcooking: Dry chicken is the enemy. Keep an eye on that internal temperature. It’s better to slightly undercook and finish it off than to turn it into a hockey puck.
Alternatives & Substitutions
Feeling adventurous? You can totally switch things up! Instead of a dry rub, try a marinade! A simple mix of olive oil, soy sauce, garlic, ginger, and a touch of honey is divine. Or, go for a lemon-herb marinade if you’re feeling zesty. For spices, honestly, anything goes. Smoked paprika, chili powder, even a dash of curry powder can be surprisingly delicious. If you don’t have olive oil, avocado oil or even melted butter can work in a pinch, though olive oil offers that classic grilled flavor.
FAQ (Frequently Asked Questions)
Q: Can I use chicken thighs instead?
A: Absolutely! Chicken thighs are even more forgiving and tend to stay juicier. Just add a few extra minutes to the grilling time.
Q: Do I *really* need a meat thermometer?
A: Look, it’s the surest way to guarantee perfectly cooked, safe-to-eat chicken without guessing. But if you’re feeling lucky and have a really good eye, knock yourself out! Just don’t say I didn’t warn you if it’s a bit… overdone.
Q: My grill is a mess. Do I need to clean it first?
A: Yes! A clean grill means less sticking and better grill marks. Plus, nobody wants bits of last week’s burgers on their pristine chicken.
Q: What if I don’t have a grill? Can I pan-sear this?
A: You bet! Heat a grill pan or a heavy-bottomed skillet over medium-high heat with a little oil. Cook for a similar amount of time per side, maybe slightly less. It won’t have that smoky grilled flavor, but it’ll still be delicious!
Q: Can I prep the chicken ahead of time?
A: Totally! You can season or marinate the chicken a few hours before grilling. Just keep it covered in the fridge. Easy peasy!
Q: How do I know if it’s done if I don’t have a thermometer?
A: The juices should run clear when you pierce the thickest part with a fork. Also, the inside should be opaque white, not pink.
Final Thoughts
There you have it – grilled chicken breast perfection, achieved with minimal fuss. It’s the kind of meal that makes you feel like a culinary wizard without actually having to perform any complex enchantments. So go forth, fire up that grill, and make some deliciousness happen. Now go impress someone—or yourself—with your new culinary skills. You’ve earned it!

