So, your little rascals are hungry again, but you’re tired of the same old chicken nuggets and mac ‘n’ cheese tango? Yeah, been there, bought the t-shirt. And frankly, I’m too lazy to perform culinary acrobatics for tiny humans who might just decide they prefer the box the food came in anyway. Enter the Kids’ Grazing Platter: your new secret weapon against snack-time anarchy and mealtime monotony. It’s basically a fancy way of saying, “Here’s a bunch of random stuff, eat what you want.” But shhh, don’t tell the kids it’s that easy. They think you’re a genius.
Why This Recipe is Awesome
Honestly, calling this a “recipe” feels like an overstatement, which is exactly why it’s so freakin’ awesome. It’s less cooking, more assembling – like adult LEGOs, but edible. Here’s the lowdown on why this platter will become your new best friend:
- It’s idiot-proof. Even I, a person who once set off the fire alarm microwaving popcorn, can nail this.
- Zero actual cooking required. Unless you count peeling a carrot, which, let’s be real, is more life skill than cooking.
- Picky eater approved (mostly). By offering a smorgasbord, they get to pick and choose, which somehow makes them feel in control. And a happy kid is a quiet kid, amirite?
- It sneakily introduces new foods. Nestled amongst their faves, that scary new veggie might just get a curious nibble. Progress!
- Aesthetically pleasing. You’ll look like a Pinterest mom without actually doing Pinterest mom things. Win-win!
Ingredients You’ll Need
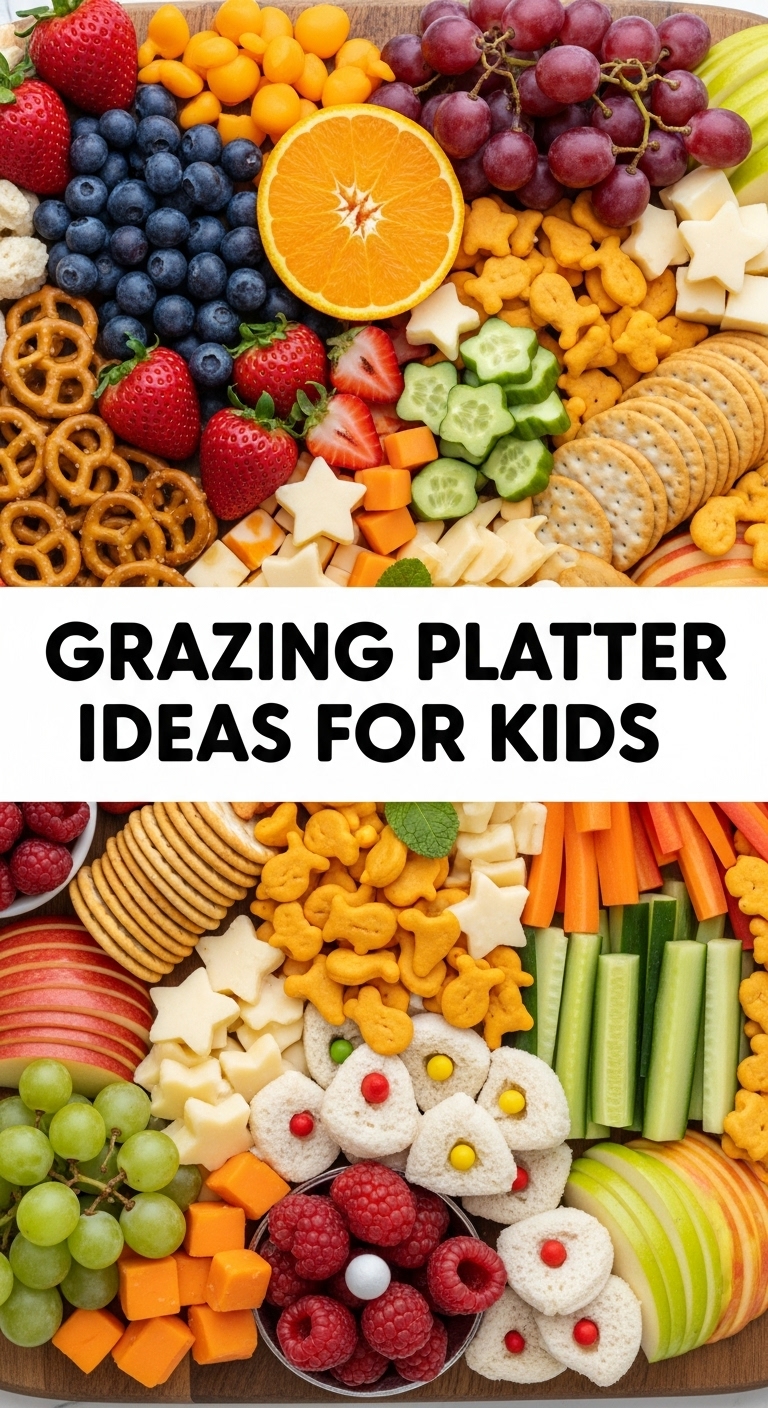
Think variety, color, and easy-to-grab. No fancy stuff, just real food that kids (and let’s be honest, you) will actually eat. Feel free to mix and match from these categories:
- Fruity Fun:
- Mini grapes (halved for tiny tots, safety first!).
- Berry medley (strawberries, blueberries, raspberries – the more colors, the better).
- Apple or pear slices (maybe a little lemon juice to prevent browning, or don’t, who cares?).
- Orange segments or mandarin oranges (easy peelers are a lifesaver).
- Melon cubes (watermelon, cantaloupe, honeydew – whatever’s in season).
- Veggie Victors:
- Cucumber slices or sticks (refreshing!).
- Carrot sticks (the classic, gotta have ’em).
- Bell pepper strips (different colors make it exciting!).
- Cherry tomatoes (if your kids aren’t weird about them, mine are).
- Sugar snap peas (fun to snap, fun to eat!).
- Protein Power-Ups:
- Cheese cubes or cheese sticks (a crowd-pleaser!).
- Hard-boiled eggs (sliced or whole, if they’re into it).
- Mini meatballs or chicken pieces (leftovers work great here, FYI!).
- Hummus (for dipping, obviously).
- Yogurt dips (plain or with a little fruit mixed in).
- Crunchy Carbs:
- Whole-wheat crackers (tiny hands love tiny crackers).
- Pretzel sticks or mini pretzels (classic munchies).
- Pita bread triangles (perfect for scooping hummus).
- Mini rice cakes (a canvas for anything!).
- Optional “Treat” Bits (because balance):
- A few chocolate buttons or small cookies (everything in moderation, right?).
- Mini marshmallows (for that extra pop of joy).
Step-by-Step Instructions
Get ready for the most complex culinary journey of your life. (Just kidding, it’s ridiculously simple.)
- Grab Your Gear: Find a large platter, cutting board, or even a baking sheet. The bigger, the better for spreading things out and making it look abundant.
- Wash & Chop: Rinse all your fruits and veggies thoroughly. Chop everything into kid-friendly, bite-sized pieces. Remember to halve grapes and cherry tomatoes for younger kiddos to prevent choking.
- Arrange the Goods: Start by placing your dips (hummus, yogurt, etc.) in small bowls on the platter. Then, artfully (or just randomly) arrange all your other ingredients around them. Think about colors and textures – put a bright red strawberry next to a green cucumber, etc.
- Fill ‘Er Up: Don’t be shy! Fill any gaps with more small items like pretzels or berries. A full platter looks more inviting and less like you just threw some scraps on a board.
- Serve & Conquer: Present your masterpiece to the hungry masses. Watch as they graze (hopefully) contentedly. You’ve earned a moment of peace, my friend.
Common Mistakes to Avoid
Look, we’ve all been there. Learning from others’ missteps saves you time, tears, and wasted food. Here are a few traps to sidestep:
- Over-complicating it: Thinking you need to use cookie cutters for every single piece of cheese. Just cut it into squares, people. It’s a grazing platter, not a work of edible art for a museum.
- Forgetting the dips: A platter without dips is like a superhero without a cape. It just feels… incomplete. Dips are the glue that holds the entire operation together (and gets more veggies eaten!).
- Too much of one thing: You might love carrots, but a platter that’s 90% carrot sticks is just sad. Variety is key! Mix it up, even if it’s just two types of fruit and two types of crackers.
- Not making it accessible: If your toddler needs a ladder to reach the platter, you’re doing it wrong. Place it where little hands can easily reach and grab.
- Expecting perfection: Your kids might still ignore half of it. It’s okay. The goal is exposure and offering options, not a clean plate.
Alternatives & Substitutions
This platter is all about flexibility, so go wild! Or don’t. Whatever makes your life easier.
- Seasonal Swaps: Out of berries? Grab some melon or peaches when they’re in season. Can’t find bell peppers? Snap peas or mini sweet peppers work a treat. Use what you have and what’s fresh!
- Dietary Needs:
- Gluten-free? Swap regular crackers for GF alternatives.
- Dairy-free? Use plant-based cheeses and yogurts.
- Nut allergies? Stick to fruit, veg, and seeds, or ensure all packaged items are certified nut-free.
- Theme It Up: Feeling fancy? Make a “rainbow” platter with colors, or a “jungle” platter with animal crackers and leafy greens. Totally optional, but fun if you have the energy.
- Leftover Love: Got some leftover roasted chicken or a few pasta shapes from dinner? Toss ’em on! This is a perfect way to repurpose small portions of food.
FAQ (Frequently Asked Questions)
Got questions? I’ve got (casual and humorous) answers!
- “My kid only eats air and the occasional dust bunny, help!” Ah, the classic picky eater dilemma. Start small, introduce one new thing at a time, and make sure there are always a few “safe” foods on the platter they will eat. It’s about exposure, not force-feeding. Patience, young padawan.
- “How much should I make?” Rule of thumb: a little more than you think they’ll eat, but not so much that you’re overwhelmed with leftovers. It’s better to replenish than to waste.
- “Can I make this ahead of time?” You sly fox! Yes, mostly. Chop hardier veggies (carrots, cucumber) and firm fruits (apples, melon) a few hours ahead. Berries and soft fruits are best added right before serving to avoid sogginess. Keep it covered in the fridge.
- “What if my kid hates healthy stuff?” We’ve all got that one kid who thinks kale is a personal insult. Focus on colorful fruits and the “fun” stuff first, then slowly introduce small amounts of veggies. Dips are your secret weapon here – everything tastes better dipped!
- “Is this just for kids, or can I steal some?” Are you kidding? This is 100% parent-friendly too! It’s the ultimate adult snack platter, especially for those “I don’t know what I want but I want something” moments. Enjoy!
- “Any tips for presentation?” Use different sized bowls, add a few small toys (cleaned, obviously!) if it’s for a party, or arrange items in fun shapes. But honestly, a colorful spread is often enough. Don’t stress too much!
Final Thoughts
So there you have it – the ultimate guide to the kids’ grazing platter. It’s simple, it’s versatile, and it just might buy you five precious minutes of quiet time. Go forth and conquer snack time (or even a light meal!). You’ve got this, and you’re officially a kitchen wizard in the eyes of your tiny tyrants. Now go impress someone – or yourself – with your new culinary “skills.” You’ve earned it!


