So, you’ve got that nagging craving for something warm, gooey, and smelling like a dream, but the thought of spending your entire Saturday slaving away in the kitchen makes you want to just order takeout? Same, friend, same. But what if I told you we could whip up some utterly divine, glazed cinnamon rolls that are so good, they’ll make you question all your life choices (in a good way!), without breaking a sweat? And then you can show them off on a fancy wooden tray, like the domestic goddess/god you are. Let’s do this!
Why This Recipe is Awesome
Okay, first things first: this isn’t your grandma’s overly complicated, multi-day cinnamon roll saga. Nope. This recipe is for the modern, slightly impatient, totally awesome home cook who wants maximum deliciousness with minimum fuss. It’s practically **idiot-proof** (and trust me, I’ve tested that theory extensively). We’re talking soft, pillowy dough, a generous swirl of cinnamony goodness, and a glaze so decadent, you’ll want to bathe in it. Plus, the smell alone will make your house feel instantly cozier and fancier. You’re basically a wizard, IMO.
Ingredients You’ll Need
Gather your magic potion components! Don’t fret, most of these are probably chilling in your pantry already.
- For the Dough:
- 1 cup warm milk (about 105-115°F/40-46°C – like a warm bath for your finger, not scalding!)
- 2 ¼ teaspoons active dry yeast (one packet, because who measures yeast granularly, am I right?)
- ¼ cup granulated sugar (for the yeasties to snack on and for general sweetness)
- 1 large egg (room temp, because science says it mixes better)
- ¼ cup unsalted butter, melted (and slightly cooled, don’t scramble that egg!)
- 3 cups all-purpose flour (the glue of our culinary dreams)
- ½ teaspoon salt (enhances all the other flavors, don’t skip it!)
- For the Filling:
- ½ cup unsalted butter, softened (soft enough to spread, not melted)
- ¾ cup packed light brown sugar (that deep, molasses-y goodness)
- 2 tablespoons ground cinnamon (generous, because we’re not shy!)
- For the Glaze:
- 1 ½ cups powdered sugar (confectioners’ sugar, whatever you call it)
- 2-3 tablespoons milk (any kind you have, whole milk makes it extra creamy)
- ½ teaspoon vanilla extract (for that “oomph” factor)
Step-by-Step Instructions
- Activate the Yeast: In a large bowl, combine the warm milk, yeast, and a pinch of that ¼ cup sugar. Give it a gentle stir and let it sit for about 5-10 minutes. It should get frothy and bubbly, looking alive! If not, your yeast might be taking an eternal nap.
- Mix the Dough: Add the remaining sugar, egg, melted butter, flour, and salt to the yeast mixture. Mix with a wooden spoon or stand mixer until a shaggy dough forms. Then, turn it out onto a lightly floured surface and **knead for 5-7 minutes** until it’s smooth and elastic. It should spring back when you poke it.
- First Rise (The Beauty Sleep): Lightly grease your mixing bowl, pop the dough back in, turn it once to coat, and cover with plastic wrap or a clean kitchen towel. Let it rise in a warm spot for 1-1.5 hours, or until it’s doubled in size. This is where the magic happens, folks!
- Roll ‘Em Out: Once risen, gently punch down the dough (satisfying, right?). Turn it out onto a lightly floured surface and roll it into a large rectangle, roughly 12×18 inches. Aim for an even thickness!
- Butter & Spice It Up: Spread the softened butter evenly over the entire dough rectangle, almost to the edges. In a small bowl, mix the brown sugar and cinnamon, then sprinkle this glorious mixture generously over the buttered dough.
- Roll ‘Em Up Tight: Starting from one of the long sides, carefully but firmly roll the dough into a tight log. Pinch the seam closed to seal it.
- Slice & Dice: Using a sharp knife or, even better, unflavored dental floss (seriously, try it!), slice the log into 12 even rolls. About 1.5 inches thick each.
- Second Rise (Almost There!): Arrange the rolls in a lightly greased 9×13 inch baking dish. Cover again and let them rise for another 30-45 minutes, or until they look puffy and cozy, snuggled up together. Preheat your oven to 375°F (190°C) during this time.
- Bake ‘Em Golden: Bake for 20-25 minutes, or until they’re beautifully golden brown on top and cooked through. Keep an eye on them – ovens vary!
- Whip Up the Glaze: While the rolls are cooling slightly (but still warm!), whisk together the powdered sugar, milk, and vanilla extract until smooth. Add more milk a tiny bit at a time if it’s too thick, or a tiny bit more sugar if it’s too thin. You want a luscious, pourable consistency.
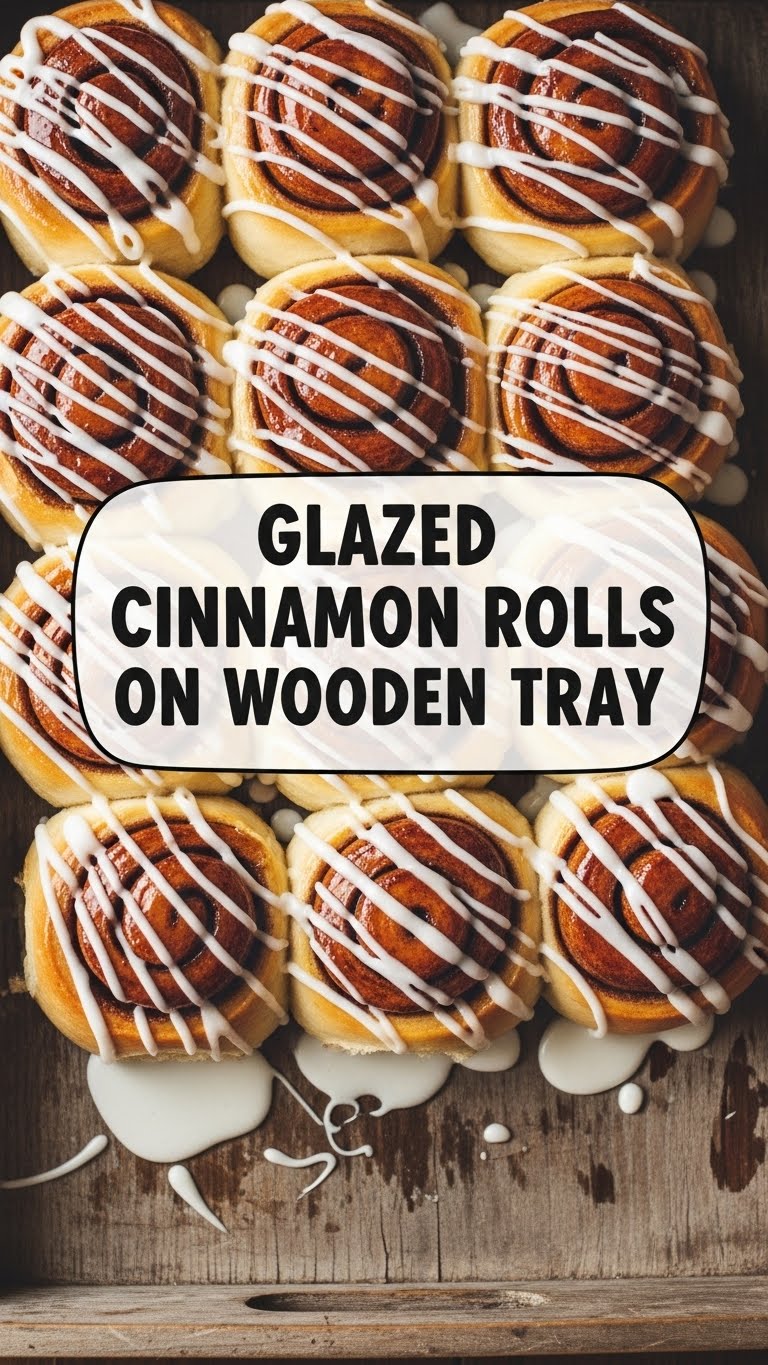
- Drizzle & Devour: Drizzle (or slather, no judgment here) that amazing glaze all over the warm cinnamon rolls. Serve immediately on a wooden tray for maximum aesthetic points. You’re welcome.
Common Mistakes to Avoid
- Using cold ingredients: Especially milk and eggs. **Room temp is your friend** when it comes to yeast dough. Cold ingredients shock the yeast and make it lazy.
- Not kneading enough (or too much): Under-kneading means tough rolls. Over-kneading? Also tough. Aim for that smooth, elastic dough that bounces back.
- Killing the yeast: Water that’s too hot will murder your yeast (RIP). Too cold, and it won’t activate. Think warm bath, not hot tub or ice bath.
- Ignoring the rises: These aren’t optional! The rising times are crucial for that light, fluffy texture. Don’t rush perfection.
- Forgetting to preheat the oven: Rookie mistake! A cold oven won’t give your rolls that initial burst of heat they need to rise properly and get that gorgeous golden crust.
Alternatives & Substitutions
Feeling a little rebellious? Want to make it your own? Here are some ideas!
- Dairy-Free? Swap the milk for a non-dairy alternative like almond or oat milk, and use a plant-based butter substitute. The texture might vary slightly, but they’ll still be delicious!
- Spice it Up: Add a pinch of nutmeg or cardamom to your cinnamon filling for an extra layer of warmth and complexity. Chai spice blend? Oh, honey, yes.
- Cream Cheese Glaze: For a more decadent topping, beat 4 oz softened cream cheese with ½ cup softened butter, 2 cups powdered sugar, and 1 teaspoon vanilla extract until fluffy. It’s extra, but in the best way.
- Different Sugars: You could try dark brown sugar for an even deeper molasses flavor in the filling, though light brown is usually preferred for balance.
- Orange Zest: Add a teaspoon of finely grated orange zest to the dough or the glaze for a bright, citrusy kick that pairs surprisingly well with cinnamon.
FAQ (Frequently Asked Questions)
Got questions? I’ve got (casual) answers!
Can I make these ahead of time? Absolutely! After placing the sliced rolls in the baking dish, cover them tightly and pop them in the fridge overnight. In the morning, pull them out about an hour before baking to let them come to room temp and proof slightly before baking. Boom, fresh morning rolls!
What if my dough isn’t rising? Uh oh, yeast drama! First, check your milk temperature next time. If it’s already mixed, find the warmest spot in your house (top of the fridge, near a sunny window, or a slightly warmed oven turned OFF) and give it more time. Sometimes yeast just needs a little encouragement (and warmth).
Can I use margarine instead of butter? Well, technically yes, but why hurt your soul (and taste buds) like that? Butter just provides superior flavor and texture. **Don’t skimp on the butter**, folks!
How do I store leftovers? If there are any, which is a big “if”! Store them in an airtight container at room temperature for up to 2-3 days, or in the fridge for up to a week. Reheat briefly in the microwave for that fresh-baked feel.
My rolls came out dry, what happened? You likely overbaked them! Every oven is different, so start checking earlier than the recipe suggests. Also, make sure your dough isn’t too dry when mixing – hydration is key for tenderness. **Don’t be afraid to adjust liquid amounts slightly** if your dough feels stiff.
Can I freeze them? Yes! You can freeze the baked and glazed rolls (individually wrapped for best results), or freeze the unbaked rolls after the second rise. If freezing unbaked, transfer the baking dish to the freezer until rolls are solid, then remove and store in a freezer bag. Thaw overnight in the fridge, then let them come to room temp before baking.
Final Thoughts
See? That wasn’t so scary, was it? You just created magic, and your kitchen probably smells like a bakery exploded (in the best way possible). Now go impress someone—or just yourself—with your new culinary skills. You’ve earned every single bite of that warm, gooey, glazed cinnamon roll. Grab that fancy wooden tray, a cup of coffee, and bask in the glory. You’re basically a pro now. Enjoy!


