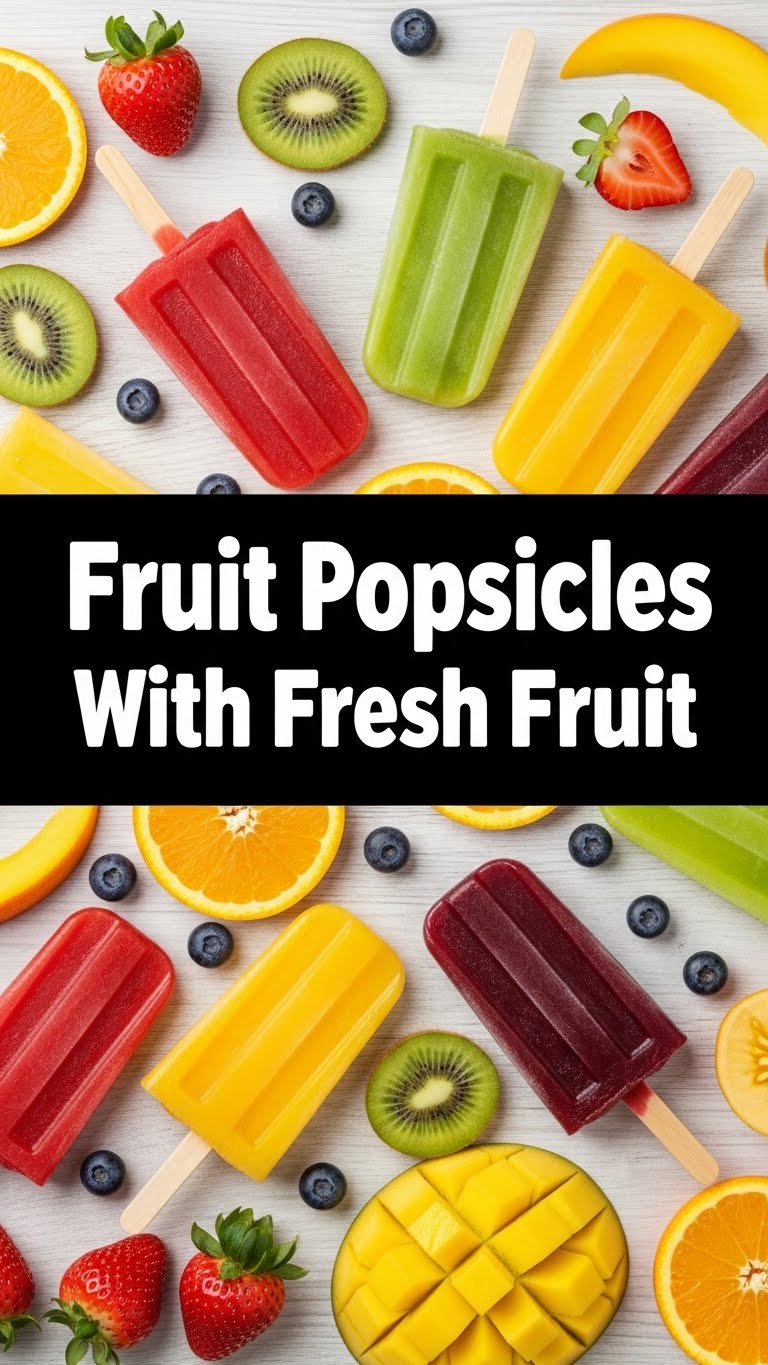
So you’re craving something tasty but too lazy to spend forever in the kitchen, huh? Same. Let’s be real, sometimes you just want a treat that screams “effortless gourmet” without, you know, actually putting in effort. Good news, my friend, because today we’re making Fruit Popsicles with Fresh Fruit, and it’s so easy, your pet hamster could probably do it (if he had opposable thumbs and a blender, obviously).
Why This Recipe is Awesome
Okay, buckle up, because this recipe is genuinely next-level awesome for a few ridiculously simple reasons. First off, it’s virtually **idiot-proof**. Seriously, if I can make these without setting off the smoke alarm, you’re golden. There’s no oven involved, no precise temperatures, just blending and freezing. It’s like magic, but with fruit.
Secondly, it’s customisable AF. Got a random half-eaten bag of berries in the fridge? Perfect. A lone mango looking forlorn? Even better! You’re the boss of your fruit choices. Plus, they’re super refreshing, naturally sweet (or as sweet as you want them to be!), and make you feel like you’re living your best summer life, even if it’s raining outside. Total win-win, IMO.
Ingredients You’ll Need
Gather ’round, fellow culinary enthusiasts (aka people who own a blender). Here’s what you’ll need for your icy masterpieces:
- Fresh Fruit: About 3-4 cups total. Think berries (strawberries, raspberries, blueberries are popsicle MVPs), mango, pineapple, kiwi, peaches, watermelon… whatever makes your taste buds sing. More color, more fun!
- Liquid: About 1/2 to 1 cup. Coconut water is a fantastic choice for a tropical vibe, but fresh orange juice, apple juice, or even just plain water (if you want the fruit to be the absolute star) works too. Pick your poison!
- Sweetener (Optional but Recommended): 1-3 tablespoons. Honey, maple syrup, agave, or a sprinkle of sugar. Adjust to your fruit’s sweetness and your personal preference. Some fruit is sweet enough on its own, so taste test!
- Popsicle Molds & Sticks: This is non-negotiable, unless you’re planning to free-form freeze on a plate and then chip away at it with a spoon (which… don’t).
Step-by-Step Instructions
- Prep Your Fruit: Wash, peel, and chop your chosen fruits. If you’re using softer fruits like berries or mango, you can just roughly chop them. For firmer fruits like pineapple or kiwi, make sure they’re in small, blendable pieces.
- Blend Some Magic: In your trusty blender, combine about half of your chopped fruit with your chosen liquid and sweetener (if using). Blend until it’s smooth and luscious. You want it to be pourable, so add a tiny bit more liquid if it’s too thick.
- Layer It Up (or Don’t!): Now for the fun part! You have options here.
- Option A (Layered Look): Place some of the remaining chopped fruit into the bottom of your popsicle molds. Pour some of your blended mixture over it. Add more chopped fruit, then more blended mixture, until the mold is nearly full.
- Option B (Mostly Blended): Just pour the blended mixture directly into the molds, leaving about a quarter-inch space at the top for expansion. You can still add a few whole fruit pieces if you like texture!
- Insert Sticks: Gently place your popsicle sticks into the center of each mold. If your molds have lids with stick slots, use those!
- Freeze, Freeze, Freeze: Carefully transfer your filled molds to the freezer. Let them chill out (literally!) for at least 4-6 hours, or preferably overnight, until they are completely solid. Patience, young grasshopper.
- Release & Enjoy: Once frozen, you might need to run the molds under warm water for a few seconds to help release the popsicles. Then, pull ’em out and get ready for a burst of frosty, fruity deliciousness!
Common Mistakes to Avoid
- Overfilling the Molds: Rookie mistake! Liquids expand when they freeze, so leave a little room at the top (about 1/4 inch). Otherwise, you’ll have a sticky mess in your freezer. You’ve been warned!
- Forgetting the Stick: Trust me, trying to eat a frozen block of fruit with a spoon is not the elegant experience you imagine. Always insert the stick before freezing!
- Not Blending Enough: If your blended mixture is too chunky, it might not freeze evenly or feel as smooth. Make sure it’s nice and smooth, especially if you’re layering. Nobody wants a gritty popsicle.
- Impatience: Pulling them out too soon will result in a sad, slushy mess. **Ensure they are fully frozen** before attempting to demold.
Alternatives & Substitutions
This recipe is practically begging for your creative input! Don’t feel bound by my suggestions:
- Juice Swaps: Instead of coconut water, try lemonade for a tangy twist, or even a splash of sparkling water for a lighter feel. For a bolder flavor, use a concentrated fruit puree (like a berry coulis) mixed with a bit of water.
- Sweetener Shenanigans: Not a fan of honey? Use agave nectar, stevia, or simply omit it if your fruit is naturally sweet enough. A tiny pinch of salt can actually enhance the sweetness of the fruit, FYI.
- Creamy Dream: For a creamier popsicle, add a splash of full-fat coconut milk or Greek yogurt to your blended mixture. It’s like a creamsicle, but healthier-ish!
- Herbal Infusion: Want to get fancy? Throw a few mint leaves, basil, or even a tiny bit of ginger into the blender with your fruit. It adds a sophisticated, refreshing kick.
- Boozy Pops (for adults only, obviously!): A small splash of rum, vodka, or Prosecco can turn these into a fun grown-up treat. Just remember that alcohol lowers the freezing point, so don’t add too much, or they won’t freeze solid. About a tablespoon per cup of liquid is a good starting point.
FAQ (Frequently Asked Questions)
- Can I use frozen fruit instead of fresh?
Absolutely! Frozen fruit works just as well, and sometimes even better for blending, as it makes the mixture super cold from the get-go. Just make sure to adjust the amount of liquid as frozen fruit often releases less water than fresh. - My popsicles are too hard/icy, what gives?
This usually means too much water and not enough sugar or fruit solids. Try adding a bit more sweetener next time, or use a higher proportion of fruit to liquid. Fruit’s natural sugars help keep them a bit softer. - How long do these last in the freezer?
If properly stored in an airtight container or bag (after they’re frozen solid), they’ll last about 2-3 weeks. Beyond that, they might start to get freezer burn, which, while not harmful, isn’t super pleasant. - Do I need fancy popsicle molds?
Nope! While dedicated molds are convenient, you can use small paper cups (like Dixie cups) with wooden craft sticks. Just tear the cup away when it’s frozen. Old yogurt containers can also work in a pinch. - Can I add whole fruit chunks without blending?
Totally! For a really rustic, chunky popsicle, you can skip blending entirely and just chop all your fruit into small pieces, mix them with a sweetened liquid (like juice), and then pour that into the molds. It’s a different texture, but equally delicious.
Final Thoughts
So there you have it, your super chill guide to making the most refreshing, easy-peasy fruit popsicles ever! This isn’t just a recipe; it’s a passport to instant coolness and bragging rights amongst your friends (because you *made* them, duh). Now go impress someone—or yourself—with your new culinary skills. You’ve earned it!

