So, you’ve stared into the fridge, seen that lonely tub of yogurt, and thought, “There *must* be more to life than this sad, plain breakfast,” right? SAME. But what if I told you there’s a way to turn that humble tub into a gourmet-ish dessert (or a ridiculously satisfying breakfast, no judgment!) with minimal effort and maximum deliciousness? Intrigued? Good. Because today, my friend, we’re making Frozen Yogurt with Granola Topping, and your taste buds are about to throw a party.
Why This Recipe is Awesome
Okay, so you’re thinking, “Frozen yogurt? Granola? Is this even a *recipe*?” And to that, I say, “Yes, friend, it is a **strategy**. A strategy for achieving deliciousness that even my goldfish could probably assemble.” This isn’t some complicated, multi-step baking endeavor. This is the culinary equivalent of putting on sweatpants and still looking fabulous. It’s **idiot-proof**, requires about three ingredients (tops!), and satisfies that sweet craving without making you feel like you just ate a sugar factory. Plus, it’s pretty much a blank canvas for whatever toppings your heart desires. Seriously, you can’t mess this up, unless you forget to freeze it. **Don’t forget to freeze it.**
Ingredients You’ll Need
- Plain Yogurt (Full-Fat or Greek): This is our MVP. Go full-fat for the creamiest, dreamiest texture. Greek yogurt gives you extra protein and a lovely tang. Don’t be shy; aim for quality here.
- Honey or Maple Syrup: Your sweet fairy godmother! Adjust to your sweet tooth’s demands. Start with a little, taste, and add more if you dare.
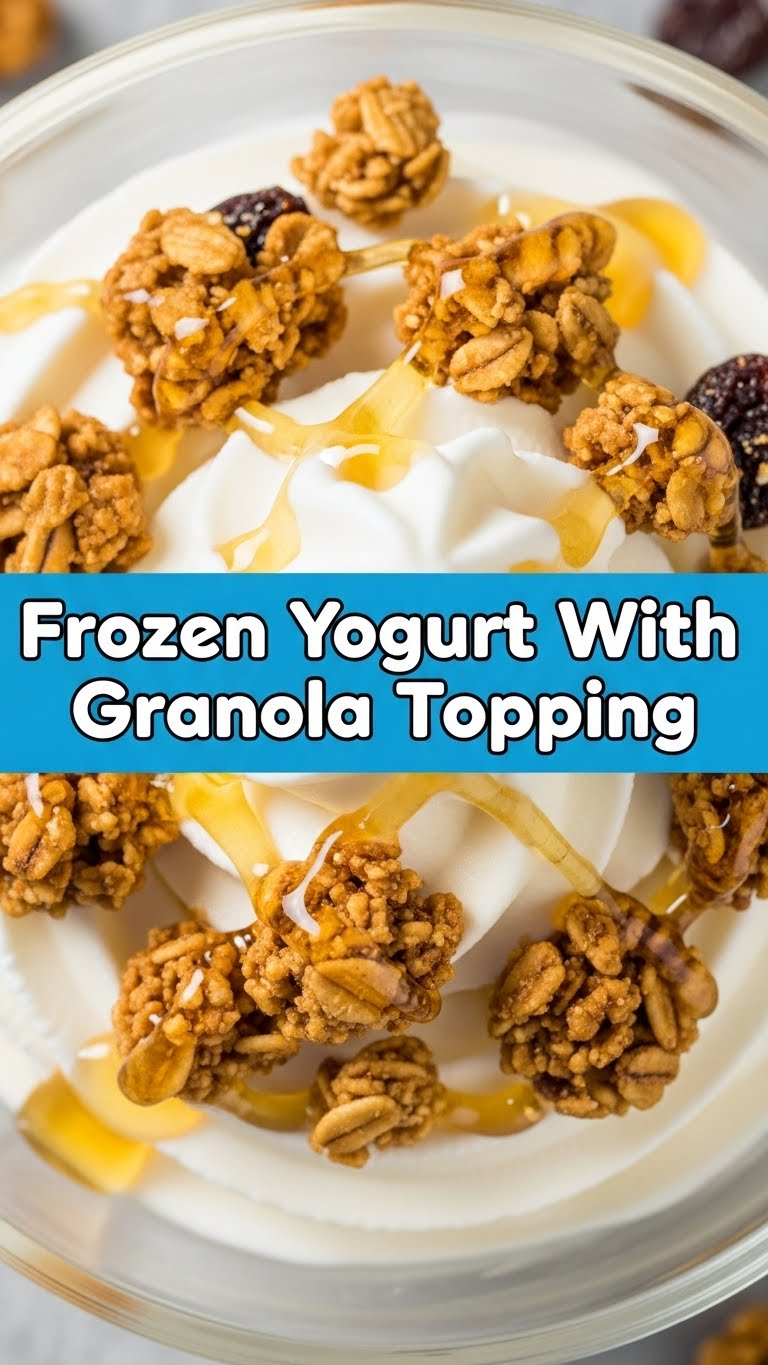
- Your Favorite Granola: The crunch factor! This is where you can truly express yourself. Chocolate chunks? Nutty clusters? Berry bliss? Your call, Captain.
- Optional Fun Stuff (because why not?): A dash of vanilla extract (adds a fancy vibe), a pinch of salt (seriously, it enhances the sweetness, trust me!).
Step-by-Step Instructions
Mix It Up: Grab a medium bowl and combine your plain yogurt with the honey or maple syrup. If you’re using vanilla extract or a pinch of salt, throw those in now too. Stir until everything is well combined and you’ve tasted it enough times to make sure it’s perfectly sweet for *you*.
Freeze Time! (The Crucial Part): Pour your sweetened yogurt mixture into a shallow, freezer-safe dish. A baking dish works perfectly. Spread it evenly. Pop it into the freezer for at least 2-3 hours, or until it’s firm but still scrape-able. We’re going for rustic-chic here, not perfectly churned ice cream.
Scrape & Serve: Once your yogurt is firm enough, pull it out of the freezer. Use a fork or a sturdy spoon to scrape it, creating lovely icy flakes or chunks. Scoop this glorious froyo into a bowl (or two, or three—again, no judgment).
Top it Like a Boss: Now for the grand finale! Pile on your favorite granola like it’s going out of style. You can also add fresh berries, a drizzle of extra honey, or anything else your heart desires. **Pro tip: Add the granola right before eating to keep it crunchy!**
Repeat (Optional, but recommended): Devour your creation. Immediately. Before anyone else gets a chance.
Common Mistakes to Avoid
- Thinking it’ll be exactly like store-bought froyo: Bless your heart. This is homemade, baby! The texture will be icier and more rustic, which is part of its charm. Embrace the wholesome goodness, don’t expect the soft-serve machine magic.
- Using low-fat yogurt and expecting full-fat creaminess: You can certainly use low-fat, but don’t blame me if it’s a bit more… frosty. **Fat equals flavor (and a better texture) in the froyo game!**
- Over-sweetening: It’s easy to get carried away. Start with less sweetener, taste, then add more. You can always add, but you can’t take away (unless you add more plain yogurt, then you’re just making more froyo. Win-win?).
- Forgetting to cover it in the freezer: If you plan to keep it longer than a few hours, cover it tightly. Otherwise, hello freezer burn, my old friend.
Alternatives & Substitutions
This recipe is super flexible, so feel free to get creative!
- Flavor Boosts: Want to level up? A splash of almond extract, a squeeze of fresh lemon zest, or even a teaspoon of cocoa powder (for chocolate froyo!) can transform things.
- Topping Swap: Granola is amazing, but don’t limit yourself! Fresh berries, sliced banana, chocolate chips, a swirl of peanut butter, chopped nuts, toasted coconut flakes – the world is your topping oyster.
- Dairy-Free Friends: Use a thick coconut or almond yogurt instead. **Just a heads-up: some dairy-free yogurts freeze differently and can get super icy.** Look for ones marketed as thick or Greek-style.
- Sweetener Alternatives: Agave nectar, stevia (if you’re into that vibe), or even a touch of date paste can work beautifully in place of honey or maple syrup.
FAQ (Frequently Asked Questions)
Can I make this ahead of time? Absolutely! It’ll be more like a solid block of froyo. Let it sit out on the counter for about 10-15 minutes before serving to soften slightly, then you can easily scoop or scrape it.
How long does it last in the freezer? IMO, it’s best enjoyed within a week for optimal texture. Beyond that, it might start getting a bit too hard and could develop some freezer burn. Fresh is best, my friend!
Do I need an ice cream maker? Nope, that’s the beauty of this whole situation! We’re going old-school, no-churn style. Who needs fancy gadgets when you have a freezer, a shallow dish, and a fork?
Can I use flavored yogurt? Technically, yes! But then you lose a little control over the sweetness and flavor profile. If you use vanilla yogurt, you might not need as much sweetener. Experiment! But plain is our go-to for maximum flexibility and pure taste bud control.
What if it’s too icy? You might have used a lower-fat yogurt, or it might have just frozen a little too long. No worries! Just let it soften a bit on the counter before scraping. It’ll still be delicious, just a different, more “icy-pop” kind of vibe.
What if I don’t like granola? **Blasphemy!** Just kidding. (Mostly.) Use whatever crunchy topping makes your heart sing, or skip the crunch entirely and just go for a fruit-forward froyo. It’s your dessert, your rules!
Final Thoughts
See? I told you it was easy! You just whipped up a genuinely delicious, relatively healthy, and super satisfying treat without breaking a sweat (or the bank). Go ahead, pat yourself on the back. You’re basically a culinary wizard now, capable of transforming humble yogurt into a frosty delight.
Now go impress someone—or yourself—with your new culinary skills. You’ve earned it! And remember, life’s too short for boring snacks. Stay cool, my friend!


