So you’re staring into the abyss of your fridge, wondering if that sad-looking lemon still has juice, but the thought of actual cooking makes you want to crawl back under your weighted blanket? Yeah, me too. Especially when it’s just for *one*. Because who wants to cook a feast for an audience of zero (unless you count your cat judging your life choices)? That’s where Frozen Meal Prep For One swoops in like a superhero with a tiny cape.
Why This Recipe is Awesome
Let’s be real, cooking for yourself can sometimes feel like a chore. You spend 45 minutes making a dish, eat it in 5, and then have enough leftovers to feed a small village (which you’ll inevitably forget about in the back of the fridge). Not anymore, my friend! This “Frozen Meal Prep For One” idea is:
- Seriously easy: If I can do it without setting off the smoke detector, you definitely can.
- A hug for Future You: Imagine coming home from a long day and remembering you have a delicious, pre-made meal waiting. Pure bliss!
- Waste-free wonderland: No more sad, forgotten leftovers. You portion exactly what you need.
- Budget-friendly boss: Ditch the pricey takeout. Your wallet (and your taste buds) will thank you.
- Infinitely customizable: Bored of chicken? Swap it! Don’t like broccoli? Don’t use it! You’re the chef, call the shots.
Ingredients You’ll Need
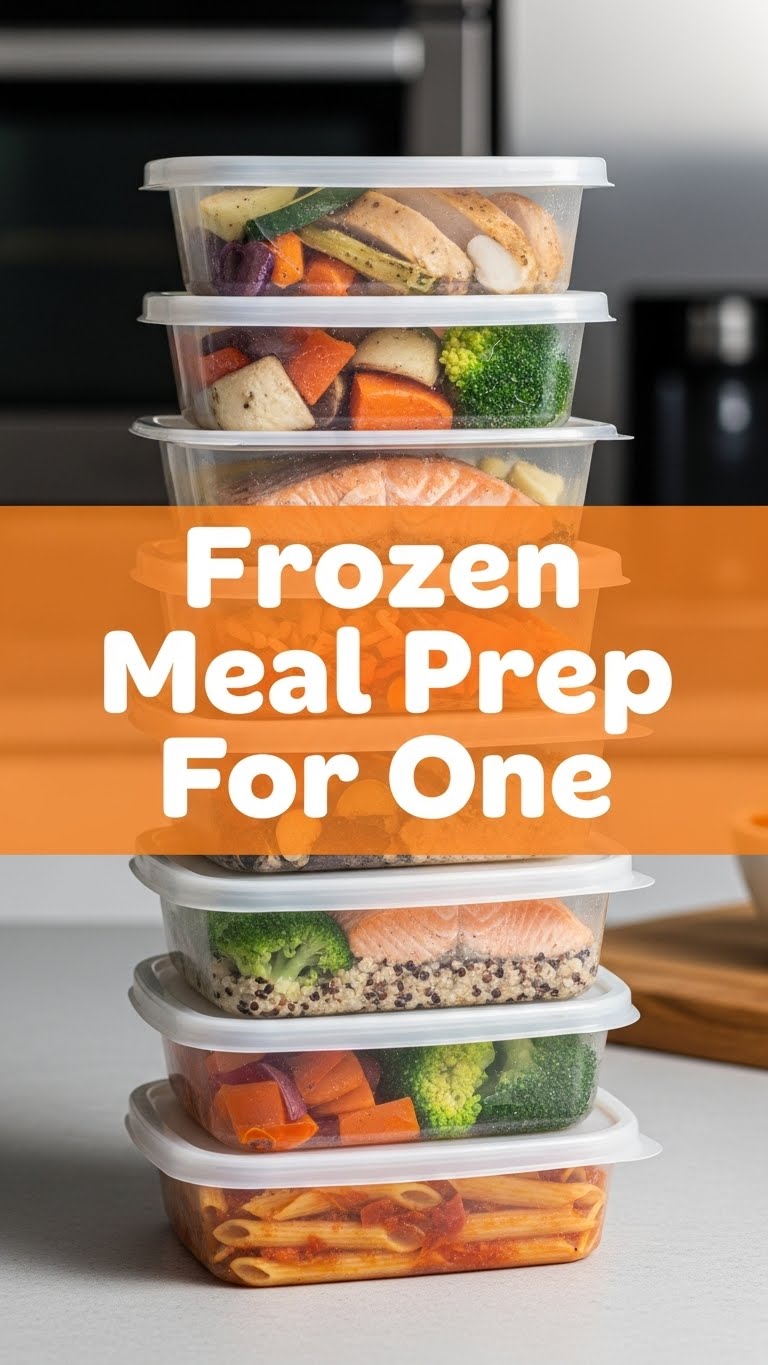
Think of this as your “build-your-own-adventure” meal kit. We’re aiming for a super versatile Grain Bowl base, but feel free to freestyle!
- Your Favorite Cooked Grain: About 1/2 to 3/4 cup per serving. Think fluffy quinoa, brown rice, or farro. (Cook a big batch; that’s part of the prep!)
- Protein Powerhouse: 3-4 oz per serving.
- Cooked chicken breast (diced, because tiny bits are cute)
- Pre-cooked shrimp (peeled, please!)
- Firm tofu (pressed, cubed, and maybe pan-fried for extra points)
- Canned chickpeas (rinsed and patted dry – crucial for freezing!)
- Vibrant Veggies: 1 cup per serving. Pick 2-3 of your faves.
- Broccoli florets (blanch quickly for best texture after freezing)
- Bell peppers (any color, sliced or diced)
- Snap peas (whole or halved)
- Shelled edamame (because who doesn’t love these?)
- Corn kernels (fresh or frozen, no need to pre-cook)
- Sweet potato cubes (roasted first!)
- Sauce/Dressing (kept separate!): Your go-to dressing, like a zesty vinaigrette, creamy peanut sauce, or a simple tahini dressing.
- Optional Toppings (for serving, not freezing): Toasted sesame seeds, chopped nuts, fresh herbs, a squeeze of lime.
- Freezer-Safe Containers or Bags: Essential for avoiding freezer burn heartbreak.
Step-by-Step Instructions
Alright, let’s get this party started! This is where the magic happens, and by magic, I mean efficient assembly line work.
- Grain Gang On: First things first, get your grains cooking. Make a larger batch than you think you need for these meals. Once cooked, spread it out on a baking sheet to cool completely. Cooling is key! Hot food in the freezer = ice crystals and mushy sadness.
- Protein Patrol: While your grains are cooling, cook your chosen protein if it’s not pre-cooked. Dice up that chicken, sauté your tofu, or just rinse those chickpeas. Again, let it cool down before moving on.
- Veggie Victory: Wash and chop your veggies. For heartier ones like broccoli or green beans, a quick blanch (boil for 2 minutes, then plunge into ice water) will help them maintain their texture once reheated. Drain and pat them *super dry*.
- Assemble Your Awesomeness: Now for the fun part! Grab your freezer-safe containers or bags. Layer in your cooled grain, then your cooled protein, and finally your prepped veggies. Don’t mix them up too much; layers help things freeze and reheat better.
- Seal the Deal: Make sure your containers are airtight. If using bags, squeeze out as much air as humanly possible to prevent freezer burn. Label with the date and contents – you think you’ll remember, but trust me, you won’t.
- Freeze ‘Em Up: Pop them into the freezer. Stack ’em nice and neat.
- Reheat & Revel: When hanger strikes, grab a container. You can usually microwave them straight from frozen (stirring halfway through) or transfer to an oven-safe dish and bake until heated through. Add your sauce, those fresh toppings, and dig in!
Common Mistakes to Avoid
Nobody’s perfect, but we can avoid some culinary faux pas together. Learn from my mistakes, because I’ve made them all (and sometimes still do, YOLO).
- The Wet Wipeout: Freezing ingredients that are still wet will result in icy, mushy, textural nightmares. Pat everything dry! Seriously, I can’t stress this enough.
- Hot Stuff, Cold Place: Putting hot food directly into the freezer raises the temperature of your freezer, potentially thawing other items and promoting bacteria growth. Plus, it makes your food sad and freezer-burnt.
- Forgetting to Season: Freezing can dull flavors. Be a little generous with your salt, pepper, and spices before freezing. Your future self will appreciate it.
- The Overstuffed Container: Leave a little headspace in your containers. Liquids expand when frozen, and nobody wants a cracked container or an exploded lid.
- Flimsy Container Fiasco: Using flimsy containers is a rookie mistake. Invest in good quality, airtight, freezer-safe containers. They’re worth it, promise.
Alternatives & Substitutions
This “recipe” is more of a guideline, a culinary launchpad for your imagination! Don’t like something? Swap it out!
- Protein Power-Up: Feeling fancy? Try cooked lentils for a plant-based twist, or even flaked salmon (just cook it super fresh before freezing). Ground turkey or beef, cooked and seasoned, also works wonders.
- Grain Gainz: Not a quinoa fan? Swap it for couscous, wild rice, or even cooked barley. For a low-carb option, you could pre-portioned cooked riced cauliflower (though the texture might be softer upon reheating).
- Veggies Galore: The world is your oyster! Consider roasted zucchini, green beans, carrots, or even mushrooms. Just remember the blanching/patting dry rule for best results.
- Sauce Sensation: Explore! Think a tangy balsamic glaze, a spicy sriracha mayo, or a rich curry sauce (add these *after* reheating). You can even freeze small portions of some sauces in ice cube trays!
FAQ (Frequently Asked Questions)
Got questions? I’ve got (mostly) witty answers!
- How long do these frozen meal prep kits last in the freezer?
Good question! Generally, 2-3 months is the sweet spot for quality. But let’s be honest, if they’re delicious, they probably won’t last that long. You’ll be devouring them way before then!
- Can I freeze the sauce along with the meal?
Hmm, depends on the sauce. Creamy, dairy-based sauces tend to separate and get weird when frozen and reheated. Vinaigrettes usually do okay, but for peak freshness and texture, I always recommend adding your sauce fresh right before eating. Your taste buds will thank you!
- What if I don’t have fancy freezer-safe containers?
No worries, budget warrior! Heavy-duty Ziploc freezer bags are your BFF here. Just make sure to press out *all* the air before sealing to prevent freezer burn. Less air = happier food.
- Do I have to thaw the meal before cooking/reheating?
Nope! That’s the beauty of it. Most of these meals can go straight from freezer to microwave or oven. Just be prepared to add a few extra minutes to the cooking time. Laziness approved, my friend!
- Is this *really* cheaper than ordering takeout?
Oh, darling, absolutely! Think of how many times you’ve impulse-ordered that Pad Thai. This is not only cheaper but often healthier too, because YOU control the ingredients. Save that money for something fun, like an epic coffee or a new plant!
- Can I add cheese to my frozen meal prep?
You absolutely *can*, but it’s best to add cheese *after* reheating. If you freeze cheese directly into the meal, it can sometimes get a weird, rubbery texture when reheated. For maximum gooey, cheesy goodness, sprinkle it on fresh!
Final Thoughts
See? That wasn’t so hard, was it? You just conquered meal prep for one like a culinary ninja! Now, go forth and fill your freezer with deliciousness. Pat yourself on the back, because you’ve just given your future self the gift of easy, tasty meals. No more sad desk lunches or frantic takeout orders. You’re a meal-prepping superstar! Now go impress someone—or yourself—with your new culinary skills. You’ve earned it!

