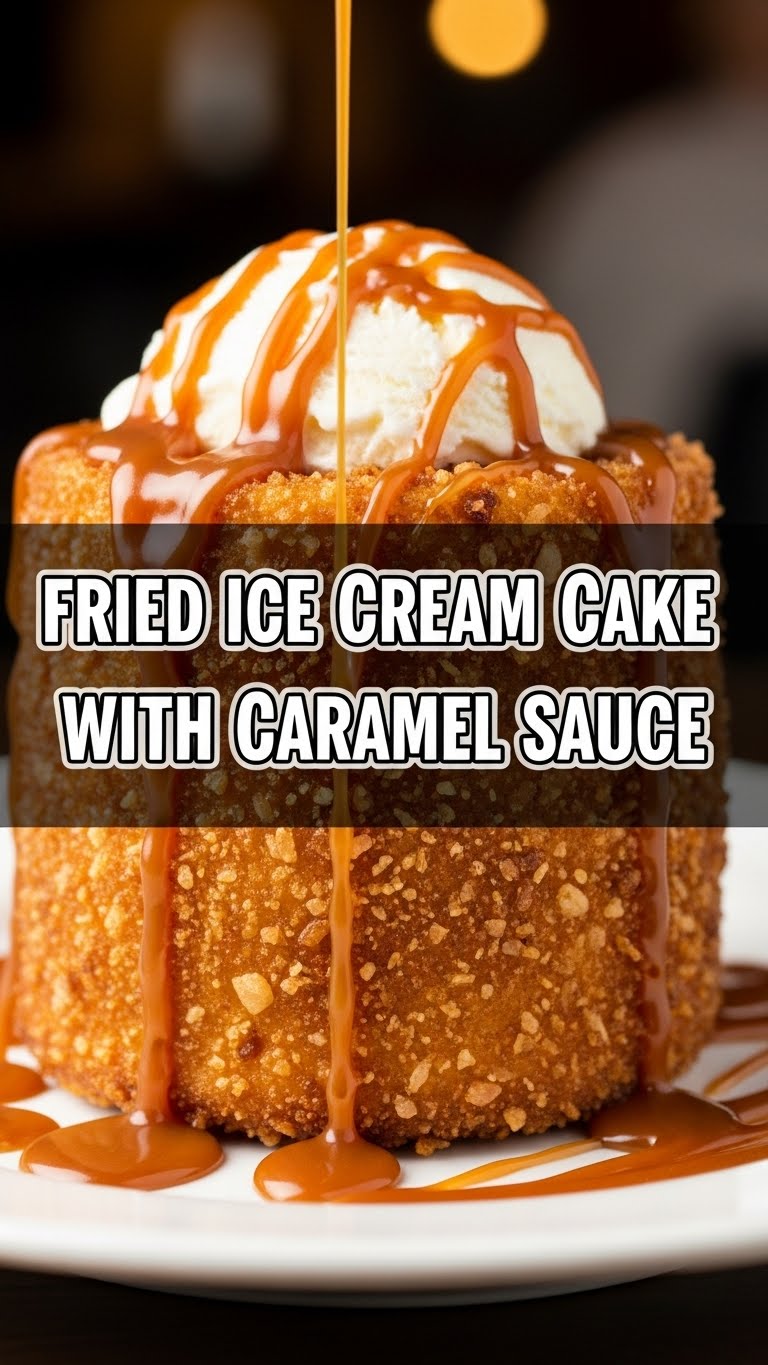
So, you’ve hit that specific craving for something utterly ridiculous, slightly theatrical, and intensely delicious, haven’t you? Something that screams “I’m fancy, but also I really just want to eat dessert with my hands.” Enter the legendary Fried Ice Cream Cake with Caramel Sauce! Forget those sad, soggy attempts at frying ice cream that ended up as a milky mess. We’re going to elevate this beast into a glorious, crunchy, creamy, caramel-drenched CAKE. Yes, a cake! No need to overthink it; just embrace the delicious chaos. Ready to become a dessert legend in your own kitchen? Let’s roll!
Why This Recipe is Awesome
Okay, let’s be real. “Fried Ice Cream Cake” sounds like something you’d need a culinary degree and a deep fryer the size of a small car to pull off. But guess what? You don’t! This recipe is basically a magic trick where you take simple ingredients and turn them into a showstopper that will make everyone gasp, then immediately ask for seconds. It’s got that *CRUNCH* from the fried coating, the luscious *MELT* of the ice cream inside, all layered with soft cake and drowned in a river of rich, buttery caramel. It’s a temperature, texture, and taste party all rolled into one. Plus, the sheer audacity of saying you fried ice cream? Chef’s kiss. It’s also surprisingly **idiot-proof**, provided you follow one crucial rule: **freeze, freeze, and freeze again!**
Ingredients You’ll Need
Gather your troops, folks. These are your weapons in the war against bland desserts.
- Vanilla Ice Cream: About 1 half-gallon (approx. 2 liters). Good quality, because you deserve it. Feel free to go crazy with other flavors if you’re feeling adventurous, but vanilla is a classic for a reason.
- Pound Cake or Sponge Cake: One pre-made loaf (the frozen kind you just thaw works great, shhh!). Or, if you’re feeling extra, bake your own. Slice it into ½-inch thick pieces. This is our sturdy foundation!
- Corn Flakes or Crushed Cereal: About 3-4 cups, crushed into medium crumbs. You can also use crushed cinnamon toast crunch, graham crackers, or even leftover cookies for extra flavor.
- Cinnamon: 1-2 teaspoons, because cinnamon just *gets* fried ice cream.
- Eggs: 2 large, lightly beaten. These are our glue.
- Vegetable Oil or Canola Oil: About 4-5 cups, for frying. Make sure it’s a neutral-flavored oil.
For the Speedy Caramel Sauce (Because Store-Bought is for quitters… usually):
- Granulated Sugar: 1 cup.
- Water: 1/4 cup.
- Unsalted Butter: 6 tablespoons (¾ stick), cut into cubes, room temperature.
- Heavy Cream: ½ cup, warmed slightly (microwave for 30 seconds).
- Vanilla Extract: 1 teaspoon.
- Pinch of Salt: Just a tiny bit to make everything pop.
Step-by-Step Instructions
- Prep Your Ice Cream: Take your ice cream out of the freezer for about 10-15 minutes to soften just enough to scoop. Scoop out 6-8 generous balls (about ¾ cup each, depending on how many layers you want). Flatten them into disc shapes, roughly the same size as your cake slices. Place them on a parchment-lined baking sheet and **freeze for at least 2 hours, or until rock solid.** Seriously, don’t skimp here.
- Crumb Coat Magic: In a shallow dish, mix your crushed corn flakes (or chosen crumbs) with cinnamon. In another shallow dish, beat your eggs. Once your ice cream discs are solid, dip each disc into the egg, let any excess drip off, then thoroughly coat it in the crumb mixture. Repeat this step for a double coating on each disc – **this is your armor against melting!**
- Re-Freeze for Glory: Place your now crumb-coated ice cream discs back on the parchment-lined baking sheet. **Freeze them again for at least 4-6 hours, or ideally overnight.** The colder, the better. This is the secret sauce (not literally, yet) to successful frying.
- Caramel Time: While your ice cream is chilling, let’s make that glorious caramel! In a medium saucepan, combine sugar and water. Cook over medium-high heat, without stirring, until the mixture turns a beautiful amber color. This takes about 8-12 minutes. Watch it like a hawk – it goes from perfect to burnt in seconds!
- Finish the Caramel: Remove from heat immediately. Carefully add the cubed butter, whisking until fully melted. Then, slowly pour in the warm heavy cream, whisking constantly (it will bubble up, don’t panic!). Stir in the vanilla and salt. Let it cool slightly, it will thicken as it cools.
- Fry Time (Fast & Furious): Heat your oil in a deep, heavy-bottomed pot or Dutch oven over medium-high heat to about **375°F (190°C)**. Use a thermometer! Working one or two at a time, carefully lower the frozen, coated ice cream discs into the hot oil using a slotted spoon.
- Quick Fry & Drain: Fry for only **20-30 seconds per side**, just until the coating is golden brown and crispy. Any longer, and you risk a melty disaster. Quickly remove with the slotted spoon and place on a wire rack lined with paper towels to drain excess oil.
- Assemble Your Masterpiece: Lay a slice of pound cake on your serving platter. Place a freshly fried ice cream disc on top. Add another slice of cake, then another fried ice cream disc. Repeat until you have your desired number of layers (usually 2-3 fried ice cream layers).
- Drizzle & Devour: Lavishly drizzle your warm (or re-warmed) caramel sauce over the entire cake. Feel free to add whipped cream, extra sprinkles, or a cherry on top. Serve immediately and bask in the glory!
Common Mistakes to Avoid
- Not Freezing Enough: This is the number one culprit for a fried ice cream meltdown. **Don’t rush the freeze.** Seriously, an hour isn’t enough. Think “arctic blast.”
- Over-Frying: You’re not cooking a chicken cutlet here! It’s a quick dip and crisp. Too long, and you’ll have ice cream soup.
- Oil Not Hot Enough: If your oil isn’t at the right temperature, your ice cream will just soak it up and get greasy without crisping. **Invest in a thermometer, people!**
- Trying to Multitask During Caramel Making: Caramel requires your undivided attention. Look away for one second, and boom, it’s burnt. Learn from my mistakes, okay?
- Skipping the Double Coat: That second layer of crumbs is your ice cream’s superhero cape. Without it, the villains (hot oil) might win.
Alternatives & Substitutions
- Ice Cream Flavor Fun: While vanilla is classic, go wild! Coffee ice cream with chocolate crumbs? Mint chip with crushed Oreos? Strawberry with shortbread crumbs? The world is your oyster!
- Cake Base Bonanza: No pound cake? No problem! Sliced brownies, thick cookies, or even a store-bought sponge cake work beautifully as the layers. You could even use sliced donuts if you’re feeling extra decadent.
- Crumb Creativity: Cornflakes are great, but try crushed graham crackers, vanilla wafers, or even slightly stale croissants pulsed into crumbs for different textures and flavors. Add some toasted coconut for a tropical twist.
- Sauce Swap: If caramel isn’t your jam (or you’re feeling lazy, no judgment), a good quality hot fudge sauce, raspberry coulis, or even a homemade dulce de leche would be absolutely divine.
- “Baked” Not Fried: If you’re really oil-averse, you *can* try baking the coated ice cream discs in a super hot oven (450°F/230°C) for just a few minutes until crispy. It won’t be quite the same, but it’s a good alternative!
FAQ (Frequently Asked Questions)
- Can I make the fried ice cream discs ahead of time? Heck yes! In fact, you *should*. Make them, double coat them, and freeze them for up to a month in an airtight container. Then just fry them up when the craving strikes.
- What kind of oil is best for frying? A neutral oil with a high smoke point, like vegetable, canola, or peanut oil. Don’t use olive oil; it’ll taste weird and smoke too much.
- My caramel seized up! What happened? You probably added cold cream or butter too quickly, or perhaps didn’t stir enough after adding them. Next time, warm your cream slightly and add it slowly while whisking vigorously. Don’t worry, it happens to the best of us!
- Is it really necessary to freeze the ice cream twice? OMG, yes! This is not a suggestion, it’s a command. The colder the ice cream, the more time you have in the hot oil before it melts, giving you that perfect crispy crust.
- Can I use a deep fryer instead of a pot? Absolutely! A deep fryer makes temperature control even easier. Just follow the same temperature guidelines.
- How do I store leftovers? Haha, leftovers? What are those? But if by some miracle you have some, wrap individual slices tightly in plastic wrap and store them in the freezer. Reheat *very* briefly in the microwave (like 10-15 seconds) or eat it cold. The fried coating might not be as crispy, but it’ll still be delicious.
Final Thoughts
So there you have it, future dessert rockstar! You’ve just learned how to transform humble ingredients into a show-stopping Fried Ice Cream Cake. It’s a little bit of effort, a lot of fun, and an absolute explosion of flavor. Don’t be intimidated by the “frying” part; remember, it’s all about that deep freeze and quick dip. You’ve got this! Now go impress someone—or yourself—with your new culinary skills. You’ve earned it!

