So, your little rascals are bouncing off the walls again, and you’re out of ideas that don’t involve a screen, huh? Been there, bought the t-shirt (and then spilled coffee on it, naturally). Well, buckle up, buttercup, because we’re about to dive into the wonderful, messy, and surprisingly delicious world of Food Art Activities for Kids! Forget those boring, perfectly plated meals. We’re talking edible masterpieces, people.
Why This “Recipe” is Awesome
Why is this the best thing since sliced bread? Because it *is* sliced bread… or at least involves it! This isn’t just about cooking; it’s about playing with your food in the most glorious, guilt-free way possible. It’s basically a genius hack to keep tiny hands busy, boost their creative mojo, and maybe, just maybe, get them to eat a vegetable without a full-blown negotiation. Plus, it’s pretty much **idiot-proof** – even I haven’t managed to mess this up, and that’s saying something. No heat, no sharp knives (unless you’re feeling brave with the fruit, but let’s not push it), just pure, unadulterated, edible fun.
Ingredients You’ll Need
Think of these as your art supplies. The more colors and textures, the better!
- The Canvas: Bread, Crackers, or Rice Cakes – Your base! Sliced bread (toast it for extra crispness!), large crackers, or plain rice cakes work wonders. Tortillas are also super fun.
- The “Glue” & Base Color: Spreads! – Peanut butter, cream cheese, hummus, plain yogurt, or even a thin layer of mashed avocado. These hold everything together and add a flavor base.
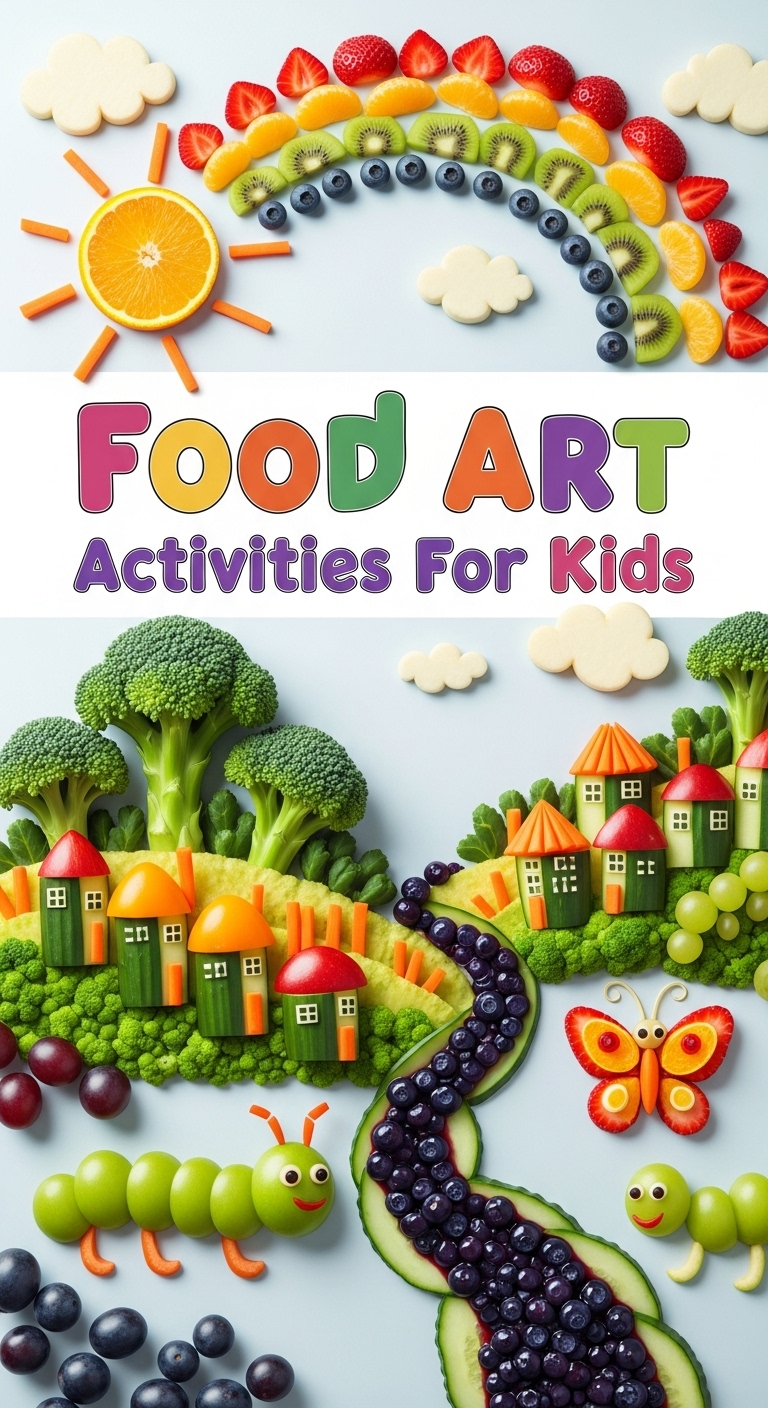
- Edible Art Supplies: Fruits & Veggies Galore! – This is where the magic happens. Think small, colorful, and easy to handle.
- Sliced bananas, strawberries, blueberries, raspberries, grapes (halved for little ones).
- Cucumber slices, bell pepper strips (various colors!), baby carrots (cut into smaller pieces), cherry tomatoes (halved).
- Broccoli florets (steamed slightly if preferred), sugar snap peas.
- Shape-Shifters: Cheese & Deli Meat – Sliced cheese (use mini cookie cutters for fun shapes!), small pieces of deli ham or turkey.
- Detailing & Sparkle:
- Raisins, chocolate chips, dried cranberries (for eyes or buttons).
- Sprinkles (because why not?), chia seeds, sesame seeds (for texture).
- Tools: Small spoons, butter knives (for spreading), kid-safe cookie cutters (optional, but highly recommended for fun shapes!).
Step-by-Step Instructions
Let’s get this party started! Seriously, it’s easier than trying to get a toddler to wear matching socks.
- Prep the Art Studio: First things first, clear a table or counter space. Lay down some newspaper or a washable placemat if you’re not into abstract expressionist food stains. Get all your “ingredients” out and pre-cut/pre-portioned into small, kid-friendly bowls. Think charcuterie board, but for tiny Picassos.
- Pick Your Canvas: Let each child choose their base – bread, cracker, or rice cake. This is their foundation for greatness.
- Spread the Fun: Hand them a butter knife or small spoon and their chosen “glue.” Encourage them to spread a thin layer of peanut butter, cream cheese, or hummus all over their canvas. This is crucial; it’s what holds their edible masterpiece together!
- Unleash the Inner Artist: Now for the best part! Present them with the bowls of fruits, veggies, cheese, and other fun bits. Tell them to make a face, an animal, a car, an abstract design, or whatever their creative little hearts desire. **The rule here is there are no rules!**
- Detailing (Optional, but Encouraged): Suggest using raisins or chocolate chips for eyes, bell pepper strips for hair, or cucumber slices for wheels. Show them how to make patterns.
- Admire, Then Devour!: Once their masterpiece is complete, take a proud photo (because it *will* be Instagram-worthy), then let them eat their art! The ultimate goal, after all, is a happy tummy.
Common Mistakes to Avoid
Trust me, I’ve made them all so you don’t have to. You’re welcome.
- Thinking It Won’t Get Messy: Rookie mistake, my friend. **Embrace the chaos!** This is a sensory activity, and stuff *will* get sticky. That’s half the fun (for them, anyway).
- Expecting Perfection: This isn’t a Michelin-star restaurant; it’s a food art studio run by tiny humans. Their “abstract” is genius. Don’t correct their banana-eye placement.
- Using Only Brown Foods: Where’s the fun in that? **Go bold with colors!** The more vibrant your ingredients, the more appealing and exciting the art will be.
- Forgetting to Take Pictures: Seriously, you’ll want proof of their genius (and the glorious mess). It’s priceless.
- Not Pre-Prepping: Nothing kills the mood faster than you frantically slicing strawberries while a child impatiently chants “snack! snack! snack!” **Prep everything beforehand.**
Alternatives & Substitutions
No rules, remember? Here are some ideas to keep things fresh!
- Different Canvases: Instead of bread, try mini pancakes or waffles (cold is fine!), large pretzels, or even sturdy lettuce cups (for a super healthy twist).
- Crazy Spreads: Nutella for the sweet tooth, mashed sweet potato for an earthy flavor, or even a thin layer of guacamole!
- Unique Toppings: How about pretzel sticks for legs on an animal? Mini marshmallows for snowy landscapes? Cooked pasta shapes for texture? Olives for super cool eyes? Go wild!
- Theme Nights: Dedicate an art session to a theme! Animal faces, space scenes (grape planets!), underwater worlds (fish crackers!), or self-portraits (hilarious results guaranteed).
- Savory vs. Sweet: Focus purely on savory with cheese, veggies, and hummus, or go all-out sweet with fruit, yogurt, and a sprinkle of granola. Your call, boss.
FAQ (Frequently Asked Questions)
Let’s answer some burning questions, shall we?
- Will this actually get my kid to eat their veggies? Hope springs eternal, my friend! It definitely increases exposure and makes them more likely to try things they’ve “created.” No guarantees, but it’s a step in the right direction!
- How long does this take to clean up? Oh, a glorious amount of time, but totally worth it for the quiet moments you get while they’re focused. **Pro tip: Use a high chair or outdoor table!**
- Can I just let them play with their food instead? Um, isn’t that kind of the point? We’re just giving it a fancy name and calling it “sensory development.”
- What if my kid eats all the “ingredients” before making art? Consider it pre-art snacking! They’re still engaging with healthy foods. Just make sure you have extra for the actual art.
- Is this only for toddlers? Heck no! My teenager still secretly enjoys decorating a bagel with berries, even if they pretend it’s “lame.” Great for all ages, even us big kids!
- Do I need fancy cookie cutters? Nah, a butter knife or even just tearing things with hands works great! But if you have some, they do add an extra layer of fun and shape-making.
Final Thoughts
See? Who needs a museum when your kitchen is an art gallery (and a snack bar)? This isn’t just about food; it’s about imagination, fine motor skills, and making happy memories. So, next time the kids are restless, skip the screens and break out the edible paints. Now go forth, unleash those tiny Picassos, and maybe grab a quick bite of their masterpiece before they do. You’ve earned it!


