Okay, let’s be real. Sometimes you just need *cake*. Not just any cake, but *the* cake. The kind that makes you close your eyes, hum a little, and temporarily forget all your adult responsibilities. And if that cake screams “tropical escape” with every bite, yet is ridiculously easy to whip up? Honey, you’ve hit the jackpot. This fluffy and moist coconut cake recipe is about to become your new best friend. So, craving something delicious but too lazy to spend forever in the kitchen, huh? Same. Let’s bake!
Why This Recipe is Awesome
Listen, I get it. You’ve seen recipes that promise the world and deliver a crumbly disappointment. But this isn’t one of those, I promise. This recipe is like that one friend who’s always got your back: **it’s practically idiot-proof.** Even I, a person who once set off a smoke detector making toast, can nail this. We’re talking maximum fluffy texture, maximum coconut moisture, and minimum fuss. You’ll look like a baking guru, and no one needs to know how ridiculously simple it was. Win-win, IMO!
Ingredients You’ll Need
Gather your troops, folks! Here’s what you’ll need for your coconut cake masterpiece. Keep it simple, keep it fun!
- 2 ½ cups all-purpose flour: The backbone of our fluffy dream. Don’t get fancy; plain old AP works perfectly.
- 1 teaspoon baking powder: Our little lift-off agent. It’s science!
- ½ teaspoon baking soda: Another leavening hero. Teamwork makes the dream work!
- ½ teaspoon salt: Balances everything out. Don’t skip it; it makes a difference!
- 1 cup (2 sticks) unsalted butter, softened: And I mean *softened*. Not melted, not straight from the fridge. Leave it out for an hour or so. We’re aiming for Goldilocks perfection here.
- 1 ¾ cups granulated sugar: Sweetness overload (in the best way).
- 4 large eggs: Room temperature, please! They emulsify better and give you a smoother batter.
- 1 teaspoon vanilla extract: The unsung hero. A good quality one, if you can swing it.
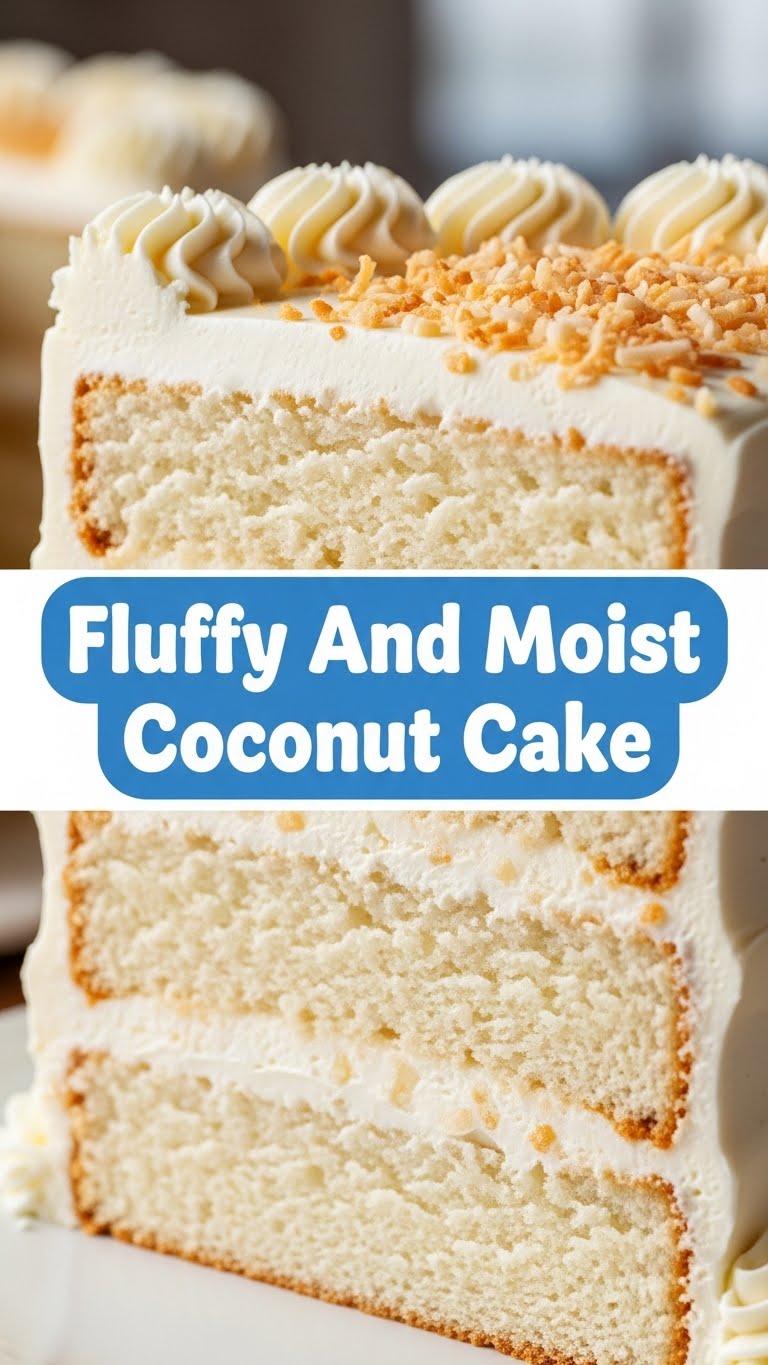
- 1 can (13.5 oz) full-fat coconut milk: This is where the magic (and moisture!) happens. Don’t even *think* about light coconut milk. Seriously, don’t.
- ½ cup buttermilk: Adds a beautiful tang and more moisture. Trust me on this.
- 1 cup sweetened shredded coconut: For that irresistible texture and flavor. YUM!
- Optional (but highly recommended) for serving: Extra shredded coconut for garnish, maybe a simple glaze or whipped cream. Go wild!
Step-by-Step Instructions
Alright, apron on? Let’s get this party started! Follow these easy steps, and you’ll be digging into coconut heaven in no time.
- Prep Your Pan: First things first, preheat your oven to 350°F (175°C). Then, grab a 9×13 inch baking pan (or two 8-inch round pans if you’re feeling fancy). Grease and flour it like you mean it. No stuck cakes on our watch!
- Whisk the Dry Stuff: In a medium bowl, whisk together your flour, baking powder, baking soda, and salt. Set it aside. We’re keeping things separate for now.
- Cream the Wet Stuff (Part 1): In a large mixing bowl (or stand mixer if you’re living the dream), beat the softened butter and granulated sugar together. Beat them on medium-high speed until they’re light and fluffy, about 3-5 minutes. This is crucial for a light cake, so don’t rush it!
- Add Eggs & Vanilla: Now, add the eggs one at a time, beating well after each addition. Scrape down the sides of the bowl as needed. Stir in the vanilla extract. Your batter should be looking smooth and dreamy.
- Alternate Wet & Dry: In a separate bowl, whisk together your full-fat coconut milk and buttermilk. Now, with the mixer on low speed, alternately add the dry ingredients and the coconut milk mixture to the butter mixture, starting and ending with the dry ingredients. Start with about a third of the flour, then half of the liquid, then another third of flour, the rest of the liquid, and finally the last third of flour. **Mix just until combined.** No overmixing here, we want fluff, not tough!
- Fold in Coconut: Gently fold in the sweetened shredded coconut. Give it a good, even distribution.
- Bake It Up: Pour the batter into your prepared baking pan(s). Spread it evenly. Bake for 30-35 minutes for a 9×13 pan, or 25-30 minutes for round pans. You’ll know it’s done when a wooden skewer or toothpick inserted into the center comes out clean.
- Cool Down: Let the cake cool in the pan for about 10-15 minutes before inverting it onto a wire rack to cool completely. Patience is a virtue, especially when cake is involved!
Common Mistakes to Avoid
Nobody’s perfect, but we can try to avoid the rookie errors, right? Learn from my past kitchen mishaps!
- **Thinking you don’t need to preheat the oven:** Rookie mistake! Your cake won’t rise properly if it goes into a cold oven. Always preheat!
- **Overmixing the batter:** Once you add the flour, treat that mixer with respect. Mix *just* until the ingredients are combined. Overmixing develops the gluten too much, giving you a tough, dense cake. We want fluffy!
- **Using cold ingredients:** Especially the butter and eggs. Room temperature ingredients emulsify better, creating a smoother, more uniform batter and a finer crumb.
- **Opening the oven door constantly:** I know it’s tempting to peek, but resist! This can cause your cake to sink in the middle. Let it do its thing.
- **Skipping the grease and flour:** Unless you want to play a game of “cake extraction”, do not skip this step. Trust me, it’s not fun.
Alternatives & Substitutions
Life happens, and sometimes you don’t have *exactly* what the recipe calls for. No stress, we’re flexible!
- No buttermilk? No problem! You can make your own. Just add 1 tablespoon of lemon juice or white vinegar to a measuring cup, then fill it up to the ½ cup line with regular milk (any kind works, but whole milk is best). Let it sit for 5 minutes; it’ll curdle slightly, and boom – instant buttermilk substitute. You’re welcome!
- Not a fan of shredded coconut in the batter? You can totally leave it out and still get an amazing, moist coconut-flavored cake from the coconut milk. Or, try toasted coconut for a deeper flavor profile.
- Want to make it gluten-free? I haven’t tested it myself for this specific recipe, but a 1:1 gluten-free baking flour blend *should* work. Just make sure it contains xanthan gum.
- Got extra coconut cream? You could use it in a simple glaze or whip it up for a dairy-free topping.
FAQ (Frequently Asked Questions)
Got questions? I’ve got answers. Probably. Let’s chat!
- **Can I use margarine instead of butter?** Well, technically yes, but why hurt your soul like that? Butter provides a richer flavor and better texture. If you must, use a good quality margarine, but you might notice a slight difference in taste and tenderness.
- **My cake sank in the middle! What went wrong?** Ah, the dreaded sinkhole! Could be a few things: overmixing the batter, opening the oven door too early, your baking powder/soda might be old (check expiration dates!), or you might have measured your flour incorrectly. Baking is science, folks!
- **How do I store this cake?** Covered tightly at room temperature for up to 3 days, or in the fridge for up to 5 days. It’s so moist, it actually holds up really well!
- **Can I make this into cupcakes?** Absolutely! Reduce the baking time to about 20-25 minutes. Keep an eye on them; cupcake ovens vary.
- **What if I only have unsweetened shredded coconut?** You can definitely use it! Just be aware your cake might be a *tad* less sweet overall, which some people prefer. You could always add a tablespoon or two more sugar to the batter if you’re worried.
- **Is full-fat coconut milk really necessary?** YES. I cannot stress this enough. Light coconut milk will give you a drier cake and less coconut flavor. Don’t do it to yourself.
Final Thoughts
So there you have it, my friend! Your new go-to recipe for a show-stopping, yet deceptively simple, fluffy and moist coconut cake. You’ve navigated the ingredients, mastered the steps, and now you’re basically a coconut cake whisperer. Go forth and impress someone—or, let’s be real, just yourself—with your newfound culinary skills. You’ve earned it! Now, seriously, go get baking!


