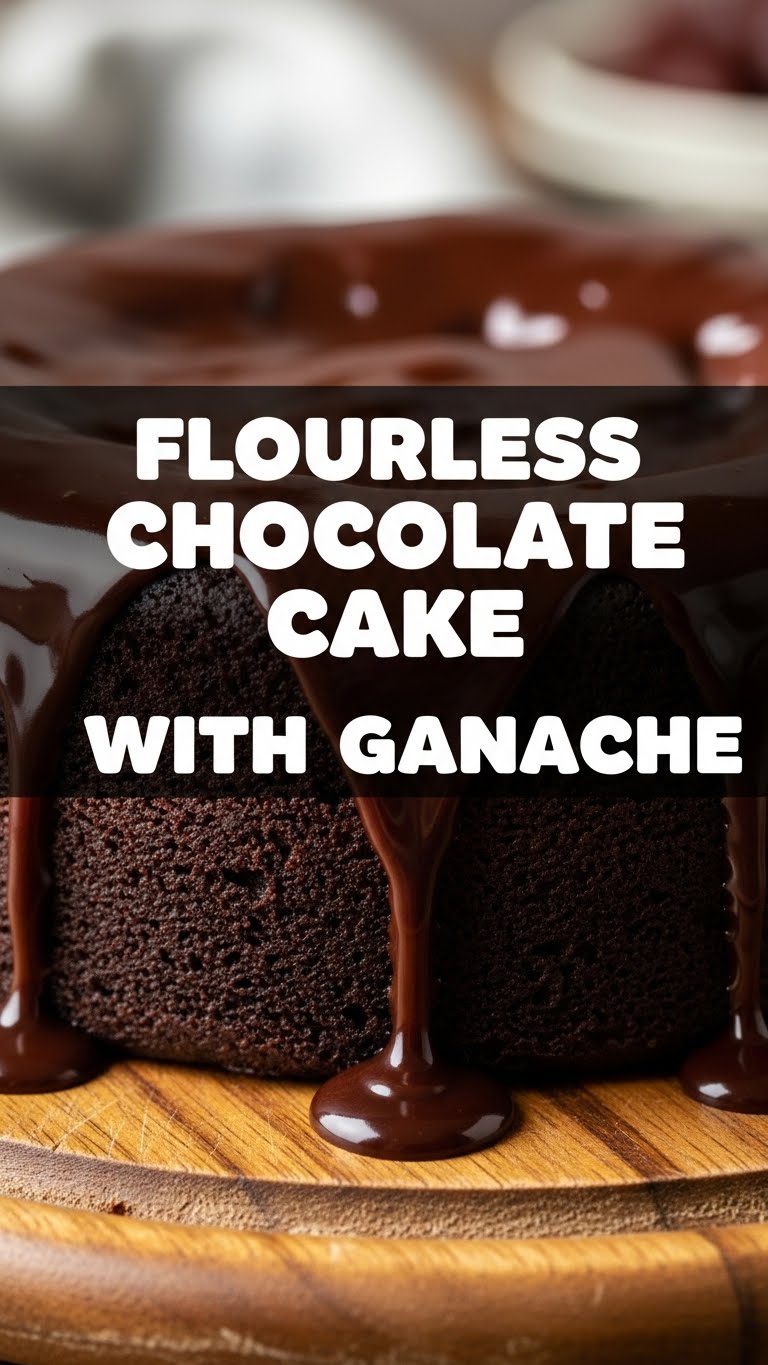
So, you’re craving something ridiculously decadent, chocolatey, and impressive, but the thought of spending an entire afternoon in the kitchen makes you want to crawl back into bed? Been there, done that, bought the T-shirt. Good news, my friend! We’re about to make a Flourless Chocolate Cake with Ganache that’s so ridiculously easy, it feels like cheating. And honestly, who doesn’t love a good shortcut to dessert heaven?
Why This Recipe is Awesome
Okay, let’s be real. This isn’t just “awesome”; it’s a culinary superhero in disguise. First off, it’s **flourless**, which means it’s naturally gluten-free. So, if you’re trying to impress that one friend (or yourself) who’s on a GF kick, you’re golden. But even if gluten is your bestie, this cake is for you. It’s incredibly rich, fudgy, and intensely chocolatey – basically, everything a chocolate cake aspires to be when it grows up. It looks super fancy, like you spent hours slaving away, but between you and me? It’s practically idiot-proof. Seriously, even I haven’t managed to mess this up yet, and that’s saying something.
Ingredients You’ll Need
Gather ’round, my sweet-toothed companions! Here’s your loot list. Nothing crazy, I promise.
- **For the Cake:**
- **1 cup (2 sticks / 226g) Unsalted Butter:** Your favorite fatty friend.
- **12 oz (340g) Good Quality Dark Chocolate:** We’re talking 60-70% cacao. This is not the time for chocolate chips that taste like sadness. Get the good stuff, you deserve it.
- **6 Large Eggs:** Room temperature, please. They mix better, trust me.
- **1 cup (200g) Granulated Sugar:** Just enough sweetness to balance the bitterness of the chocolate.
- **1 tsp Vanilla Extract:** A little hug for your chocolate.
- **Pinch of Salt:** Because every sweet treat needs a tiny bit of salt to make it sing.
- **A little extra butter/cocoa powder** for prepping the pan.
- **For the Ganache (because why stop at just cake?):**
- **6 oz (170g) Dark Chocolate:** Again, the good stuff.
- **1 cup (240ml) Heavy Cream:** The richer, the better!
Step-by-Step Instructions
Deep breaths, buttercup. We’re doing this. It’s simpler than assembling IKEA furniture, I swear.
- **Preheat & Prep:** Get your oven to **350°F (175°C)**. Grab a 9-inch round springform pan. Liberally butter the inside, then dust it with cocoa powder. Tap out any excess. This ensures your beautiful cake won’t stick.
- **Melt the Dream Team:** In a heatproof bowl set over a saucepan of simmering water (or a microwave, if you’re feeling feisty, but stir often!), melt the butter and 12 oz of dark chocolate together until smooth and glorious. Remove from heat and let it cool a little.
- **Whisk It Real Good:** In a separate large bowl, whisk together the eggs, sugar, vanilla extract, and salt until light and fluffy. This should take about 3-5 minutes with an electric mixer, or a good arm workout if you’re going old school. You want it pale yellow and voluminous.
- **Combine the Magic:** Gently fold the slightly cooled chocolate mixture into the egg mixture. Don’t go crazy; you want to keep that air in the eggs. Mix until just combined and streak-free.
- **Bake Your Heart Out:** Pour the batter into your prepared springform pan. Bake for **30-35 minutes**. The edges should be set, but the center will still be a bit jiggly. This is crucial! **Do NOT overbake.**
- **Cool Down:** Let the cake cool completely in the pan on a wire rack. It will sink in the middle—that’s totally normal and actually creates a perfect little well for our ganache. Once cool, carefully remove the springform ring.
- **Ganache Time (the best time):** Chop your 6 oz of dark chocolate finely and put it in a heatproof bowl. In a small saucepan, heat the heavy cream until it just starts to simmer around the edges (don’t boil!).
- **Pour & Stir:** Pour the hot cream over the chopped chocolate. Let it sit for 5 minutes, then whisk gently until smooth and glossy. Instant gratification!
- **Top It Off:** Pour the ganache over your cooled cake, letting it cascade elegantly down the sides. Chill for at least 30 minutes for the ganache to set, or just dive in if you’re impatient (I won’t judge).
Common Mistakes to Avoid
We all make mistakes, but let’s try to avoid these rookie errors, shall we?
- **Overbaking:** This is the cardinal sin of flourless chocolate cake. A dry flourless cake is a sad, sad thing. **Remember: jiggly center is good!** It will set as it cools.
- **Using Subpar Chocolate:** Seriously, don’t skimp here. The chocolate is the star of the show. If you use waxy, cheap chocolate, your cake will taste… waxy and cheap.
- **Not Cooling It Completely:** Attempting to de-pan or ganache a warm cake is a recipe for a crumbly, melty disaster. Patience, young Padawan.
- **Over-whisking the Ganache:** Once the cream is added to the chocolate, whisk gently until smooth. If you go wild, it can get grainy or seize up.
Alternatives & Substitutions
Feeling adventurous? Here are a few ways to mix things up, or just make do with what you’ve got:
- **Espresso Kick:** Add 1-2 teaspoons of instant espresso powder to the chocolate while it’s melting. It won’t make your cake taste like coffee, but it will seriously deepen and enhance the chocolate flavor. Trust me on this one.
- **Boozy Twist:** A splash of Kahlúa, Grand Marnier, or even a good whiskey in the ganache (after it’s made, obviously) can add a sophisticated touch. Adults only, please!
- **Dairy-Free Ganache:** Swap the heavy cream for full-fat canned coconut milk (the thick cream at the top). Heat it up, pour over chocolate, whisk. Voila! Just make sure your cake ingredients are also dairy-free (use a good vegan butter alternative).
- **Different Toppings:** Don’t feel like ganache? Dust with cocoa powder, serve with fresh raspberries, a dollop of whipped cream, or a scoop of vanilla bean ice cream. Sky’s the limit!
FAQ (Frequently Asked Questions)
Got questions? I’ve got (casual) answers!
- **”What’s the best kind of chocolate to use?”**
A good quality dark chocolate, around 60-70% cacao. Think brands like Ghirardelli, Lindt, Callebaut. Avoid anything labeled “baking chocolate” that’s super sweet or has weird additives. You want that rich, intense flavor.
- **”Can I make this ahead of time?”**
Absolutely! This cake actually gets better the next day, as the flavors meld. Store it covered in the fridge for up to 3-4 days. Just bring it to room temperature before serving for the best texture.
- **”My cake cracked! Is it ruined?”**
Nope! Flourless cakes are prone to cracking a bit as they cool and sink. It’s totally normal and adds character. Plus, we’re covering it with ganache anyway, so nobody will ever know your “secret.”
- **”Can I use semi-sweet chocolate instead of dark?”**
You *can*, but it will be a much sweeter cake. If you prefer less intense chocolate, go for it, but you might want to slightly reduce the granulated sugar in the cake batter to balance it out.
- **”My ganache looks lumpy/separated. Help!”**
Oh no! This usually means your chocolate wasn’t chopped finely enough, or your cream wasn’t hot enough, or you over-whisked. Try reheating it gently over a double boiler, adding a tiny splash more hot cream, and whisking *very* slowly until it comes together. Sometimes a quick blitz with an immersion blender can save it!
Final Thoughts
So there you have it! A show-stopping, rich, and utterly delicious flourless chocolate cake with ganache that basically screams “I’m a pro baker!” without all the actual pro-baker effort. Now go impress someone—or yourself—with your new culinary skills. You’ve earned every single fudgy, chocolatey bite. Enjoy!

