
So, you’re staring at those spotty bananas on your counter, knowing they’re too far gone for a smoothie but just right for something delicious? And maybe you’re also thinking, “Flour? Nah, too much effort. And carbs.” 😉 Well, guess what, friend? I’ve got your back. This flour-free banana bread recipe is about to become your new bestie.
Why This Recipe is Awesome
Okay, let’s be real. We all want impressive results with minimal fuss. This recipe delivers that and then some. First off, it’s **flour-free**, which means fewer complex carbs and a total win if you’re trying to avoid gluten (or just feel a bit lighter). But don’t mistake “flour-free” for “flavor-free” – nope, this bad boy is packed with moist, banana-y goodness that’ll make your taste buds do a happy dance.
It’s also ridiculously simple. Seriously, if you can mash a banana and crack an egg, you’re basically a master baker in the making with this one. **It’s practically idiot-proof**, even I didn’t mess it up on the first try. Plus, it uses ingredients you probably already have lying around. No fancy stuff needed. Win-win-win, if you ask me!
Ingredients You’ll Need
- 3 Super Ripe Bananas: We’re talking brown spots galore, practically mush. The riper, the sweeter and more banana-y the bread. Don’t be shy!
- 2 Large Eggs: Your binding agents. Think of them as the glue holding all that deliciousness together.
- ½ cup Nut Butter: Almond butter, peanut butter, cashew butter… whatever your heart (and pantry) desires! Just make sure it’s the creamy, natural kind without added sugars or weird oils. This is where the magic (and healthy fats) happens.
- ¼ cup Maple Syrup or Honey: Your natural sweetener. Adjust to your sweet tooth’s preference.
- 1 tsp Baking Soda: The puff-upper! Don’t skip it, unless you want banana bricks.
- 1 tsp Vanilla Extract: Because everything is better with a splash of vanilla, right?
- Pinch of Salt: Just to balance out all that sweetness and make the flavors pop.
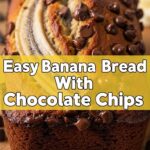
- Optional Mix-ins (¼-½ cup): Chocolate chips (dark chocolate, obvs!), chopped nuts (walnuts or pecans are *chef’s kiss*), or a sprinkle of cinnamon if you’re feeling spicy.
Step-by-Step Instructions
- **Preheat Power:** Get your oven cranked up to **350°F (175°C)**. And for the love of all that is holy, line a loaf pan (8.5×4.5 inch or similar) with parchment paper or grease it well. Future you will thank past you for this.
- **Banana Bash:** In a medium bowl, mash those ripe bananas until they’re mostly smooth but still have a few charming lumps. Don’t go full puree, we like a little texture!
- **Wet Mix Wonder:** Add the eggs, nut butter, maple syrup (or honey), and vanilla extract to the mashed bananas. Whisk it all together until everything is happily combined. Don’t overmix; just get it uniform.
- **Dry Duo Dive:** Sprinkle in the baking soda and salt. Give it another gentle stir until just incorporated. If you’re using mix-ins, fold them in now!
- **Pan Parade:** Pour your glorious batter into your prepared loaf pan. Give it a gentle tap on the counter to settle.
- **Bake Bliss:** Pop it into your preheated oven and bake for **35-45 minutes**. You’ll know it’s ready when a toothpick inserted into the center comes out clean or with just a few moist crumbs.
- **Cool Down Crew:** Once baked, let it cool in the pan for about 10-15 minutes before carefully transferring it to a wire rack to cool completely. **Seriously, don’t cut it hot** unless you want a crumbly mess. Patience, young padawan.
Common Mistakes to Avoid
- **Ignoring Oven Preheat:** Thinking you don’t need to preheat the oven? Rookie mistake, my friend. Baking is a science, not a suggestion! Your bread won’t rise properly.
- **Under-ripe Bananas:** Using firm, yellow bananas is like trying to make lemonade with unripe lemons. You’ll miss out on natural sweetness and that deep banana flavor. **Embrace the brown spots!**
- **Overmixing the Batter:** This isn’t a race to see how fast you can whisk. Overmixing can lead to a dense, tough bread. We want light and fluffy, remember? Mix just until combined.
- **Cutting It Hot:** I know, the smell is intoxicating. But resist the urge to slice into it fresh out of the oven! It needs time to set, or it’ll crumble and fall apart.
Alternatives & Substitutions
Feeling adventurous? Or just out of an ingredient? No stress, here are some ideas:
- **Nut Butter Swap:** Out of almond butter? Peanut butter or cashew butter works just as well. Just make sure it’s a natural, creamy variety. I’m personally a sucker for cashew butter in this, it makes it extra rich!
- **Sweetener Switch:** Maple syrup or honey are my go-tos, but you could try agave nectar or even a sugar-free alternative if that’s your jam. Just taste as you go!
- **Spice It Up:** A dash of cinnamon, nutmeg, or even a pinch of allspice can really elevate the flavor profile. **IMO, cinnamon is a must!**
- **Mix-in Madness:** No chocolate chips? Add dried cranberries, raisins, or even shredded coconut. Chopped walnuts or pecans add a fantastic crunch. Get creative!
FAQ (Frequently Asked Questions)
- Can I make this vegan? Absolutely! Swap the eggs for “flax eggs” (1 tbsp ground flaxseed + 3 tbsp water per egg, let sit for 5 mins). And ensure your nut butter and sweetener are vegan-friendly.
- How long does it last? Stored in an airtight container at room temp, it’s usually good for 3-4 days. In the fridge, it’ll stretch a bit longer, up to a week.
- Can I freeze it? Heck yes! Once completely cooled, wrap individual slices or the whole loaf tightly in plastic wrap, then foil. It’ll keep for up to 3 months in the freezer. Just thaw on the counter when cravings strike.
- My bananas aren’t super ripe, what now? If you’re desperate, you can bake them on a parchment-lined baking sheet at 300°F (150°C) for 15-30 minutes until soft and black. **FYI, this is a game-changer when you’re impatient!**
- What if I don’t have a loaf pan? You can use a square 8×8 inch baking dish, but keep an eye on the baking time as it might be shorter. Or make muffins! Divide the batter into a greased muffin tin and bake for 18-22 minutes.
- Is it *really* healthy? Well, it’s definitely a healthier treat than your average flour-and-sugar-laden banana bread. It’s packed with good fats from the nut butter and natural sweetness. Enjoy in moderation, as with all good things!
Final Thoughts
And there you have it, folks! Your new favorite, super-easy, flour-free banana bread recipe. Whether you’re whipping this up for a quick breakfast, a guilt-free snack, or to impress your unsuspecting friends (who will never guess how simple it was), you’re in for a treat.
Now go forth, embrace those spotty bananas, and get baking! You’ve totally got this. And maybe, just maybe, save me a slice? 😉
