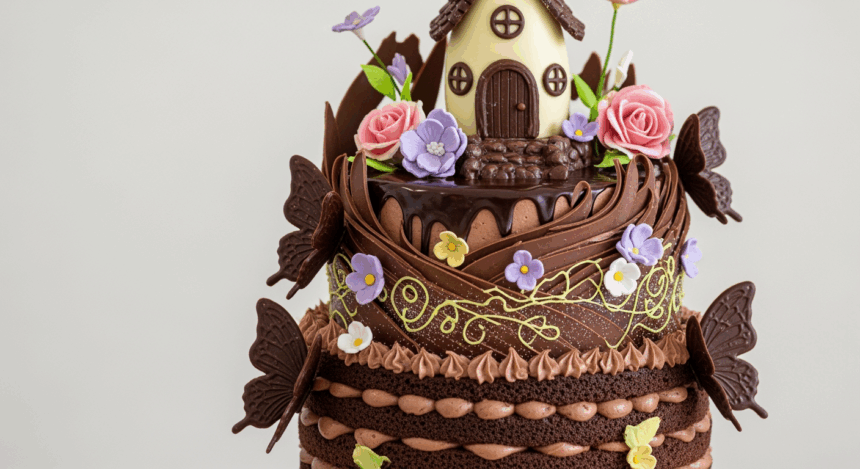
Picture this: you’re hosting a birthday party for your niece who’s obsessed with fairies, or maybe you just want to eat something magical because adulting is hard. Either way, this fairy-themed cake with chocolate decorations is about to become your new obsession. It’s whimsical, it’s chocolate-y, and it’s just the right amount of extra to make everyone think you’ve got your life together (even if you don’t).
Why This Recipe is Awesome
Let’s be real—most “fancy” cakes look like they require a culinary degree and the patience of a saint. Not this one! This fairy cake is deceptively simple but looks like you spent hours on it. Perfect for impressing your friends while secretly knowing you had time to binge three episodes of your favorite show while making it. The chocolate decorations can hide a multitude of frosting sins, and the whole “fairy” theme gives you permission to be gloriously imperfect. Fairies are whimsical, after all—not symmetrical.
Ingredients You’ll Need
For the cake:
- 2 cups all-purpose flour (the regular stuff, nothing fancy)
- 1 ¾ cups granulated sugar (because fairies are sweet, duh)
- ¾ cup unsweetened cocoa powder (the good kind, not the sad dusty stuff)
- 1 ½ teaspoons baking powder
- 1 ½ teaspoons baking soda
- 1 teaspoon salt
- 2 eggs (room temperature, because cold eggs are party poopers)
- 1 cup buttermilk (or regular milk with a splash of vinegar if you forgot to buy buttermilk…again)
- ½ cup vegetable oil (or any neutral oil that won’t make your cake taste like a salad)
- 2 teaspoons vanilla extract (the real stuff, not that imitation nonsense)
- 1 cup hot coffee (or hot water if caffeine makes you see actual fairies)
For the frosting:
- 1 cup unsalted butter, softened (patience, grasshopper—truly softened, not just slightly less cold)
- 4 cups powdered sugar (yes, that much)
- ¼ cup heavy cream
- 2 teaspoons vanilla extract
- Food coloring (pastel colors work best for fairy vibes—think lavender, mint green, baby blue, or pale pink)
For the chocolate decorations:
- 8 oz dark or semi-sweet chocolate, melted
- Edible glitter or shimmer dust (because FAIRIES)
- Edible flower decorations (optional, but highly recommended for maximum fairy energy)
- Small candy pearls or sprinkles (the fancier-looking, the better)
Step-by-Step Instructions
- Prep your battle station. Preheat your oven to 350°F (175°C) and grease two 8-inch round cake pans. Line the bottoms with parchment paper because you’re not a monster who wants cake stuck to the pan.
- Mix the dry ingredients. Whisk together flour, sugar, cocoa, baking powder, baking soda, and salt in a large bowl. Make a little well in the center like you’re creating a fairy pond.
- Add the wet team. Pour in eggs, buttermilk, oil, and vanilla. Mix until just combined—nobody likes an over-mixed tough cake. It’s like the cake equivalent of trying too hard at a party.
- Coffee time. Stir in the hot coffee (or water). The batter will be thin, almost suspiciously so. Trust the process.
- Bake it up. Pour the batter evenly into your prepared pans and bake for 30-35 minutes, or until a toothpick inserted in the center comes out clean. If you forget the toothpick test, just gently press the center—if it springs back, you’re good to go.
- Cool your jets. Let the cakes cool in their pans for 10 minutes, then transfer to a wire rack to cool completely. Seriously, COMPLETELY. Trying to frost a warm cake is like trying to apply makeup in a sauna.
- Make that frosting magic. Beat the butter until creamy, then gradually add powdered sugar, heavy cream, and vanilla. Beat until fluffy and cloud-like. Divide into bowls and add different pastel food coloring to each portion.
- Create chocolate fairy accessories. Melt your chocolate in the microwave in 30-second bursts (stirring in between) or use a double boiler if you’re feeling fancy. Draw fairy wings, wands, mushrooms, or swirly designs on parchment paper with the melted chocolate. Let them set completely in the refrigerator.
- Assembly time! Place one cake layer on your serving plate, spread a generous layer of frosting, top with the second cake, then frost the entire cake. Get creative with different colored frosting patterns—swirls, dots, or an ombré effect all work beautifully.
- Decorate like a fairy godmother. Once your cake is frosted, carefully peel your chocolate decorations off the parchment and arrange them on your cake. Add edible flowers, sprinkle with edible glitter, and add any candy pearls or sprinkles for extra magic.
Common Mistakes to Avoid
Rushing the cooling process – Unless your goal is a landslide of frosting and regret, wait until your cake is completely cool before frosting.
Overcomplicating the chocolate decorations – Keep them simple! Even basic chocolate squiggles can look fairy-like when dressed up with some edible glitter.
Being a perfectionist – This is a FAIRY cake, not a military inspection. Fairies are known for being a little chaotic and whimsical, so embrace any “rustic” elements.
Forgetting about humidity – If you live somewhere humid, your chocolate decorations might need extra time in the fridge to set properly. Don’t let them melt on you at the last minute!
Alternatives & Substitutions
Gluten-free? Swap the all-purpose flour with your favorite gluten-free blend. Just expect a slightly different texture—but hey, the fairies won’t mind.
Dairy-free? Use plant-based milk with a splash of lemon juice instead of buttermilk, and substitute the butter in the frosting with a plant-based alternative. The frosting might be a tad less stable, but refrigeration helps.
Not a coffee fan? Use hot water or hot chocolate instead. The coffee doesn’t make the cake taste like coffee—it just enhances the chocolate flavor. But I get it, some people have coffee trauma.
If chocolate isn’t your jam (who are you?), you can make a vanilla cake instead and use the same decoration techniques. The fairies are pretty flexible about their housing requirements.
FAQ (Frequently Asked Questions)
How far in advance can I make the chocolate decorations?
Up to a week ahead if stored properly in a cool, dry place. Just keep them in an airtight container with parchment between layers so they don’t become a sad, melted mess.
Can I use store-bought frosting? I’m feeling lazy.
I mean, sure, if you want your fairy cake to taste like it came from the back shelf of a gas station. But hey, we all have those days. Just whip the store-bought stuff with a mixer to make it fluffier and less chemical-tasting.
My chocolate decorations keep breaking! What am I doing wrong?
Probably making them too thin, you ambitious minimalist. Try a slightly thicker layer of chocolate. Also, make extras because, let’s be honest, casualties are inevitable.
Do I really need edible glitter?
Well, do fairies really need wings? The answer is technically no, but why would you deprive yourself of this joy? FYI, regular craft glitter is NOT edible and will send your guests to the ER instead of Fairyland.
Can I make this cake the day before the party?
Absolutely! In fact, it often tastes better the next day when the flavors have had time to mingle and get to know each other. Just store it in the refrigerator and bring it to room temperature before serving.
My frosting looks curdled! Help!
Breathe. Your butter was probably too cold. Keep beating it, and it should come together. If not, warm the bowl slightly (over steam or with a warm towel wrapped around it) and try again.
Final Thoughts
There you have it—a fairy cake that’s as magical as it is delicious! Don’t stress if it doesn’t look exactly like those perfect Pinterest photos. Remember, the best thing about homemade fairy cakes is that they have personality and charm. Plus, chocolate makes everything better. So go on, channel your inner fairy godmother and create something magical. And if anyone criticizes your creation, just tell them the fairies made it that way on purpose. Who’s going to argue with fairy logic?
