So, you peek into your fridge at lunchtime, and all you see is existential dread and maybe a sad, forgotten lemon, right? Been there, bought the T-shirt. You want something delicious, satisfying, and *actually* good for you, but the idea of cooking a full meal *every single day* makes you want to crawl back into bed? Yep, that’s why we’re here today! I’m about to drop some serious knowledge on the easiest meal prep lunches that even *I* can manage without setting off the smoke detector. Get ready to embrace your inner culinary guru, without, you know, actually becoming one.
Why This Recipe is Awesome
Because, darling, it’s practically magic! This isn’t just a recipe; it’s a blueprint for a week of stress-free lunching. It’s **idiot-proof** – seriously, if I didn’t mess it up, you’re golden. You get to feel all accomplished without, like, breaking a sweat. Plus, it’s infinitely customizable, so you’ll never get bored. Think of it as your personal culinary playground, but with fewer sticky surfaces to clean. And best of all? It tastes amazing, which, let’s be honest, is the real MVP here.
Ingredients You’ll Need
Gather your gladiators, my friend! Here’s what we’re rounding up for our “Lazy Guru’s Power Bowls”:
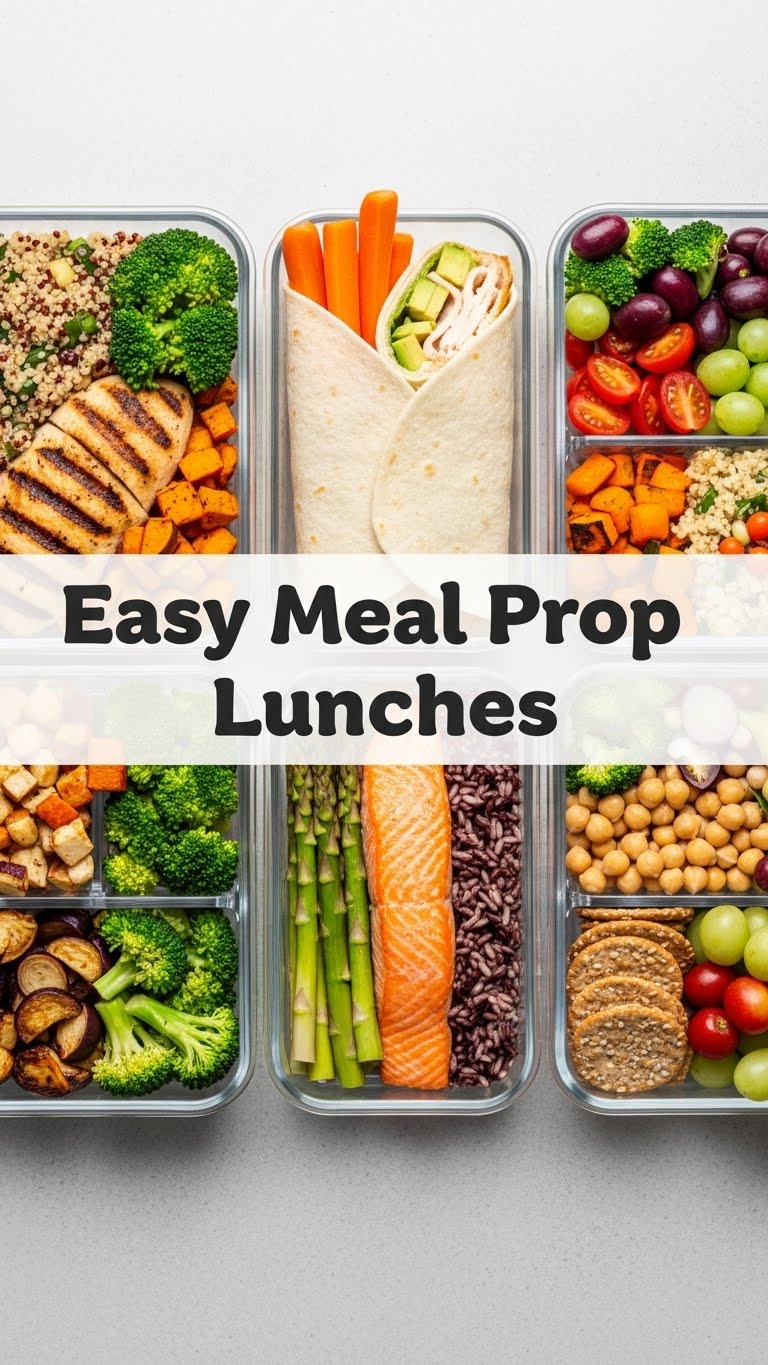
- Protein of Choice: About 1-1.5 lbs. Think chicken breast (baked, grilled, or shredded rotisserie for ultimate laziness), pre-cooked lentils (hello, shortcut!), chickpeas, or firm tofu. Whatever floats your boat and your macros.
- Grain Base: 1-2 cups dry quinoa, brown rice, or couscous. Something that holds up well for a few days. Don’t even *think* about instant ramen here, okay?
- Veggies Galore: 4-5 cups of your favorite roasting or steaming veggies. Broccoli florets, bell peppers (any color for a party!), zucchini, sweet potato cubes, carrots. The more colorful, the better – because we eat with our eyes first, right?
- Healthy Fats/Toppings: A ripe avocado (your future best friend), a handful of nuts or seeds (almonds, sunflower, pumpkin), some crumbled feta or goat cheese if you’re feeling fancy.
- Dressing/Sauce: Your favorite store-bought dressing (I’m a big fan of a good vinaigrette or a creamy tahini-based one). Or, if you’re feeling ambitious, whip up a quick lemon-tahini dressing!
- Olive Oil: For roasting, of course.
- Salt & Pepper: The OG flavor enhancers.
- Optional Fun Stuff: Fresh herbs, a squeeze of lime, chili flakes if you like a little kick.
Step-by-Step Instructions
- Preheat & Prep: Crank that oven to 400°F (200°C). While it’s heating, chop your chosen veggies into roughly equal, bite-sized pieces. Toss them with a glug of olive oil, salt, and pepper on a large baking sheet. **Don’t overcrowd the pan** – give those veggies some breathing room for optimal crispiness.
- Roast Away: Pop the veggies into the preheated oven. Roast for 20-30 minutes, tossing halfway, until they’re tender and slightly caramelized. Keep an eye on them; nobody likes burnt broccoli!
- Cook Your Grain: While the veggies are roasting, cook your grain according to package directions. For quinoa, typically 1 part quinoa to 2 parts water, simmer for 15 minutes, then let it sit covered for 5 minutes. Fluff with a fork. Easy peasy.
- Prep Your Protein: If you’re cooking chicken, season it well and bake/pan-fry it until cooked through. Shred or slice. If using pre-cooked protein like lentils or chickpeas, just give them a quick rinse.
- Assemble Your Masterpieces: Once everything is cooked and slightly cooled (this is key for meal prep!), grab your airtight containers. Divide the cooked grain, roasted veggies, and protein evenly among them.
- Dress & Garnish (Later!): Keep your dressing separate until just before eating to prevent soggy lunches. Same goes for avocado – slice it fresh right before serving. Add nuts, seeds, or cheese when you’re ready to dive in.
Common Mistakes to Avoid
Listen up, buttercup, because these are the pitfalls even seasoned (read: lazy but hungry) chefs like us can tumble into:
- Overcrowding the Baking Sheet: Seriously, it’s not a party! Give your veggies space. Otherwise, they’ll steam instead of roast, and you’ll end up with sad, mushy veggies. **Mushy veggies are a crime.**
- Adding Dressing Too Soon: Unless you *enjoy* a soggy lunch (and who are you, a monster?), keep your dressing in a separate tiny container until mealtime.
- Not Letting Things Cool: Packing warm food into containers can create condensation, leading to weird textures and a shorter shelf life. Let everything chill out (literally) before sealing.
- Forgetting to Season: Bland food is a tragedy. Don’t be shy with the salt and pepper, or even some garlic powder or paprika on your veggies.
- Thinking you don’t need to read the instructions: Rookie move. Even simple recipes have little quirks!
Alternatives & Substitutions
This recipe is like a choose-your-own-adventure book, but with food! Feel free to mix and match:
- Protein Power-Up: Swap chicken for baked salmon, ground turkey, or even hard-boiled eggs. Vegetarians, try black beans, edamame, or tempeh!
- Grain Game Changer: Instead of quinoa, try farro for a chewier texture, or even cauliflower rice for a low-carb option.
- Veggie Variety: Not a fan of broccoli? Roast asparagus, Brussels sprouts, or even snap peas. Go wild! Just make sure they’re sturdy enough to last a few days.
- Dressing Drama: Bored of vinaigrette? Try a spicy peanut sauce, a creamy ranch, or even a simple squeeze of lemon and a drizzle of good olive oil. The world is your oyster (but maybe not *in* your bowl, unless you’re feeling adventurous). A good tahini dressing, IMO, is always a winner.
- Flavor Boosters: Add pickled red onions, a sprinkle of everything bagel seasoning, or some fresh cilantro right before eating for an extra pop.
FAQ (Frequently Asked Questions)
- How long do these meal prep bowls last?
Generally, about **3-4 days in the fridge** in an airtight container. Freshness is key, my friend!
- Can I reheat these?
Absolutely! Pop them in the microwave for 1-2 minutes, stirring halfway. If you’re feeling fancy, you can even warm them in a pan on the stovetop. Just avoid reheating avocado – it gets weird.
- Is it okay to use frozen vegetables?
You bet! Just know they might release a bit more water when roasting, and could be a tad softer. But for convenience? Totally fine. **No shame in that game!**
- What if I don’t have all the ingredients?
Relax! This recipe is all about flexibility. Use what you have. Don’t have quinoa? Use rice. No chicken? Canned chickpeas to the rescue! It’s less about strict adherence and more about getting *something* good in your belly.
- Can I eat these cold?
For sure! Many people prefer their power bowls cold, especially if they have a vinaigrette-based dressing. It’s like a super hearty salad. Do what feels right for your taste buds, you rebel.
- What’s the trick to perfectly roasted veggies?
**High heat and not overcrowding!** That’s the secret sauce. And a little olive oil, salt, and pepper never hurt anyone.
Final Thoughts
See? That wasn’t so scary, was it? You just conquered a whole week of lunches like a pro! Now you’ve got tasty, healthy, and easy meals waiting for you, freeing up your precious time for… well, whatever you want. Binge-watching that new show? Reading a book? Taking a nap? You’ve earned it! Go forth, my friend, and enjoy your delicious, stress-free week. And remember, cooking should be fun, not a chore. Happy prepping!

