So you’re craving something tasty but too lazy to spend forever in the kitchen, huh? Same. And maybe you don’t have a giant outdoor grill, or it’s raining cats and dogs, but your taste buds are screaming for that smoky, charred goodness? Don’t sweat it, my friend. We’re about to make some magic happen, right on your stovetop. No fancy equipment, just pure, unadulterated grilled chicken vibes!
Why This Recipe is Awesome
Alright, let’s get real. Why bother with this recipe? First off, it’s pretty much **idiot-proof**. Seriously, if I can do it without setting off the smoke detector (most of the time), you’re golden. Secondly, it’s fast. Like, “dinner-on-the-table-before-you’ve-finished-bingeing-that-one-episode” fast. Plus, you get that lovely ‘grilled’ char without having to brave the elements or deal with propane tanks. It’s a win-win-win. And did I mention cleanup is a breeze? You’re welcome.
Ingredients You’ll Need
- Chicken Breasts (2-4, boneless, skinless): The stars of our show. Or thighs if you’re feeling a bit more adventurous and juicy.
- Olive Oil (2 tbsp): Your trusty sidekick for getting that perfect sear.
- Salt & Pepper: The OGs. Don’t skip these. Seriously.
- Garlic Powder (1 tsp): Because everything is better with garlic. Duh.
- Paprika (1 tsp): For that lovely color and a hint of smoky sweetness.
- Onion Powder (1/2 tsp): The unsung hero of flavor.
- Optional fun stuff (your choice!): A dash of cayenne for a kick, dried herbs like oregano or thyme, or a squeeze of lemon juice at the end. Get wild!
Step-by-Step Instructions
- Prep Time! Grab your chicken breasts and pat them super dry with paper towels. This is crucial for that awesome crust. If they’re too thick, slice them in half horizontally (butterfly style) or pound ’em thin with a mallet. No mallet? A heavy pan works!
- Season Like a Pro. In a small bowl, mix your salt, pepper, garlic powder, paprika, and onion powder. Now, sprinkle this glorious mix all over your chicken. Don’t be shy! Rub it in like you’re giving it a spa treatment.
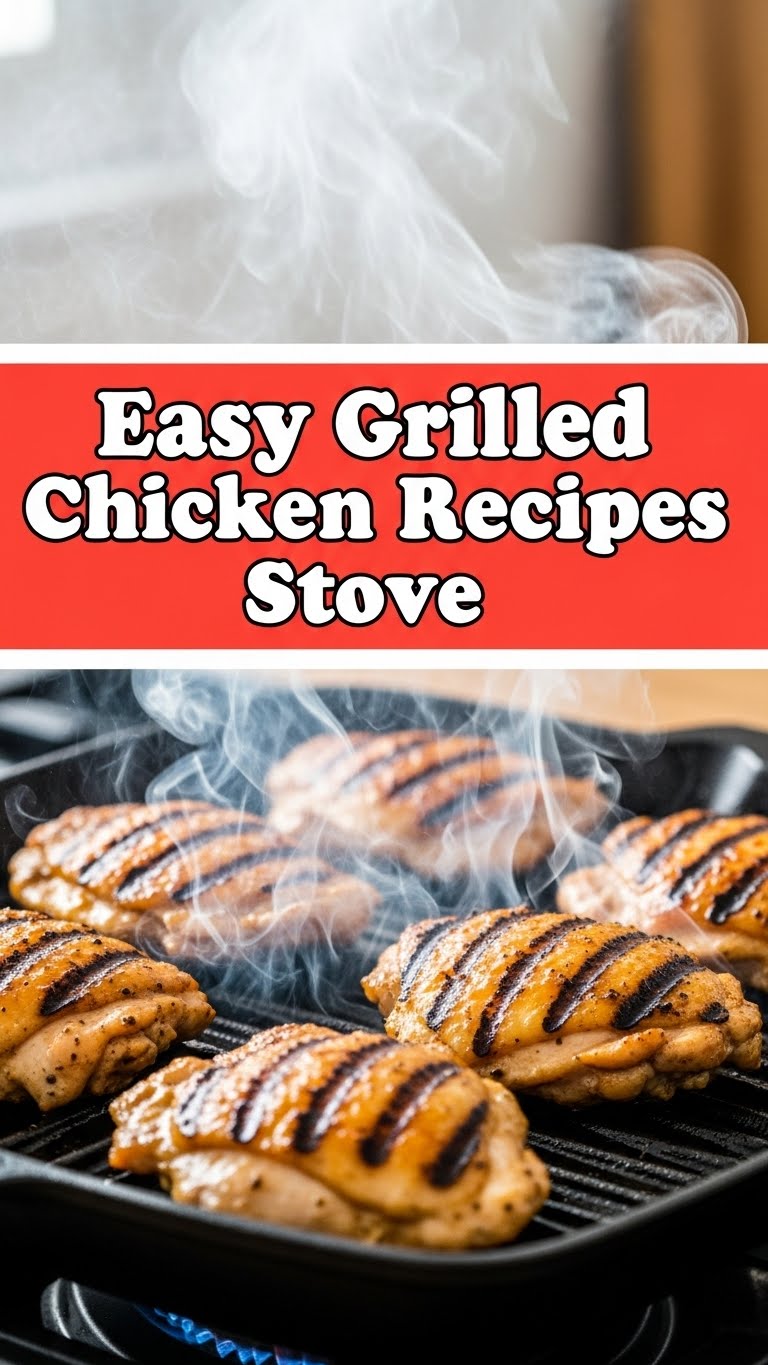
- Heat Things Up. Place your trusty cast iron skillet (or a heavy-bottomed pan) on medium-high heat. Let it get nice and hot, like “sizzle-when-you-flick-water-on-it” hot. Add the olive oil and let it shimmer.
- Sear, Baby, Sear! Carefully lay your seasoned chicken into the hot pan. Don’t overcrowd it; cook in batches if needed. Let it cook undisturbed for about 4-6 minutes per side. You’re looking for a beautiful golden-brown crust and those lovely grill marks.
- Check for Doneness. Once both sides are beautifully seared, reduce the heat to medium-low, cover the pan, and let it cook for another 5-7 minutes. This ensures it’s cooked through without drying out. **Always use a meat thermometer** to check: 165°F (74°C) is the magic number for chicken.
- Rest and Devour. Take the chicken off the pan and let it rest on a cutting board for 5 minutes. This lets the juices redistribute, keeping it super tender. Slice it up or serve whole. Boom! Dinner is served.
Common Mistakes to Avoid
- Not Patting Chicken Dry: This is like trying to tan with sunscreen on. You won’t get that gorgeous sear! **Always pat your chicken dry.**
- Cold Pan Syndrome: Throwing chicken into a cold pan? Rookie mistake. Your chicken will steam, not sear, and stick like glue. **Preheat your pan, people!**
- Overcrowding the Pan: Trying to fit too much chicken in one go lowers the pan’s temperature. This means steaming instead of searing. Cook in batches, trust me.
- Forgetting to Rest the Chicken: You’ve worked so hard for juicy chicken, don’t ruin it by cutting into it immediately! **Let it rest; it’s non-negotiable.**
Alternatives & Substitutions
- Chicken Thighs instead of Breasts? Absolutely! Thighs are more forgiving and naturally juicier. Just cook them a bit longer until they reach 165°F.
- No Olive Oil? Avocado oil or grapeseed oil are great high-heat options. Skip butter for searing, it tends to burn too quickly at high temps.
- Spice Blend Swap: Don’t have all those spices? No worries! A good all-purpose seasoning or even just salt, pepper, and garlic powder will still taste amazing. Or try a smoky BBQ rub for extra flavor!
- Want a Sauce? A squeeze of lemon, a dollop of pesto, or a quick pan sauce (deglaze with a splash of broth or white wine!) can elevate this dish even further.
FAQ (Frequently Asked Questions)
- “Do I really need a cast iron skillet?” While a heavy-bottomed stainless steel pan works, a cast iron skillet is truly the **MVP for searing**. It holds heat like a champ and gives you those awesome grill marks. If you don’t have one, consider it an investment!
- “My chicken is sticking! What gives?” Probably not hot enough, or you flipped it too soon. Let that crust develop before you try to move it. It’ll release naturally when it’s ready. Patience, grasshopper!
- “Can I use frozen chicken?” Technically, yes, but you MUST thaw it completely first. Trying to grill frozen chicken is a recipe for uneven cooking and dry disaster. **Thaw it out!**
- “What if I don’t have a meat thermometer?” Seriously, get one! It’s the only way to **guarantee perfectly cooked, safe chicken** without drying it out. Eyeballing it is a gamble you don’t want to take.
- “Can I marinate the chicken?” OMG, yes! A quick 30-minute marinade (lemon-herb, yogurt-based, or even a simple Italian dressing) will take this to the next level. Just pat it dry again before cooking!
Final Thoughts
See? Told you it was easy! Now you’re officially a stovetop grilling guru. No fancy grills, no propane tanks, just pure, unadulterated deliciousness in your kitchen. Go ahead, bask in the glory of your perfectly ‘grilled’ chicken. Serve it with a simple salad, some roasted veggies, or just eat it straight off the cutting board (no judgment here). Now go impress someone—or yourself—with your new culinary skills. You’ve earned it!

