So you’re craving something rich, decadent, and utterly divine, but the thought of spending hours in the kitchen makes you want to curl up with a bag of chips instead? Honey, I feel you. We’ve all been there – that intense chocolate craving that demands satisfaction, but not at the expense of our precious couch time. Enter the hero of our story: The Easy Chocolate Mousse Cake. Get ready to fool everyone into thinking you’re a pastry chef without breaking a sweat (or even turning on the oven, mostly!).
Why This Recipe is Awesome
Seriously, this isn’t one of those “easy” recipes that secretly requires a culinary degree, a unicorn’s tear, and three obscure ingredients you can only find in a specialty shop. This is *actually* easy. Like, “can do it in your pajamas while binging Netflix” easy. We’re talking minimal effort for maximum deliciousness. It looks fancy as heck, but the process is so straightforward, it’s practically idiot-proof. Even I didn’t mess it up, and my track record with delicate desserts is… let’s just say “spotty” is a generous description. You’ll impress your friends, your family, your significant other, or just your cat. It’s a no-bake wonder, FYI, which means less oven time and more tasting time. What’s not to love?
Ingredients You’ll Need
Gather ’round, my sweet-toothed friends. Here’s your simple shopping list:
- 200g (about 1.5 cups) Chocolate Sandwich Cookies: Think Oreos, but any chocolate cookie with a creamy filling will do. These are the foundation of our dreams.
- 60g (about 1/4 cup) Unsalted Butter: Melted. Because everything’s better with butter, right?
- 300g (about 10-11 oz) Dark Chocolate: The good stuff! Go for 60-70% cocoa solids. Don’t skimp here; your taste buds (and your soul) will thank you.
- 600ml (about 2.5 cups) Heavy Cream: We need the full-fat variety for that luscious, cloud-like mousse. This isn’t the time for “light” anything.
- 60g (about 1/2 cup) Powdered Sugar (Confectioners’ Sugar): Because nobody wants gritty mousse, right? Plus, it helps stabilize our whipped cream.
- 1 tsp Vanilla Extract: A dash of magic. Don’t skip it!
- Pinch of Salt: Just a tiny pinch to enhance all that glorious chocolatey goodness. Trust me on this one.
Step-by-Step Instructions
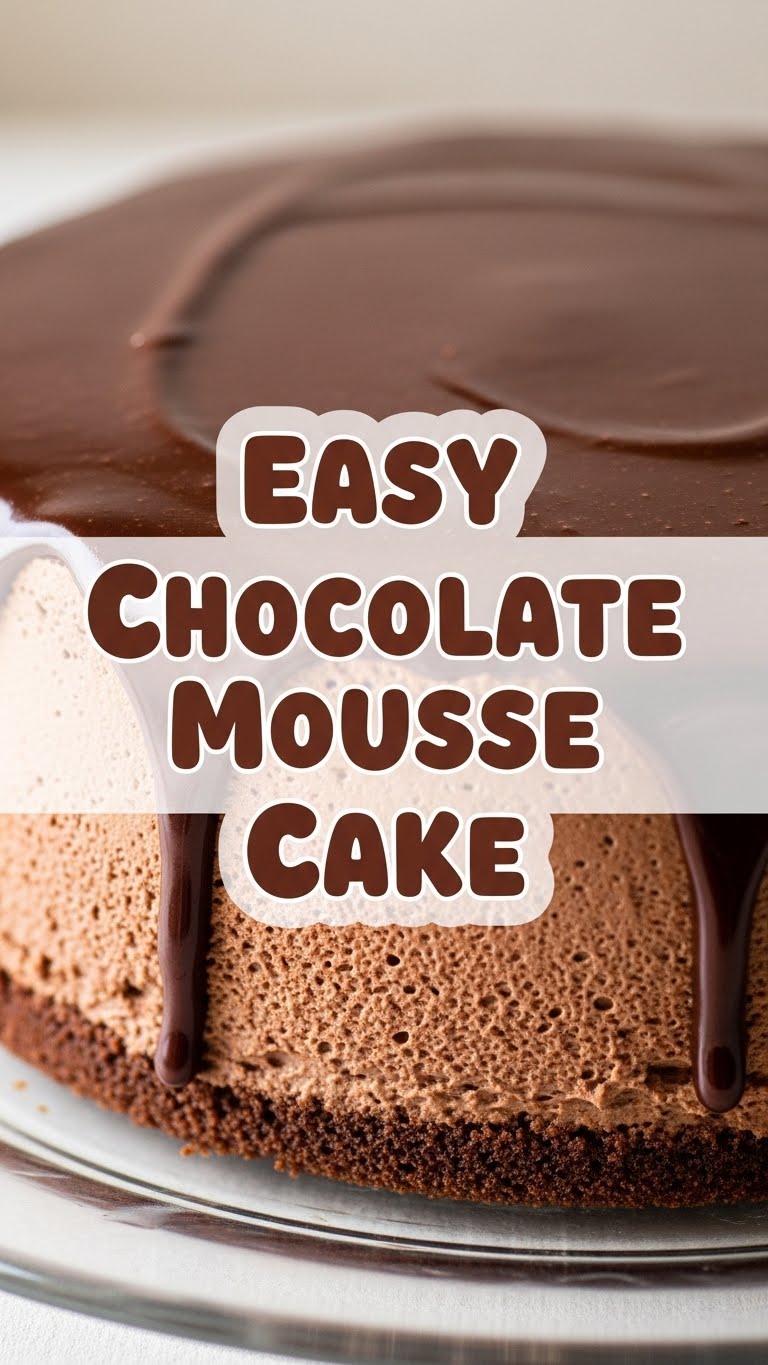
- Prep the Base: Grab those chocolate sandwich cookies and either bash them in a Ziploc bag with a rolling pin or whiz them in a food processor until they’re fine crumbs. Melt your butter. Combine the crumbs and melted butter in a bowl until moist. Press this mixture firmly into the bottom of a 20cm (8-inch) springform pan. Use the back of a spoon or a flat-bottomed glass. **Pop it in the fridge to chill** while you work on the mousse.
- Melt the Chocolate: Break your dark chocolate into small pieces and place it in a heatproof bowl. You can melt it gently over a double boiler (a bowl over a saucepan of simmering water, not touching the water) or in 30-second bursts in the microwave, stirring well after each burst. **The key here is low and slow – don’t burn it!** Let it cool slightly once melted, but keep it fluid.
- Whip the Cream: In a large, chilled bowl (a cold bowl helps!), pour in your heavy cream, powdered sugar, and vanilla extract. Beat with an electric mixer on medium-high speed until it forms medium-stiff peaks. We’re looking for something that holds its shape but isn’t overly stiff, like little fluffy mountains. **Don’t over-whip it, or you’ll get butter!**
- Fold it In: Pour about a third of your slightly cooled melted chocolate into the whipped cream. Gently fold it in with a spatula using a cutting and lifting motion. Once mostly combined, add the remaining chocolate and the pinch of salt, and continue to gently fold until everything is just incorporated and you have a beautiful, uniform chocolate mousse. **Be careful not to overmix** – we want to keep that lovely airy texture!
- Assemble & Chill: Spoon or pour your glorious chocolate mousse over the chilled cookie base in the springform pan. Use your spatula to gently smooth out the top. Now, for the hardest part: **send it back to the fridge for at least 4 hours, or ideally, overnight.** This chilling time is crucial for the mousse to set perfectly. IMO, overnight is always best!
- Decorate (Optional): Once fully set, carefully remove the springform pan sides. You can dust it with a little cocoa powder, add some chocolate shavings, or adorn it with fresh berries (raspberries and strawberries are always winners!). Make it look extra fancy pants!
Common Mistakes to Avoid
Listen, we’ve all made culinary boo-boos. Here are a few to steer clear of:
- Overheating the Chocolate: Microwaving on high heat or leaving it unsupervised over a double boiler is a recipe for disaster (and sad, burnt-tasting chocolate). Go low and slow, stir often.
- Overwhipping the Cream: One minute you have perfect whipped cream, the next you have butter. Great for toast, not so much for mousse. Keep an eye on it!
- Not Chilling Long Enough: I know, I know, the wait is agonizing. But pulling it out too soon will result in a sad, runny mess instead of a firm, luscious slice. Patience, grasshopper!
- Overmixing the Mousse: Once you add the chocolate to the whipped cream, gentle folding is key. We’re incorporating air, not beating the life out of it. Aggressive mixing will deflate the mousse and make it dense.
Alternatives & Substitutions
Feeling creative? This recipe is pretty flexible!
- Cookie Base: Any chocolate cookie will work, or even graham crackers mixed with a tablespoon of cocoa powder for a similar effect. For a gluten-free version, just grab your favorite GF chocolate cookies!
- Chocolate Type: While dark chocolate gives the best depth, you can use milk chocolate for a sweeter mousse (you might want to reduce the powdered sugar slightly), or even white chocolate for a completely different vibe.
- Add-ins for Mousse: Want to level up the flavor? Stir in a teaspoon of espresso powder with your chocolate for a mocha kick, a dash of orange zest for a citrusy hint, or a splash of your favorite liqueur like Kahlua, Bailey’s, or Grand Marnier (you do you!).
- Toppings: Beyond the classics, consider candied nuts, a drizzle of caramel sauce, or even a few dollops of extra whipped cream.
FAQ (Frequently Asked Questions)
Got questions? I’ve got (casual and humorous) answers!
Can I make this ahead of time? Absolutely! It actually tastes even better the next day, as the flavors meld together beautifully. So it’s a perfect make-ahead dessert for parties. Win-win!
What if I don’t have a springform pan? No stress! A regular cake pan (preferably 8-inch) lined with parchment paper will do the trick. Just make sure to leave some overhang on the sides so you can lift the entire cake out once it’s set. A removable bottom tart pan also works wonders.
My mousse isn’t setting, what went wrong? Hmm, a few culprits here. It might not have chilled long enough (be patient!). Or, your cream wasn’t whipped firm enough to begin with. Also, ensure your melted chocolate wasn’t too hot when you folded it into the cream; too hot chocolate can melt the cream and prevent it from setting.
Can I make it less sweet? Definitely. The amount of powdered sugar is pretty flexible. If you’re using a sweeter dark chocolate or just prefer a less sweet dessert, reduce the powdered sugar by a tablespoon or two.
Is this recipe kid-friendly? Making it? Maybe with supervision for the melting and whipping parts! Eating it? Oh, absolutely. They’ll devour it faster than you can say “chocolate coma.”
How long does it last in the fridge? Properly covered in the fridge, it’ll last about 3-4 days. But let’s be real, in my house, it rarely sees past day two.
Final Thoughts
See? I told you it was easy! Now you’ve got this gorgeous, ridiculously delicious chocolate mousse cake that screams “I’m a kitchen wizard!” (even if you just followed my ridiculously simple instructions). This dessert is a game-changer for anyone who loves chocolate but doesn’t love complicated recipes. It’s rich, it’s smooth, it’s chocolatey heaven, and it requires zero oven time (mostly!). Go forth and conquer your cravings. Impress your friends, or just enjoy every single bite yourself. You’ve earned it, superstar! Happy baking (or, more accurately, ‘no-baking’)!


