So, you’ve got a hankering for something ridiculously delicious, preferably chocolate, and you want it to look like you actually put in effort… but without, you know, *actually* putting in effort? My friend, you’ve come to the right place. Because who wants a plain cake when you can have a fancy-ish cake with minimal fuss? Exactly. Let’s get our hands (just a little) dirty!
Why This Recipe is Awesome
Okay, let’s be real. We all want to look like domestic goddesses (or gods) sometimes, but the thought of intricate piping bags and fondant disasters makes us want to crawl under the covers. This “recipe” isn’t really a recipe; it’s more like a cheat sheet for making a chocolate cake look amazing with almost zero skill required. It’s so **idiot-proof**, I practically invented it after a particularly challenging Monday. Seriously, if you can spread butter on toast, you can do this. Plus, it’s customizable, fun, and guarantees oohs and aahs from your unsuspecting victims (I mean, guests).
Ingredients You’ll Need
Remember, we’re decorating here, not baking from scratch! That’s half the battle won already, you superstar.
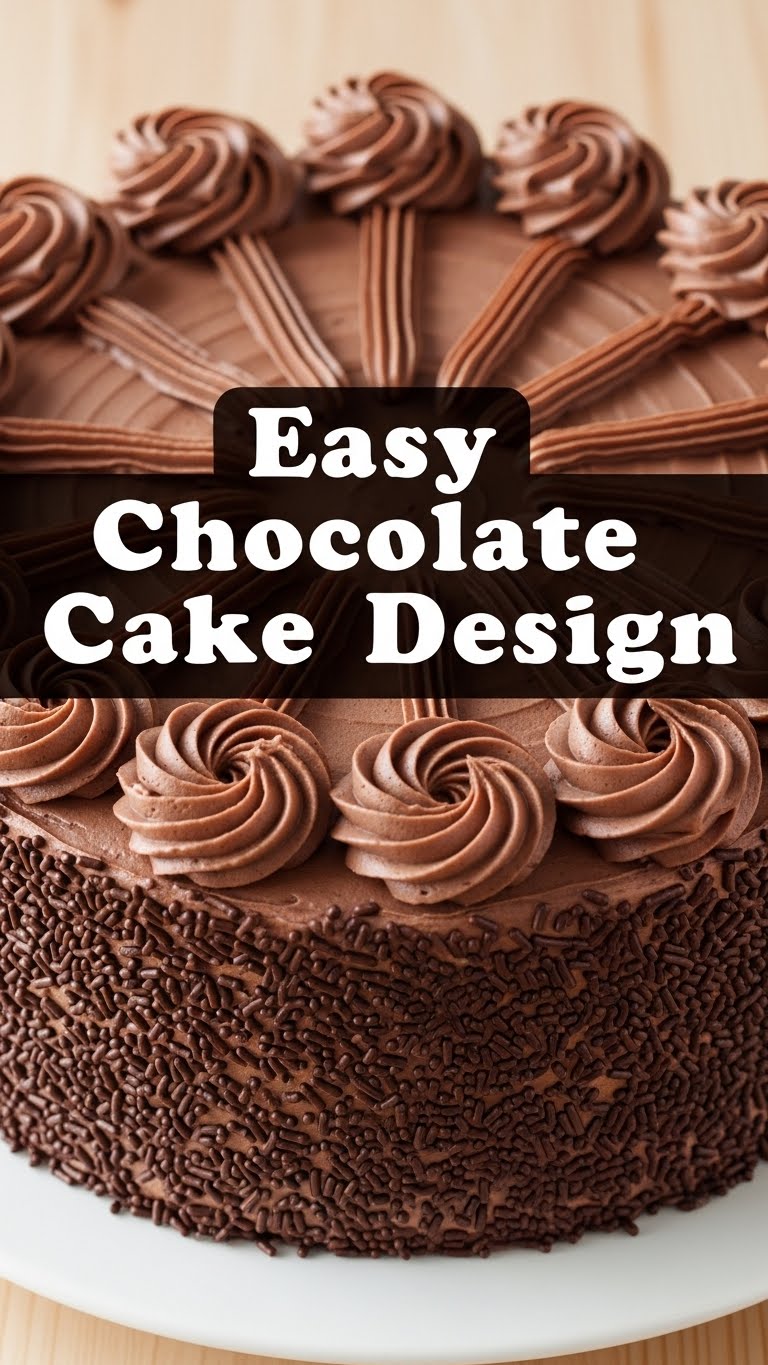
- One pre-baked chocolate cake: Store-bought, from a box mix, or even your grandma’s secret recipe. Whatever makes your heart sing (and your life easy). Just make sure it’s cooled down. Like, seriously cooled.
- 1-2 tubs of ready-made chocolate frosting: Or whip up your own if you’re feeling ambitious. But let’s be honest, store-bought is our bestie for this adventure.
- Assorted candies/chocolates: Think Kit Kats, M&Ms, Oreos, chocolate chips, mini Reese’s cups… the world is your candy store! Pick things that make you happy.
- Sprinkles: Rainbow, chocolate, glittery – the more, the merrier. They hide a multitude of sins (aka frosting mishaps).
- Optional (but helpful) tools: An offset spatula (your new best friend for smooth frosting), a regular butter knife, a small plate for candy, and maybe some parchment paper for easy cleanup.
Step-by-Step Instructions
Get ready to unleash your inner cake artist!
- Cool it down: First things first, ensure your cake is **completely cool**. Like, chillier than your ex’s heart. A warm cake and frosting are a recipe for a melty, sliding disaster. Trust me on this one.
- The Crumb Coat (The ‘Invisible Shield’): If you’re feeling fancy, do a thin “crumb coat.” Spread a very thin layer of frosting all over the cake to trap any loose crumbs. Pop it in the fridge for about 15-20 minutes to set. This step is optional but makes for a much neater final result, IMO.
- Frosting Time! Take a generous dollop of frosting and spread it evenly over the top of the cake. Use your offset spatula or butter knife to get it as smooth as you can. Don’t stress about perfection; character is charming, right?
- Sides Matter: Now, frost the sides of the cake. Again, aim for evenness, but a little texture looks artisanal, so don’t beat yourself up if it’s not super slick.
- The Kit Kat Fence (or other border): This is where the magic happens! Take your Kit Kat bars (or chocolate fingers) and gently press them upright against the sides of the cake, all the way around. They’ll create a lovely little fence that holds everything in and looks super impressive. Break them into individual sticks first, of course!
- Candy Mountain Top: Now for the fun part! Pile your chosen candies (M&Ms, crushed Oreos, chocolate chips) onto the top of the cake, filling the space inside your Kit Kat fence. Get creative! Mix and match.
- Sprinkle Shower: Finish with a generous cascade of sprinkles over the entire top. They add sparkle and an undeniable “party time” vibe. And as mentioned, they’re excellent for camouflaging any less-than-perfect frosting spots.
- Chill (Again!): Pop your masterpiece back into the fridge for at least 30 minutes. This helps the frosting firm up and keeps your decorations from sliding off when you transport it.
Common Mistakes to Avoid
We’ve all been there. Learn from my (many) mistakes!
- Frosting a Warm Cake: This is literally rule number one. Doing this will result in a soupy, crumbly mess. **Always let your cake cool completely.** Like, leave it overnight if you have to.
- Over-Thinking It: Seriously, this isn’t a culinary exam. Don’t agonize over every little detail. The beauty of this design is its playful, slightly chaotic charm. Embrace the “rustic” look.
- Trying to Frost the Whole Cake at Once: Take your time. Do the top, then the sides. Or do a crumb coat, chill, then do the main coat. Rushing leads to frustration and more crumbs in your frosting.
- Not Enough Frosting: Skimping on frosting is a rookie error. You need enough to cover the cake generously and act as “glue” for your decorations. Buy two tubs, just in case. Better safe than sorry!
Alternatives & Substitutions
Feeling a little extra? Or maybe you just ran out of M&Ms (the horror!):
- Frosting Flavors: Not a chocolate-on-chocolate person? (Gasp! But okay, I respect it.) Use vanilla, cream cheese, or even peanut butter frosting! The design principles remain the same.
- Side Borders: Instead of Kit Kats, try chocolate-covered pretzels, chocolate-dipped wafer cookies, or even just some artfully arranged chocolate shavings. Fresh strawberries cut in half would also look elegant and delicious.
- Top Fillings: No candy? No problem! Fresh berries (strawberries, raspberries, blueberries) make a beautiful and slightly healthier alternative. Or try crushed nuts, toasted coconut, or even a simple swirl pattern made with the back of a spoon.
- Tool-Free Zone: Don’t have an offset spatula? A regular butter knife or even the back of a spoon works just fine for spreading frosting. Your hands are your best tools, TBH!
FAQ (Frequently Asked Questions)
Let’s tackle some of those burning questions, shall we?
- Can I use homemade frosting instead of store-bought? Absolutely! If you’re feeling domestically inspired, go for it. Just make sure it’s stable enough to hold your decorations.
- My frosting is too stiff/too runny, help! If it’s too stiff, add a tiny bit of milk or cream, a teaspoon at a time, until it’s spreadable. Too runny? Pop it in the fridge for 15-20 minutes to firm up.
- How far in advance can I decorate the cake? You can usually decorate a day or two in advance. Store it in an airtight container in the fridge. Let it come to room temperature for about 30 minutes before serving for the best flavor and texture.
- What if my cake isn’t perfectly flat on top? Who cares?! Embrace the wobbly charm! You’re covering it with candy anyway. If it’s really lopsided, you can gently level it with a serrated knife before frosting, but honestly, it’s rarely necessary for this design.
- Can kids help with this? OMG, YES! This is the perfect kid-friendly decorating project. Let them go wild with the sprinkles and candy placement. Expect glorious, sticky chaos, but also pure joy.
- My Kit Kats keep falling off! What am I doing wrong? Your frosting might not be thick enough, or the cake might still be a tad warm. Make sure your cake is cool, apply a good, slightly thicker layer of frosting on the sides, and press the Kit Kats gently but firmly. A quick chill in the fridge after placing them can also help set them.
Final Thoughts
There you have it! An incredibly easy, ridiculously fun, and surprisingly impressive way to decorate a chocolate cake. No fancy skills, no stress, just delicious results that look like you actually know what you’re doing. Now go impress someone—or yourself—with your new culinary (design) skills. You’ve earned it, you magnificent cake artist!


