So, you’ve baked a chocolate cake. High five! It probably smells amazing, and you’re already eyeing that first slice. But let’s be real, a plain chocolate cake, while delicious, can sometimes look a little… well, *brown*. Like a super tasty brown blob. And while we’re all for delicious blobs, sometimes we want to make it look like we actually *tried*, right? But without, you know, *trying too hard*. Welcome, my friend, to the lazy-genius guide to making your chocolate cake look like it came from a fancy bakery, but only you (and maybe your cat) know the truth: it took five minutes and zero stress. Let’s get decorating!
Why This Decoration Method is Awesome
Because it’s **idiot-proof**. Seriously. If I can do it without making a catastrophic mess, you absolutely can too. This isn’t about perfectly piped rosettes or intricate fondant work (shudders). This is about making a statement with minimal effort, maximum impact, and a whole lot of fun. It’s quick, uses stuff you probably already have or can grab from the corner shop, and makes your cake look like a million bucks. Plus, it’s a great way to hide any little imperfections your cake might have—shhh, that’s our secret!
Ingredients You’ll Need
Alright, “ingredients” might be a strong word, as most of these are more like “fun enhancers.”
- 1 Cooled Chocolate Cake: Yes, it HAS to be cool. We’re not making frosting soup here.
- 1 Tub of Store-Bought Chocolate Frosting: Or vanilla, or cream cheese, whatever floats your boat! (Because who has time for homemade frosting on a lazy day? Not us.)
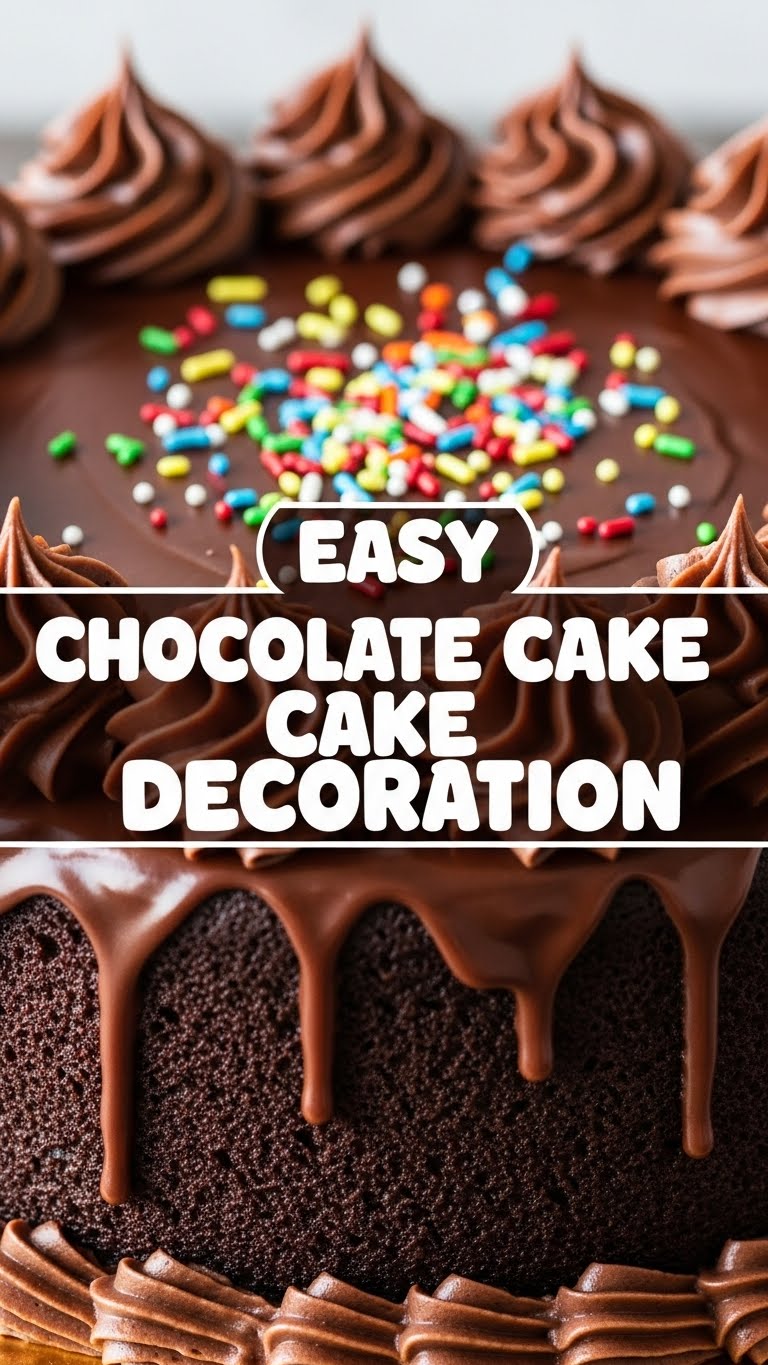
- Sprinkles, Sprinkles, and More Sprinkles: The more colorful, the better. Jimmies, nonpareils, confetti – go wild!
- A Dusting of Powdered Sugar: For that “I’m fancy but don’t care” vibe.
- Fresh Berries: Think strawberries, raspberries, blueberries. They add a pop of color and a hint of health (ish).
- Chocolate Shavings or Mini Chocolate Chips: Because, more chocolate. Duh.
- Optional: Candy Bar Bits or Mini Candies: Snickers, Kit Kats, M&M’s – whatever you secretly want to snack on.
Step-by-Step Instructions
- First, the Base Layer: Grab that tub of frosting and slather it all over your cooled cake. Don’t stress about perfection; this is not a Michelin star restaurant. A simple kitchen knife, an offset spatula (if you’re feeling fancy), or even the back of a spoon works wonders. Just get an even-ish layer all around.
- Sprinkle Time! This is where the magic happens. Hold your cake over a plate (to catch the inevitable overflow) and go to town with your sprinkles. Shower them everywhere! Sides, top, middle—no spot is safe. Pro Tip: Press gently on the sides to make sure they stick.
- The Elegant Dusting: Get a small sieve or a fine-mesh strainer. Put a spoonful or two of powdered sugar in it and gently tap it over the top of your cake. You want a light, snowy dusting, not a thick blanket. This adds a touch of “I know what I’m doing.”
- Berry Bling: Arrange your fresh berries artfully on top. Maybe in a circle around the edge, or piled casually in the center. The contrast of red/blue against the brown and sprinkles is just *chef’s kiss*.
- Chocolatey Goodness: Scatter your chocolate shavings or mini chocolate chips around the berries, or anywhere you feel needs a little extra chocolatey flair. Because, again, more chocolate is always the answer.
- Candy Crush (Optional): If you’re using candy bar bits or mini candies, sprinkle them on now. This is a great way to add extra texture and a burst of unexpected flavor. Your cake is basically a party now!
Common Mistakes to Avoid
- Attempting to Frost a Warm Cake: Rookie mistake! Your frosting will melt into a sad, gooey mess. Be patient, my friend. Chill your cake completely.
- Overthinking It: This isn’t brain surgery. It’s cake decoration. Don’t spend an hour moving a single sprinkle. Embrace the chaos, it’s part of the charm.
- Using Too Much Frosting at Once: You want a nice, even layer, not a frosting avalanche. Start with less and add more if needed. Less mess, IMO.
- Not Having Fun: Seriously, this is the biggest mistake. Blast some tunes, maybe pour a little something extra in your drink, and just enjoy the process. It’s cake!
Alternatives & Substitutions
Ran out of something? **Don’t panic!** We’re all about resourcefulness here.
- No Sprinkles? Crush up some Oreos, chocolate chip cookies, or even some nuts (almonds, walnuts) for a textural topping.
- No Fresh Berries? A handful of chocolate chips, dried cranberries, or even some thinly sliced banana (if serving immediately!) will do the trick. Maraschino cherries? Why not!
- No Powdered Sugar? Skip it! The sprinkles and berries will carry the show just fine. Or, if you have cocoa powder, a light dusting of that can also look super elegant.
- No Fancy Spatula? A butter knife, the back of a spoon, or even a flexible plastic card (clean it first, obviously!) can spread frosting in a pinch.
- Not a fan of chocolate frosting? Use vanilla, cream cheese, peanut butter frosting—whatever makes your taste buds sing.
FAQ (Frequently Asked Questions)
- Do I *really* need an offset spatula? Nah, honey, you don’t *need* anything fancy. A good old butter knife works perfectly well. An offset spatula just makes you feel like you’re on a cooking show, FYI.
- My cake is a bit lopsided, will this hide it? Absolutely! Pile on the frosting, heap on the sprinkles, arrange the berries strategically. It’s called “rustic charm” and you’re owning it!
- Can I use whipped cream instead of frosting? For sure! Just remember whipped cream is a bit more delicate, so decorate closer to serving time and keep it chilled. It tends to melt and get sad if left out too long.
- How do I store my beautifully decorated cake? If you used fresh berries or whipped cream, pop it in an airtight container in the fridge. If it’s just frosting and sprinkles, it’s usually fine at room temp for a couple of days, covered. Or, you know, just eat it all immediately.
- Can kids help with this? Oh my gosh, YES! This is peak kid-friendly decorating. Give them their own little section of the cake or their own mini cupcake to go wild on. Embrace the mess, it’s worth the smiles.
- What if I only have one type of sprinkle? One type is still a million times better than no sprinkles! Don’t let perfection be the enemy of fun.
Final Thoughts
See? That wasn’t so hard, was it? You just transformed a humble chocolate cake into a showstopper with minimal effort and maximum personality. You’re basically a culinary wizard now, wielding sprinkles and berries like magic wands. Now go impress someone—or yourself—with your new cake decorating prowess. You’ve earned it! And remember, the best decoration is the one you had fun making (and that tastes delicious, obviously).


