So, you’re looking for something that screams “I tried… but also, I really didn’t try *that* hard” in the best way possible? You’ve come to the right place, friend. Because today, we’re whipping up an Easy Cheese Ball that’s so ridiculously simple, you’ll wonder why you ever bought one. And let’s be real, you probably just want an excuse to eat cheese with a spoon, and I’m here to enable that. Welcome to your new favorite party trick (or Tuesday night snack, no judgment here!).
Why This Recipe is Awesome
Listen, some recipes demand your blood, sweat, and tears. This one? It asks for like, ten minutes of your time and minimal brain power. Seriously, if you can open a package and stir, you can make this cheese ball. **It’s practically idiot-proof.** Even I, a person who once set off a smoke alarm making toast (don’t ask), have mastered this gem. It’s creamy, it’s savory, it’s endlessly customizable, and it’s guaranteed to be a hit. Plus, it looks fancy, which means you get all the credit without any of the culinary struggle. Winning!
Ingredients You’ll Need
Gather ’round, buttercups! Here’s the line-up for your cheesy masterpiece:
- **Cream Cheese:** Two 8-ounce packages, softened. Seriously, softened. Don’t even *think* about trying this with cold cream cheese unless you enjoy a good arm workout and lumpy cheese.
- **Shredded Cheddar Cheese:** About 2 cups, sharp or mild, your call! The sharper, the more “zing” your ball will have.
- **Green Onions:** 2-3 stalks, thinly sliced. Adds a lovely, mild oniony kick and some pretty green flecks.
- **Worcestershire Sauce:** 1 teaspoon. Don’t skip this! It’s the secret umami whisperer that makes everything better.
- **Garlic Powder:** 1/2 teaspoon. Because everything is better with a little garlic, right?
- **Salt & Black Pepper:** To taste. Start small, you can always add more.
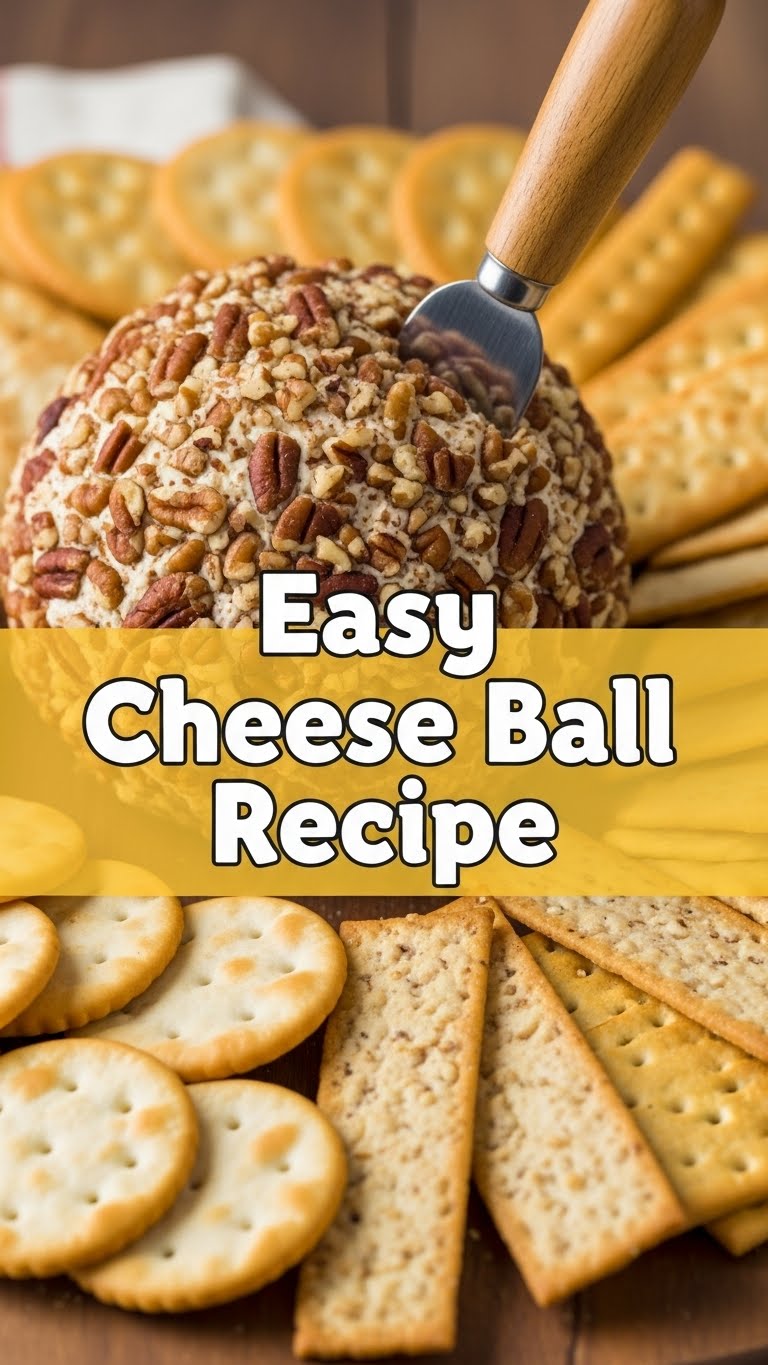
- **Your Favorite Topping:** (Optional, but highly encouraged!) Think chopped pecans, walnuts, crispy bacon bits, or even more chopped green onions.
Step-by-Step Instructions
Alright, put on your metaphorical chef’s hat (or just make sure your hands are clean) because this is where the magic happens. And by magic, I mean mixing stuff in a bowl.
- **Soften Up:** Make sure your cream cheese is nice and soft. Take it out of the fridge about an hour before you start, or zap it in the microwave for 10-15 seconds if you’re impatient (like me).
- **Combine the Good Stuff:** In a medium-sized bowl, plop in your softened cream cheese, shredded cheddar, sliced green onions, Worcestershire sauce, and garlic powder.
- **Mix It Like You Mean It:** Grab a sturdy spoon or a rubber spatula and mix everything together until it’s well combined. You want it smooth and uniform. No chunky bits of unmixed cream cheese, please! Add salt and pepper to your liking.
- **Shape Your Masterpiece:** Now for the fun part! Scrape the mixture onto a piece of plastic wrap. Use the wrap to help you form the cheese mixture into a nice, tight ball. Think of it as sculpting, but with cheese.
- **Chill Out:** Wrap your cheese ball snugly in the plastic wrap and pop it in the fridge for at least 1 hour. **This step is crucial!** It helps the ball firm up and makes it easier to handle and serve. Overnight is even better if you can swing it.
- **Roll in the Glam:** Just before serving, unwrap your chilled cheese ball. If you’re using a topping like nuts or bacon bits, gently roll the ball in them until it’s fully coated. Press them on a bit to make sure they stick.
- **Serve and Conquer:** Place your magnificent cheese ball on a platter surrounded by crackers, pretzel crisps, veggie sticks, or whatever dippable delights your heart desires. Prepare for compliments!
Common Mistakes to Avoid
Even though this recipe is basically a cheat code for entertaining, there are a couple of pitfalls even the most seasoned (pun intended!) home cooks might encounter. Let’s steer clear, shall we?
- **The Cold Cream Cheese Conundrum:** Trying to mix rock-hard cream cheese? You’ll end up with lumpy cheese and a sore wrist. **Always use softened cream cheese.** You’ve been warned!
- **Over-Mixing Syndrome:** While you want it combined, don’t go crazy. Over-mixing can sometimes make the cheese ball a bit too “airy” or crumbly. Mix until just combined, then stop.
- **Skipping the Chill:** Impatience is a virtue sometimes, but not with cheese balls. If you don’t chill it, your beautiful ball will be a sad, shapeless blob. **Chilling helps it firm up and hold its shape perfectly.**
- **Forgetting the Flavor Boosters:** Worcestershire and garlic powder might seem small, but they add depth. Don’t leave them out unless you want a blander cheese experience.
Alternatives & Substitutions
Feeling creative? This cheese ball is your canvas! Go wild (within reason, obvi).
- **Cheese Swaps:** Instead of all cheddar, try a mix! Smoked gouda, Monterey Jack, colby, or even a bit of blue cheese for a tangier kick. Just make sure they shred well.
- **Herb Power:** Add some fresh chopped chives, parsley, or even a tiny pinch of dried dill for extra fresh flavor.
- **Spice It Up:** A dash of cayenne pepper, a pinch of red pepper flakes, or a tiny bit of smoked paprika can add a nice warmth and kick.
- **Topping Transformations:** Beyond nuts and bacon, consider finely chopped sun-dried tomatoes, a mix of everything bagel seasoning, crushed pretzels, or even a sweet-savory combo like finely diced dried cranberries. IMO, pecans are king, but don’t let me stop you!
- **Lighter Option:** You can totally use light cream cheese and low-fat cheddar. It might be a *smidge* less decadent, but still delicious.
FAQ (Frequently Asked Questions)
Got questions? I’ve got answers. Probably. Let’s dive into the common curiosities!
- **Can I make this ahead of time?** Absolutely! **This cheese ball is a superstar for make-ahead convenience.** You can prep it up to 3-4 days in advance and keep it wrapped in the fridge. Just add the outer coating (nuts, etc.) right before serving.
- **What if I don’t have green onions?** No worries! Finely minced chives are a great substitute. A tiny bit of very finely minced red onion could work too, but use sparingly, as it’s stronger.
- **How long does a cheese ball last?** Stored properly in an airtight container in the fridge, it’s good for about a week. But honestly, it rarely lasts that long, does it?
- **Can I freeze a cheese ball?** Yep! Wrap it super tightly in plastic wrap, then again in foil, and it’ll keep in the freezer for about a month. Thaw it in the fridge overnight before serving. **FYI, it’s best to add the topping after thawing.**
- **What should I serve it with?** Crackers (butter, wheat, water, everything!), pretzel crisps, pita chips, crostini, carrot sticks, celery sticks, bell pepper strips, apple slices… the possibilities are endless!
- **My cheese ball is too soft, help!** Did you chill it long enough? If it’s still too soft after chilling, it might be too warm, or perhaps you added a bit too much liquid somewhere. Pop it back in the fridge for a good long rest.
Final Thoughts
And there you have it! Your ticket to cheesy, effortless deliciousness. This easy cheese ball recipe is your secret weapon for potlucks, parties, or just a Tuesday night craving. It’s proof that amazing flavor doesn’t have to come with a side of stress. Now go impress someone—or yourself—with your new culinary skills. You’ve earned it!


