So you’re craving something impressive, comforting, and seriously delicious, but also want to accomplish it with minimal fuss and maximum flavor, right? Same, friend, same. We’re talking about that magical moment when you open your oven, and the aroma alone makes you feel like a culinary wizard. And guess what? It all happens in one glorious pot. Enter: the Dutch oven whole chicken. Your weeknight dinner hero, your lazy Sunday savior.
Why This Recipe is Awesome
Okay, let’s be real. Cooking a whole chicken can sound intimidating. But not this one, oh no. This recipe is so ridiculously easy, it practically cooks itself while you’re binging your favorite show. You pop it in, let your trusty Dutch oven work its magic, and come back to a perfectly juicy, tender chicken with crispy skin that’ll make you question if you actually did anything at all. **It’s idiot-proof, even I didn’t mess it up**, which is really saying something. Plus, one pot means less washing up, and that, my friends, is a win in my book.
Ingredients You’ll Need
Get ready for a short but mighty list. These simple ingredients transform into pure magic. Don’t worry, you probably have most of this stuff lurking in your pantry already.
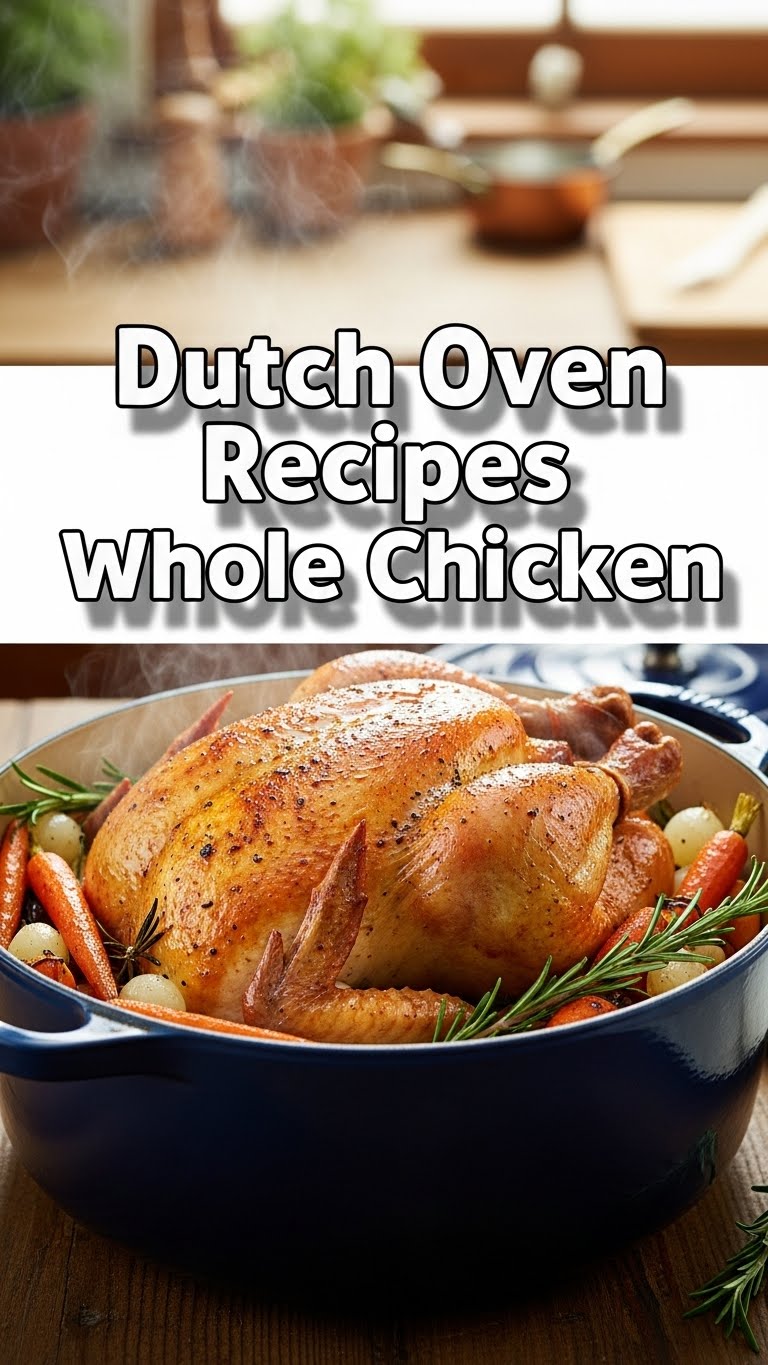
- 1 Whole Chicken (3-4 lbs): The star of our show. Make sure it’s thawed, obvs.
- 4 Tbsp Unsalted Butter: Softened. Don’t even think about margarine here. Your soul deserves better.
- 1 Lemon: Halved. Because everything is better with a little zest (and juice!).
- 1 Head Garlic: Smashed and peeled cloves. Embrace the garlic breath; it’s worth it.
- 1 Onion: Quartered. It adds flavor and a nice little “bed” for our bird.
- Fresh Herbs (e.g., Rosemary, Thyme): A few sprigs of each. For that fancy, aromatic touch.
- 1 Tbsp Paprika: Smoked if you’re feeling extra fancy.
- 1 Tsp Onion Powder: For an extra kick of savory goodness.
- Salt & Freshly Ground Black Pepper: To taste, but don’t be shy. Seasoning is key!
- Optional: Root Vegetables (e.g., Carrots, Potatoes): Chopped into chunks. Throw ’em in the pot for a complete meal.
Step-by-Step Instructions
Right, apron on, spirit lifted. Let’s get this chicken cooking!
- Prep Your Bird: First things first, take your chicken out of the fridge about 30 minutes before you start. Pat it super, super dry with paper towels. Seriously, **dry chicken = crispy skin**, and we’re all about that life.
- Preheat & Butter Up: Preheat your oven to a glorious 425°F (220°C). While it’s heating, grab your softened butter. In a small bowl, mix it with the paprika, onion powder, salt, and pepper. This is your flavor paste!
- Stuff It Good: Now for the fun part. Stuff the cavity of your chicken with the lemon halves, garlic cloves, onion quarters, and herb sprigs. This infuses flavor from the inside out.
- Massage That Bird: Take your butter-spice mixture and rub it all over the chicken, under the skin, and on top. Don’t be shy; give it a good massage. Get into all the nooks and crannies.
- Veggie Bed (Optional but Recommended): If you’re using root veggies, toss them with a little olive oil, salt, and pepper. Spread them out in the bottom of your Dutch oven. They’ll soak up all those delicious chicken juices.
- Into the Pot: Place the buttered-up chicken directly on top of the veggies in your Dutch oven (or directly in the pot if no veggies). Cover it tightly with the lid.
- Roast Away: Pop that beautiful bird into your preheated oven. Roast for 60-70 minutes with the lid on.
- Crisp It Up: After the initial roasting time, remove the lid. Let it cook for another 20-30 minutes, or until the skin is beautifully golden brown and crispy. The internal temperature should reach 165°F (74°C) in the thickest part of the thigh without touching the bone.
- Rest, Then Devour: This is crucial! Take the Dutch oven out of the oven, transfer the chicken to a cutting board, and **tent it loosely with foil for 10-15 minutes**. This allows the juices to redistribute, ensuring a super moist chicken. Then, carve and serve.
Common Mistakes to Avoid
Even though this recipe is practically foolproof, there are a few rookie errors that can stand between you and chicken nirvana. Let’s make sure you don’t fall victim:
- Not Patting Dry: Seriously, I can’t stress this enough. A wet chicken will steam, not crisp. And nobody wants flabby skin.
- Forgetting to Season Properly: Chicken without enough salt is like a joke without a punchline. Boring. **Don’t skimp on the seasoning!**
- Not Resting the Chicken: You’ve waited this long, what’s another 10 minutes? Cutting into it too soon means all those precious juices will run out, leaving you with dry meat. Tragic, really.
- Overcrowding the Pot (if using veggies): If you stuff too many veggies in, they’ll steam instead of roast nicely. Give everything some breathing room.
Alternatives & Substitutions
Feeling adventurous? Or maybe you just ran out of rosemary? No stress, here are some ideas:
- Herbs: No fresh rosemary or thyme? Dried works in a pinch, or try sage, oregano, or even a bay leaf or two in the cavity.
- Spices: Swap paprika for smoked paprika (highly recommended!) or add a pinch of garlic powder, dried oregano, or even a touch of chili powder for a kick.
- Citrus: No lemon? An orange half can also work inside the cavity for a different, slightly sweeter aroma.
- Veggies: Beyond carrots and potatoes, consider parsnips, sweet potatoes, bell peppers, or even brussels sprouts tossed in the bottom.
FAQ (Frequently Asked Questions)
Got questions? I’ve got answers (and maybe a little sass).
- Do I really need a Dutch oven? Well, this recipe is specifically for a Dutch oven, so yes, kinda! It excels at even heat distribution and locking in moisture. You *can* use a heavy-bottomed roasting pan with a lid, but the results might not be *quite* as magical.
- Can I truss the chicken? You can, but it’s not strictly necessary for this recipe. Trussing (tying the legs together) helps it cook more evenly and keeps it compact, but the Dutch oven generally handles that pretty well. So, **IMO, skip it for an easier life.**
- My chicken isn’t crispy enough, help! Did you pat it dry? Did you remove the lid for the last 20-30 minutes? Also, try a slightly higher temperature or an extra 10 minutes with the lid off next time.
- What if my chicken is bigger/smaller than 4 lbs? Adjust cooking time accordingly. A good rule of thumb is about 20 minutes per pound at 400°F (or slightly less at 425°F), plus 15-20 minutes extra for browning. Always use a meat thermometer!
- Can I make gravy from the pan drippings? Absolutely! Pour the drippings into a saucepan, skim off excess fat, and thicken with a cornstarch slurry or roux. Add a splash of broth if needed. It’s liquid gold!
- Why is resting so important? It looks done! Resting allows the muscle fibers to relax and reabsorb all those beautiful juices. If you cut it immediately, the juices will rush out, leaving you with a drier bird. **Patience, grasshopper!**
Final Thoughts
So there you have it, folks! Your new favorite way to cook a whole chicken with minimal fuss and maximum payoff. You’ve just created a masterpiece, a culinary hug in a pot, all thanks to your trusty Dutch oven and your newfound (or newly reinforced) cooking prowess. Now go impress someone – or just yourself – with your skills. You’ve earned it! Seriously, go forth and conquer those dinner cravings. And maybe send me a slice?


