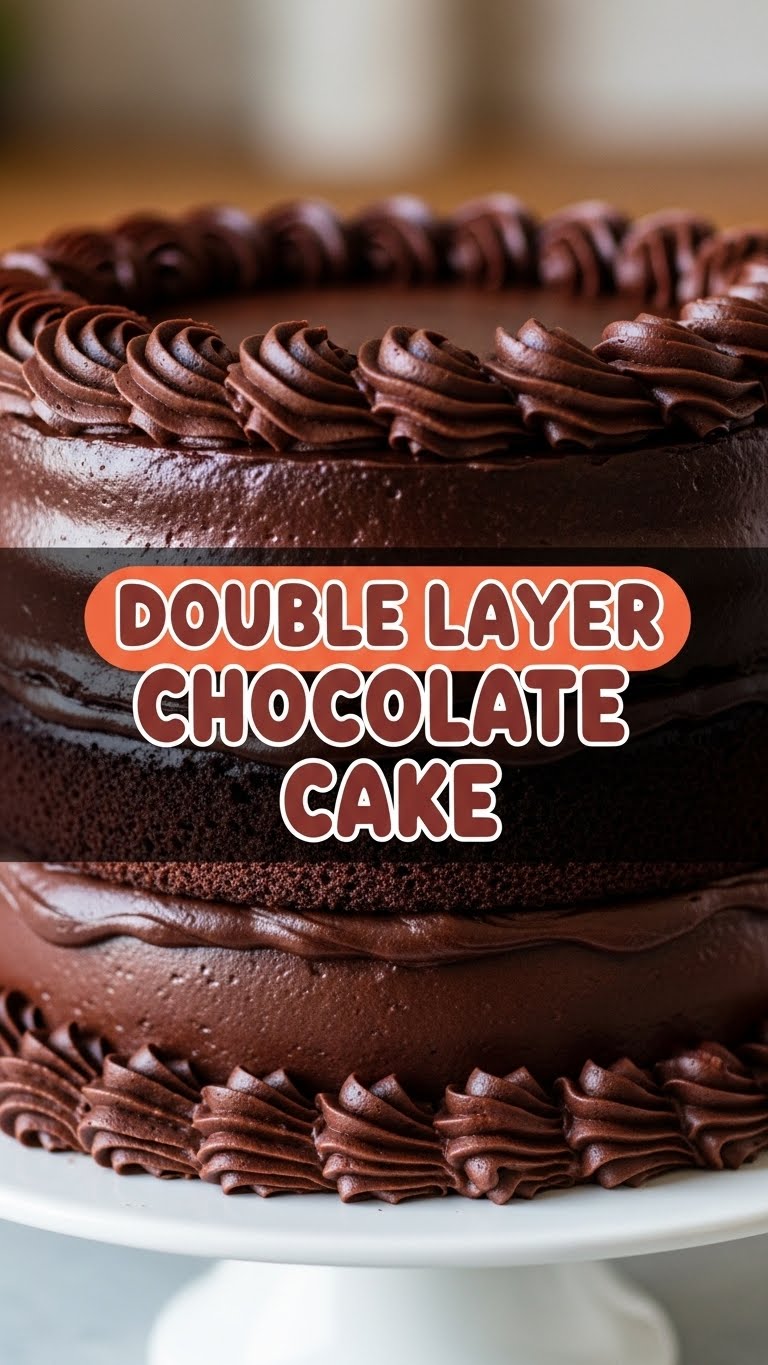
So you’re craving something tasty but too lazy to spend forever in the kitchen, huh? Same. High five! Today, we’re not just making a cake; we’re crafting a legend. A Double Layer Chocolate Cake that’ll make you feel like a five-star pastry chef without needing actual culinary school or, you know, effort. Get ready to bake something so good, your taste buds might send you a thank-you note.
Why This Recipe is Awesome
Listen up, buttercup. This isn’t just *any* chocolate cake recipe. This is THE chocolate cake recipe for when you want maximum deliciousness with minimum fuss. Why is it so awesome, you ask? Well, for starters, it’s pretty much **idiot-proof**. And I say that with love, knowing full well I’ve turned brownies into hockey pucks more times than I care to admit. If I can do it, you can too.
Secondly, it tastes like a warm hug from a chocolate angel. Seriously, it’s moist, rich, and ridiculously chocolatey, making it perfect for any occasion (or, let’s be real, a Tuesday night). Plus, it looks super impressive, making everyone think you actually tried hard. And who doesn’t love looking like a baking genius without, you know, all the genius part?
Ingredients You’ll Need
Gather ’round, my sweet-toothed companions! Here’s your shopping list. Try not to eat half of the chocolate chips before they make it into the batter. (No judgment, just a friendly warning.)
- For the Cake:
- 1 ¾ cups (210g) all-purpose flour (The white stuff. Not sugar. Double check, it happens.)
- 1 ¾ cups (350g) granulated sugar (Yes, that much. It’s cake, not health food.)
- ¾ cup (65g) unsweetened cocoa powder (The dark magic that makes it chocolatey!)
- 1 ½ teaspoons baking soda (For that fluffy rise, baby.)
- 1 ½ teaspoons baking powder (Its equally important sibling.)
- 1 teaspoon salt (Don’t skip this! It makes everything taste *more*.)
- 2 large eggs (Room temp if you can remember, but not the end of the world if you don’t.)
- 1 cup (240ml) buttermilk (Or our little DIY trick below!)
- ½ cup (120ml) vegetable oil (Or any neutral oil you have lurking.)
- 2 teaspoons vanilla extract (Liquid gold for bakers.)
- 1 cup (240ml) hot brewed coffee (Don’t worry, it won’t taste like coffee, just makes the chocolate sing! Trust me.)
- For the Chocolate Buttercream Frosting:
- 1 cup (226g) unsalted butter, softened (Because everything’s better with butter, duh.)
- 3 ½ cups (420g) powdered sugar (Also known as confectioners’ sugar. It’s what makes frosting, well, frosting!)
- ¾ cup (65g) unsweetened cocoa powder (More chocolate, because why not?)
- ½ teaspoon salt (Again, for balance!)
- 2 teaspoons vanilla extract (Hello again, old friend.)
- ¼ cup (60ml) heavy cream or milk (To get that perfect creamy consistency.)
Step-by-Step Instructions
Okay, apron on, game face ready! Let’s get baking. You’ve got this.
- Get Your Oven Warm & Ready: Preheat your oven to 350°F (175°C). Seriously, preheat it. Your oven needs a warm-up, just like you before a dance party. Grease and flour two 8-inch round cake pans. Or line with parchment paper circles if you’re feeling fancy.
- Whisk the Dry Stuff: In a large mixing bowl, whisk together the flour, sugar, cocoa powder, baking soda, baking powder, and salt. Give it a good whisk until everything is super combined. No lumps allowed!
- Add the Wet Wonders: In a separate medium bowl, whisk together the eggs, buttermilk, oil, and vanilla extract.
- Combine & Conquer: Pour the wet ingredients into the dry ingredients. Mix on low speed with an electric mixer (or by hand, if you’re feeling strong) until *just* combined. Don’t overmix! We’re making cake, not bread dough.
- The Secret Ingredient: Slowly pour in the hot coffee and mix until the batter is smooth. It’ll be thin, but that’s what we want! It’s the secret to an incredibly moist cake.
- Divide & Bake: Divide the batter evenly between your two prepared cake pans. Pop them into the preheated oven for 30-35 minutes, or until a toothpick inserted into the center comes out clean.
- Cool Down, Buttercup: Let the cakes cool in the pans for about 10-15 minutes. Then, carefully invert them onto a wire rack to cool completely. **This is crucial! Don’t rush it.** A warm cake will melt your beautiful frosting into a sad puddle.
- Time for Frosting Magic: While the cakes are cooling, let’s make that dreamy buttercream. In a large bowl, beat the softened butter on medium speed until creamy (about 2 minutes).
- Build the Buttercream: Gradually add the powdered sugar, cocoa powder, and salt, mixing on low speed until combined. Then add the vanilla extract and heavy cream (or milk). Beat on medium-high speed for another 2-3 minutes until light, fluffy, and utterly irresistible.
- Assemble Your Masterpiece: Once the cakes are completely cool, place one layer on your serving plate. Spread about a third of the frosting evenly over the top. Place the second cake layer on top and frost the top and sides of the entire cake with the remaining buttercream.
- Admire & Devour: Step back. Admire your creation. You just made a double-layer chocolate cake! Now, go on, cut yourself a slice. You’ve earned it!
Common Mistakes to Avoid
We all make mistakes, especially in the kitchen. But some are easily avoidable! Learn from my past kitchen fails, dear friend.
- Thinking you don’t need to preheat the oven. Rookie mistake! Your cake needs consistent heat from the start. Otherwise, it won’t rise properly and you’ll end up with dense sadness.
- Overmixing the batter. Treat your batter like a delicate flower, not a gym workout. Overmixing develops the gluten in the flour, leading to a tough, rubbery cake. Mix until *just* combined.
- Trying to frost a warm cake. I know, you’re excited. But seriously, don’t. Your beautiful buttercream will melt into a chocolate disaster, leaving you with a slumped cake and a sticky mess. Patience, young padawan!
- Eyeballing ingredients. Baking is more science than abstract art. While cooking allows for more flexibility, baking requires precision. Use measuring cups and spoons accurately!
- Skipping the coffee. “Oh, I don’t like coffee,” you say. Doesn’t matter! It deepens the chocolate flavor without making the cake taste like a latte. It’s a flavor enhancer, not a coffee substitute!
Alternatives & Substitutions
Life happens, ingredients run out. No worries, I’ve got your back with some easy fixes!
- No buttermilk? No problem! You can totally make your own. For 1 cup of buttermilk, measure 1 tablespoon of white vinegar or lemon juice into a liquid measuring cup, then fill the rest with regular milk (any kind works!). Stir, let it sit for 5 minutes (it’ll curdle slightly), and voilà! DIY buttermilk.
- Hate coffee? Okay, fine. You *can* use hot water instead of hot coffee. But IMO, the coffee really does elevate the chocolate flavor to another level. Just sayin’.
- Feeling lazy with the frosting? Hey, no shame in the game! Grab a tub of your favorite store-bought chocolate frosting. I won’t tell anyone. (But homemade is definitely worth it if you have the energy!)
- Want to jazz it up? Feel free to add some chocolate chips to the batter before baking for an extra chocolatey punch. Or sprinkle some sprinkles, chopped nuts, or even a dusting of cocoa powder on top for garnish.
FAQ (Frequently Asked Questions)
Got questions? I’ve got (casual, humorous) answers!
- Can I use margarine instead of butter? Well, technically yes, but why hurt your soul like that? Butter just tastes better, and it helps with the texture. Stick with butter for optimal deliciousness.
- What if I don’t have buttermilk? No worries, we covered that! Just whip up our little DIY version with milk and vinegar/lemon juice. Easy peasy!
- My cake is dry! What went wrong? Bummer! Usually, a dry cake is either overbaked (keep an eye on that toothpick test!) or you overmixed the batter (leading to toughness). Make sure you’re measuring your ingredients accurately too!
- Can I make this into cupcakes? Absolutely! Divide the batter into cupcake liners, filling them about two-thirds full. Bake for approximately 18-22 minutes, or until a toothpick comes out clean.
- How long does this cake keep? Covered tightly at room temperature, it’s usually good for 3-4 days. In the fridge, it’ll last a bit longer, up to a week. Just let it come to room temp before serving for the best texture.
- Can I freeze this cake? You bet! You can freeze unfrosted cake layers wrapped tightly in plastic wrap for up to 2-3 months. Or, you can freeze individual slices of the frosted cake. Just wrap them well!
Final Thoughts
And there you have it, folks! You’ve just created a masterpiece. A double layer chocolate cake that looks fancy, tastes incredible, and probably only took you a fraction of the time you thought it would. You’ve basically conquered Mount Everest, but with chocolate and significantly less frostbite. Pat yourself on the back, you magnificent baker, you!
Now go impress someone—or yourself—with your new culinary skills. You’ve earned it! Seriously, go grab a slice. You deserve every crumb. Happy baking (and eating)!

