So, you’ve stared into the abyss of your fridge, scrolled past a million sad-looking veggies, and all your brain can scream is “CHOCOLATE!”? Yeah, been there. And my friend, when that primal craving hits, you don’t just want chocolate, you want *double* chocolate. You want a towering, cloud-like, decadent masterpiece that makes you feel like a culinary wizard without actually, you know, being one. Enter the Double Chocolate Mousse Cake!
Why This Recipe is Awesome
First off, it looks like it took you days, but shhh, it’s our little secret. It’s the kind of dessert that gets you compliments and makes people ask for the “secret recipe” (you can tell them it’s magic, I won’t tell). Plus, two layers of mousse? Because one is just plain boring. This recipe is seriously easy; if I can whip this up without setting off the smoke alarm, you’re golden. It’s also impressive AF – prepare for endless praise. Best part? You don’t need a bunch of fancy equipment, just your trusty mixer and a fridge that works overtime.
Ingredients You’ll Need
- For the Base (or just buy a brownie mix, no judgment here):
- ½ cup all-purpose flour (your kitchen’s best friend)
- ¼ cup unsweetened cocoa powder (the dark stuff, for drama)
- ½ cup granulated sugar (the sweet stuff, duh)
- ½ tsp baking powder (to make things rise, like your confidence)
- ¼ tsp salt (just a pinch, don’t want it bland like your ex’s personality)
- 1 large egg (the binder, not the human kind)
- ¼ cup milk (any kind, oat if you’re feeling fancy)
- ¼ cup vegetable oil (or melted butter for extra oomph)
- ½ tsp vanilla extract (because everything needs a little vanilla)
- For the Mousse Layers (the real star!):
- 3 cups heavy cream (super cold, straight from the fridge – this is crucial!)
- 6 oz dark chocolate (70% cocoa or higher, for depth and intensity)
- 6 oz milk chocolate (or semi-sweet, for that perfect sweetness balance)
- ¼ cup powdered sugar (aka confectioners’ sugar, for smooth moves, divided)
- 1 tsp vanilla extract (again, because why not?)
Step-by-Step Instructions
Prep Time! Preheat your oven to 350°F (175°C). Grab an 8-inch springform pan, grease and flour it like you’re prepping for a photoshoot. For extra peace of mind, line the bottom with parchment paper.
Brownie Base Boogie: In a large bowl, whisk together your flour, cocoa powder, sugar, baking powder, and salt. In a separate bowl, combine the egg, milk, oil, and vanilla. Pour the wet ingredients into the dry, then mix until *just* combined – don’t overmix, unless you’re secretly aiming for a hockey puck.
Bake It Off: Pour that luscious batter into your prepared pan. Bake for 20-25 minutes, or until a toothpick inserted into the center comes out with moist crumbs. Let it cool completely in the pan. Once cool, carefully remove the cake base and give your springform pan a quick wash. Pop the cooled base back into the clean springform pan – this is key for assembly!
Dark Chocolate Dream: Break your dark chocolate into small, meltable pieces. Melt it gently either in a microwave (use short bursts, stirring often) or over a double boiler. Let it cool slightly, but make sure it stays melted and wonderfully smooth.
Whip It Good (Part 1): In a *chilled* bowl, whip about 1½ cups of your heavy cream until soft peaks form. Add half of your powdered sugar (about 2 tablespoons) and ½ teaspoon of vanilla, then whip until you get medium-stiff peaks. Don’t go overboard; we’re making mousse, not butter.
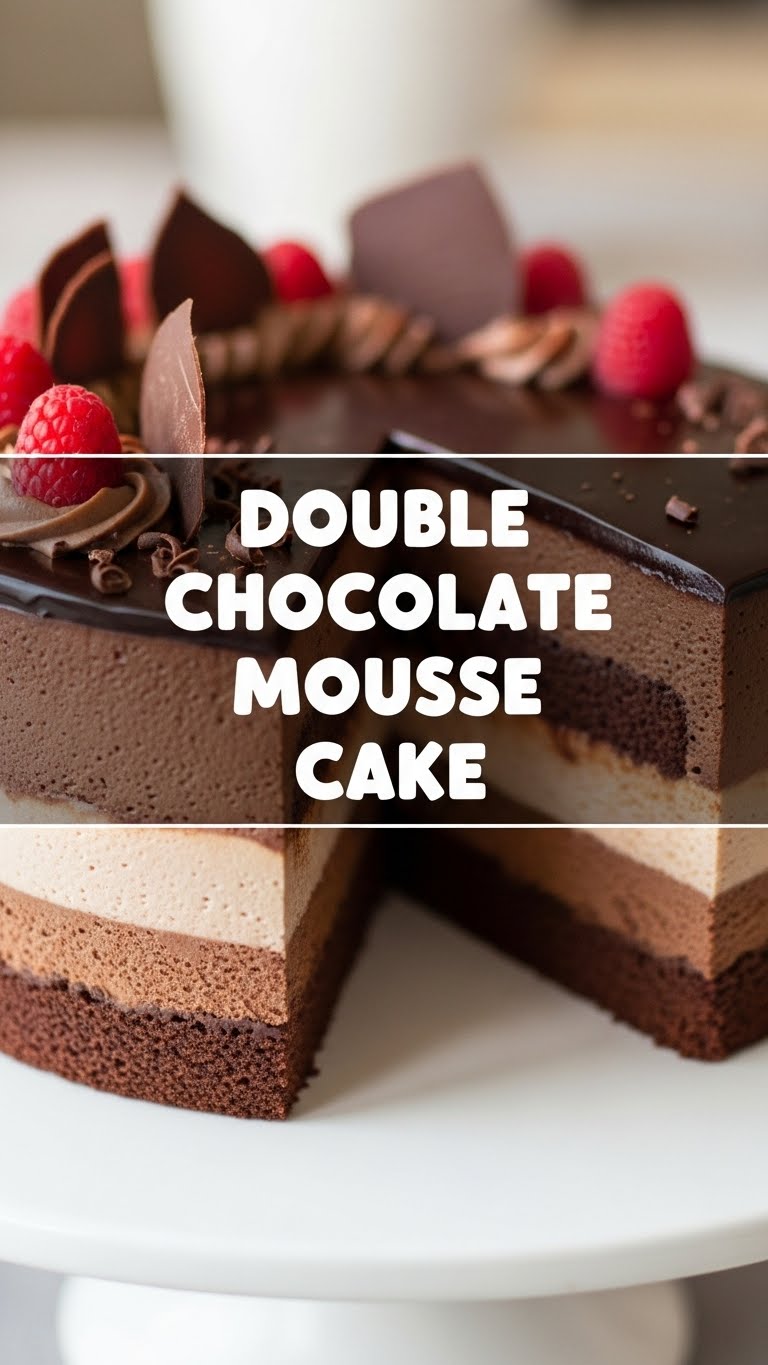
Fold It In: Gently fold the cooled, melted dark chocolate into your whipped cream until it’s just combined and no streaks remain. Be super gentle to keep that airy volume! Pour this dark mousse mixture over your brownie base in the springform pan. Smooth the top and pop it in the fridge for at least 30 minutes to firm up.
Milk Chocolate Magic: Repeat steps 4, 5, and 6 with your milk chocolate, the remaining 1½ cups heavy cream, the other half of the powdered sugar, and the remaining ½ teaspoon of vanilla. Once this lighter, sweeter milk chocolate mousse is ready, gently pour it over the chilled dark chocolate layer.
The Waiting Game (the hardest part, IMO): Cover the cake loosely and chill for at least 4 hours, or ideally, overnight. Patience, my friend, is a virtue, especially when mousse is involved.
Release the Beast: Once firm, carefully run a thin knife around the edge of the pan before releasing the springform. Decorate with chocolate shavings, a dusting of cocoa powder, or some fresh berries if you’re feeling extra fancy. Slice and devour!
Common Mistakes to Avoid
- Warm Cream Calamity: Trying to whip warm heavy cream is like trying to nail jelly to a tree. Use super cold cream and a chilled bowl for best results. No shortcuts here!
- Overmixing the Batter: Unless you’re aiming for a dense, rubbery cake, stop mixing your cake batter as soon as the streaks of flour disappear. Less is more.
- Hot Chocolate Hazard: Adding piping hot melted chocolate to your beautifully whipped cream will give you chocolate milk, not mousse. Let it cool down a bit – room temperature is your sweet spot.
- Impatience is Not a Virtue Here: Don’t even *think* about unmolding that cake before it’s thoroughly chilled. You’ll end up with a chocolate puddle, not a masterpiece. Trust the process!
- “Just a Little More Whipping” Syndrome: Over-whipping your cream turns it grainy, then buttery. Stop when it’s just stiff enough to hold its shape. A little wobble is fine!
Alternatives & Substitutions
- Chocolate Choice: Feel free to mix up your chocolates! Use all dark, all milk, or even white chocolate for one layer (though “double chocolate” purists might judge). A touch of espresso powder added to the dark chocolate layer really amps up the chocolate flavor!
- Base Options: Not feeling the brownie base? Use a crushed Oreo crust mixed with melted butter for a super easy (and delicious) no-bake option. Or, simply omit the base for a truly light, flourless mousse cake. You do you!
- Flavor Boosters: A splash of coffee liqueur (like Kahlua) or a hint of mint extract in one of the mousse layers can be a game-changer. Just keep it on the down-low from the kiddos.
- Dairy-Free? You *can* make this dairy-free with well-chilled full-fat coconut cream (chilled overnight!) and dairy-free chocolate, but the texture might be slightly different. Still yummy, though!
FAQ (Frequently Asked Questions)
- Can I make this ahead of time? Absolutely! This cake actually tastes better the next day, so go ahead and make it 1-2 days in advance. Future you will thank past you.
- My mousse isn’t setting, what did I do wrong? Uh oh! Did your chocolate cool enough? Was your cream super cold and whipped stiffly? Or did you try to unmold it after only 30 minutes? Chill, chill, chill! If all else fails, serve it in pretty glasses and call it “deconstructed chocolate trifle.”
- Can I use chocolate chips instead of bars? Technically yes, but chocolate chips often have stabilizers that make them melt differently and can result in a grainier mousse. IMO, proper chocolate bars give a smoother, silkier result. Treat yourself!
- What if I don’t have a springform pan? You can use a regular cake pan lined with parchment paper that overhangs the sides (to lift it out). Or, skip the base and layer the mousse in individual dessert glasses for cute, easy servings.
- How long does it last? Stored in the fridge, it’s generally good for 3-4 days. But let’s be real, it usually doesn’t last that long!
- Can I freeze it? You bet! Slice individual portions and freeze them for up to a month. Just let them thaw in the fridge for a few hours before indulging. It’s like finding a hidden treasure!
Final Thoughts
So there you have it, chief! Your very own, ridiculously impressive Double Chocolate Mousse Cake. You’ve conquered the chocolate mountain, tamed the springform pan, and now you have a dessert that screams “I’m fancy and I know things!” without actually, you know, being a professional baker. Now go forth and impress your significant other, your friends, or just yourself (you deserve it!). Take a pic, do a happy dance, and maybe, just maybe, share a slice. You earned those bragging rights!


