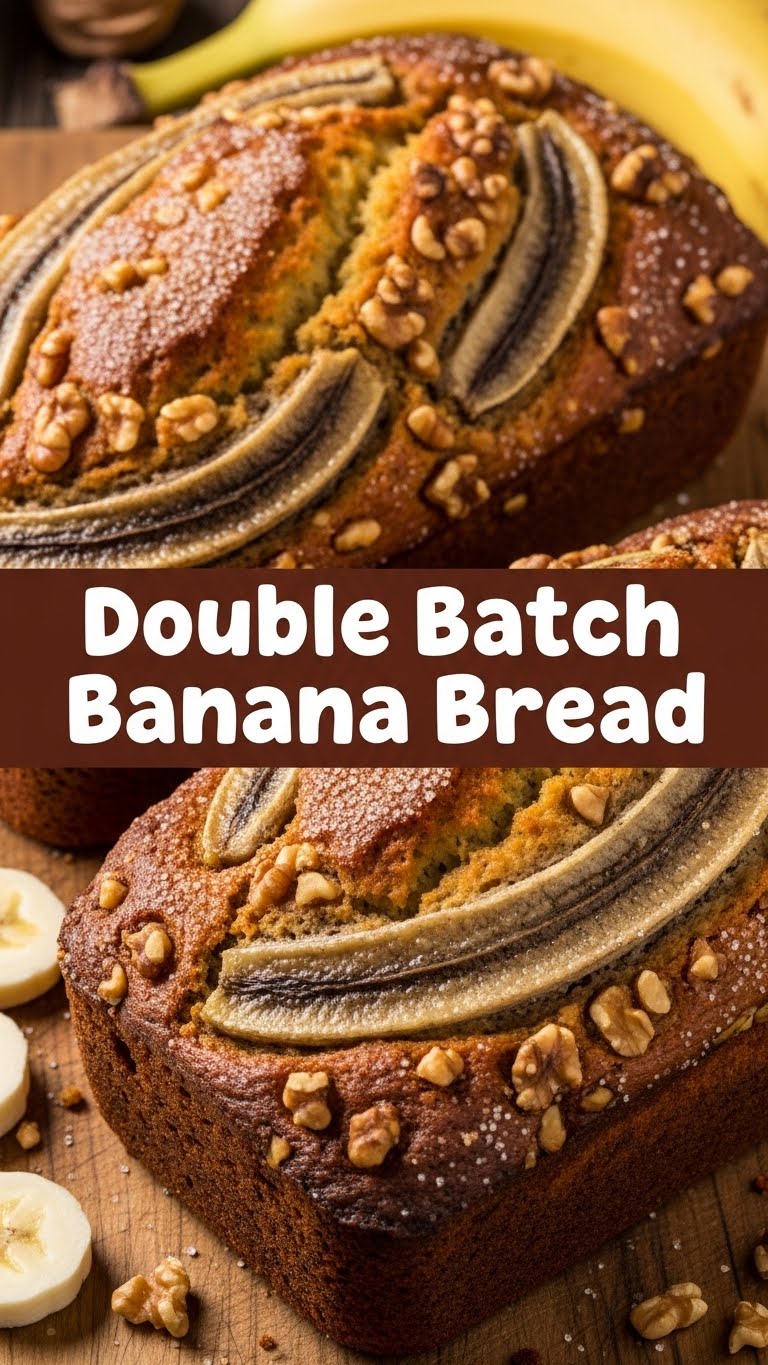
So you’ve got a pile of ridiculously ripe bananas glaring at you from the counter, practically begging for their sweet, squishy destiny, right? And you’re thinking, “One loaf? Pfft. That’ll last five minutes.” My friend, I feel you. That’s why we’re not just making banana bread today; we’re going full-throttle, double-batch style! Get ready for twice the deliciousness with barely any extra effort. Because, frankly, who has time to bake twice in one week? Not me, not you. Let’s do this!
Why This Recipe is Awesome
Okay, let’s be real. This isn’t just a recipe; it’s a life hack. Why is it awesome? First off, it’s **double the banana bread**! Think about it: one for now (or, let’s be honest, for breakfast, lunch, and dinner), and one for later (hello, freezer stash!) or for that friend who *might* get lucky. Secondly, it’s pretty much **idiot-proof**. Seriously, even I haven’t managed to mess this up, and I’ve set off more smoke alarms than a faulty toaster. It’s simple, it’s forgiving, and the cleanup is minimal. Plus, the smell alone is worth the effort, IMO.
Ingredients You’ll Need
Gather your troops, folks! Here’s what you’ll need for two glorious loaves of banana goodness:
- **6-8 ridiculously ripe bananas:** We’re talking brown, spotty, almost-liquid gold. The riper, the sweeter. Don’t you dare touch those pretty yellow ones!
- **1 cup (2 sticks) unsalted butter:** Softened. None of that straight-from-the-fridge rock-hard stuff, unless you enjoy wrestling butter.
- **1 ¾ cups granulated sugar:** Sweetness is key, my friends.
- **4 large eggs:** Room temperature, please. They just mix better.
- **2 teaspoons vanilla extract:** The good stuff. It makes a difference.
- **2 teaspoons baking soda:** Essential for that fluffy rise.
- **1 teaspoon salt:** Balances all that sweetness. Don’t skip it!
- **3 ½ cups all-purpose flour:** The backbone of your bread.
- **Optional fun stuff (highly recommended):** 1-2 cups chocolate chips (because, duh) or chopped walnuts/pecans if you’re feeling fancy.
Step-by-Step Instructions
- **Prep for Glory:** First things first, **preheat your oven to 350°F (175°C)**. Then, lightly grease and flour two 9×5-inch loaf pans. Trust me, you don’t want your precious loaves sticking.
- **Mash Those ‘Nanas:** In a large bowl, mash your ripe bananas with a fork. You want some lumps for texture, but mostly squishy goodness. Set aside.
- **Cream it Up:** In another large bowl (or your stand mixer), cream together the softened butter and granulated sugar until light and fluffy. This usually takes 2-3 minutes.
- **Egg-cellent Addition:** Beat in the eggs, one at a time, making sure each is fully incorporated before adding the next. Then stir in the vanilla extract.
- **Dry Mix Magic:** In a separate medium bowl, whisk together the flour, baking soda, and salt. This ensures everything is evenly distributed.
- **Combine Forces:** Gradually add the dry ingredients to the wet ingredients, mixing on low speed until *just* combined. **Do not overmix!** A few streaks of flour are totally fine. Overmixing leads to tough bread, and nobody wants that.
- **Fold in the Fun:** Gently fold in your mashed bananas. If you’re adding chocolate chips or nuts, now’s the time! Fold them in until evenly distributed.
- **Divide and Conquer:** Divide the batter evenly between your two prepared loaf pans.
- **Bake Away!** Pop those beauties into your preheated oven. Bake for **55-70 minutes**, or until a wooden skewer inserted into the center of a loaf comes out clean.
- **Cool Down:** Let the loaves cool in the pans for about 10-15 minutes before inverting them onto a wire rack to cool completely. Or, you know, just slice into one when it’s still warm and gooey. I won’t tell.
Common Mistakes to Avoid
- **Using under-ripe bananas:** Rookie mistake! Green or yellow bananas don’t have the sugar content or the soft texture needed. Wait for those glorious brown spots!
- **Overmixing the batter:** This is probably the most common banana bread blunder. Once you add the flour, mix only until *just* combined. **Lumpy batter is happy batter.**
- **Forgetting to preheat the oven:** Your bread needs that immediate heat to rise properly. Don’t rush it!
- **Opening the oven door too early:** Patience, young padawan! Resist the urge to peek before at least 45-50 minutes have passed. You’ll make your bread collapse.
- **Not greasing and flouring the pans properly:** Nothing is sadder than a perfectly baked loaf stuck forever to its pan.
Alternatives & Substitutions
Feeling a bit adventurous, or maybe just out of butter? No worries, we’ve got options!
- **Butter vs. Oil:** You can swap the butter for an equal amount of vegetable oil or melted coconut oil. It makes for a slightly denser, moister loaf, but IMO, butter wins on flavor every time. But hey, if you’re out, oil works!
- **Sugar Swap:** Brown sugar can replace some or all of the granulated sugar for a deeper, more caramel-y flavor. Maple syrup or honey could work too, but you might need to adjust other liquids slightly.
- **Flour Power:** While all-purpose is classic, you could experiment with up to half whole wheat flour for a nuttier, healthier twist. Gluten-free 1:1 baking flour usually works great too!
- **Add-ins Galore:**
- **Nuts:** Walnuts or pecans add a lovely crunch.
- **Spices:** A teaspoon of cinnamon or a pinch of nutmeg can really elevate the flavor.
- **Dried Fruit:** Raisins, dried cranberries, or chopped dates are fantastic.
- **Other Chips:** Peanut butter chips, white chocolate chips… get wild!
FAQ (Frequently Asked Questions)
Got questions? I’ve got (casual) answers!
- **Can I use those pretty yellow bananas?** Uh, no. Those are for fruit bowls, not the soul-crushing sweetness of banana bread. You need the ugly, spotty ones that scream “compost me or bake me!”
- **Can I freeze banana bread?** Absolutely! Once completely cooled, wrap each loaf (or slices) tightly in plastic wrap, then aluminum foil. It’ll keep for up to 3 months. Just thaw at room temp when the craving hits. It’s a lifesaver, FYI.
- **My bread turned out tough, what happened?** Probably overmixing! Remember, when you add the flour, mix *just* until it comes together. Don’t beat it into submission.
- **What if I don’t have two loaf pans?** No stress! You can bake one loaf now and save half the batter in the fridge for up to 24 hours (covered). Or, get creative with muffins! This recipe makes about 24-30 muffins (bake at 375°F/190°C for 20-25 minutes).
- **Can I add more bananas for extra moistness?** You can, but be careful not to add *too* much liquid, or your bread might become a bit gummy. Stick to 6-8 for this double batch.
- **Do I *really* need room temperature eggs and butter?** For the best results, yes. Room temp ingredients emulsify better, creating a smoother, more even batter and a better texture in your final bread. If you’re in a hurry, you can warm eggs in a bowl of warm water for 5-10 mins, and cut butter into small pieces to soften faster.
Final Thoughts
Alright, superstar! You’ve just created two loaves of pure, unadulterated happiness. Go ahead, pat yourself on the back. You earned it. Now go impress someone—or yourself—with your new culinary skills. Maybe share one (or just a slice), or hoard both for yourself. No judgment here. Just remember this moment when you pull those warm, fragrant loaves from the oven. That’s the good stuff right there. Happy baking!

