So you’re craving something tasty but too lazy to spend forever in the kitchen, huh? Same. And by “forever,” I mean anything longer than, like, 20 minutes of active chopping. Let’s be real, adulting is hard enough without having to cook a gourmet meal every single night *just for yourself*. Enter the unsung hero of solo dining: **DIY Frozen Dinners For One**. It’s basically meal prep for people who hate meal prep but love eating well without the fuss. We’re talking grab, heat, and eat. Your future self will thank you, probably with a high-five or at least a nod of approval.
Why This Recipe is Awesome
Because it’s the culinary equivalent of putting on sweatpants after a long day. It’s comforting, it’s easy, and it just *works*. Seriously, this isn’t some fancy chef-level endeavor. This is **idiot-proof**. Even I didn’t mess it up, and my track record with keeping houseplants alive is questionable at best. You get to control what goes into your meal (adios, mystery ingredients!), save some serious cash compared to takeout, and avoid the dreaded “what’s for dinner?” panic attacks. Plus, portion control is built-in, which is a win for anyone who accidentally eats an entire family-sized bag of chips when stressed. Not that I’d know anything about that, of course.
Ingredients You’ll Need
Get ready for some serious flavor without breaking the bank or your brain. Adjust quantities for how many future meals you want to stash away!
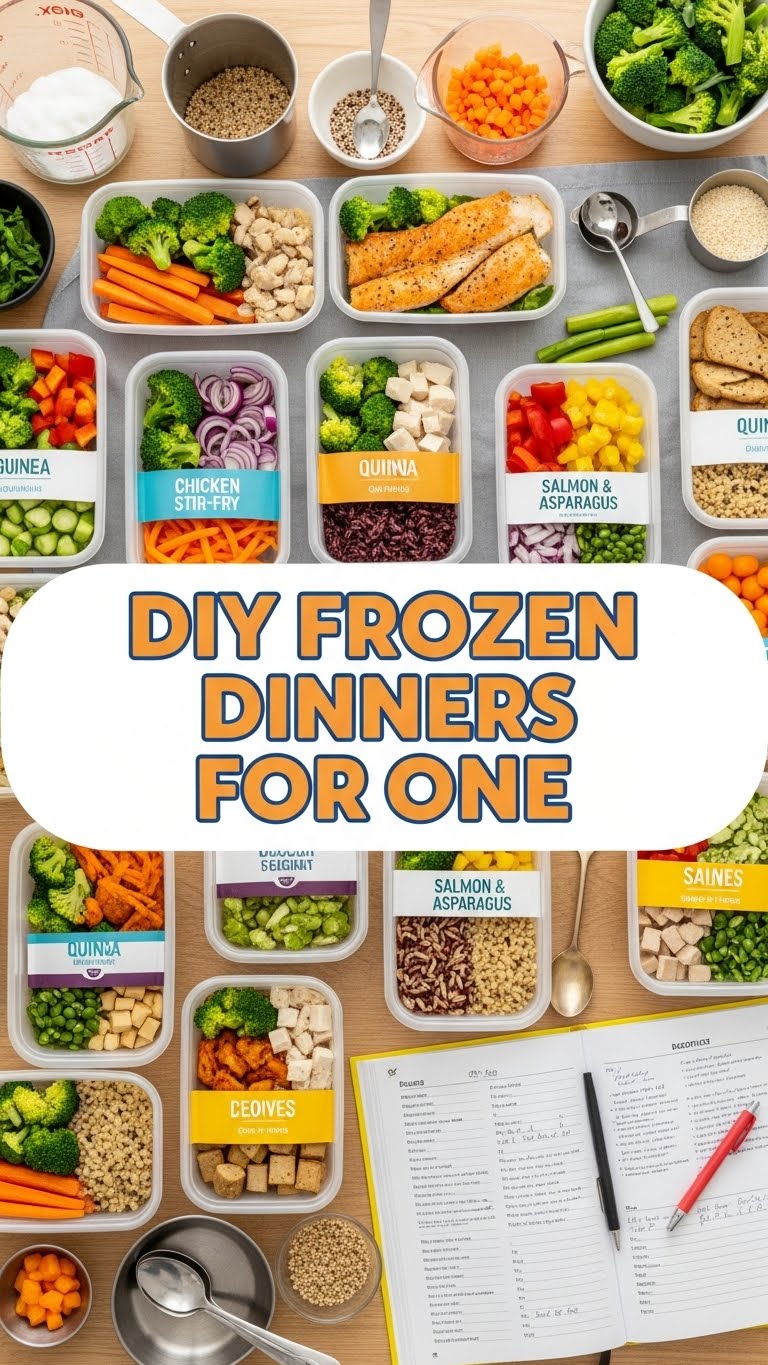
- **1 lb Boneless, Skinless Chicken Breast or Thighs:** Or whatever protein makes your heart sing. Cubed, please. No one wants to fight a whole chicken breast on a Monday night.
- **2-3 cups Mixed Veggies:** Think broccoli florets, bell pepper strips (any color!), snap peas, maybe some thinly sliced carrots or zucchini. The more color, the better, darling.
- **1-2 tbsp Olive Oil:** Your trusty kitchen sidekick.
- **1 tsp Garlic Powder:** Because fresh garlic is a commitment, and we’re keeping it breezy.
- **½ tsp Onion Powder:** Its less-pungent but equally useful cousin.
- **½ tsp Dried Italian Herbs:** Or whatever herb blend tickles your fancy. Rosemary and thyme also love chicken.
- **Salt and Black Pepper:** To taste. Don’t be shy, but don’t overdo it. You can always add more later.
- **Optional Flavor Boosters:** A squeeze of lemon juice, a dash of soy sauce, or a drizzle of honey/maple syrup if you like a little sweet with your savory.
Step-by-Step Instructions
Alright, let’s get this show on the road! Remember, we’re aiming for chill vibes here.
- **Prep Your Players:** Grab that chicken and cut it into roughly 1-inch cubes. Do the same for your veggies – aim for bite-sized pieces so everything cooks evenly.
- **Season Like a Boss:** In a large bowl, toss the chicken cubes with half of the olive oil, garlic powder, onion powder, dried herbs, salt, and pepper. Make sure every piece gets some love.
- **Veggie Time:** Add your mixed veggies to the same bowl (no need for a new one, we’re saving dishes!). Drizzle with the remaining olive oil, a pinch more salt and pepper, and any optional flavor boosters you’re using. Toss ’em around until they’re nicely coated.
- **Assemble Your Future Dinners:** Now for the magic! Grab some freezer-safe containers (lunch-sized, about 2-3 cups capacity is perfect). Divide the seasoned chicken and veggies evenly among them. Try to spread things out so they don’t clump too much.
- **The Freeze Dance:** Pop the lids on your containers and place them flat in your freezer. Let them freeze completely. This usually takes a few hours, but overnight is even better.
- **Ready for Action (Reheating):** When you’re ready to eat, grab a container from the freezer. You can either microwave it (start with 3-4 minutes, stir, then continue in 1-2 minute intervals until heated through) or, my personal fave, **bake it for superior texture**.
- **Oven Method for the Win:** Preheat your oven to **375°F (190°C)**. Dump the frozen contents onto a small baking sheet (line with parchment paper for easy cleanup, you genius!). Bake for 25-35 minutes, stirring halfway through, until the chicken is cooked through and the veggies are tender-crisp. *Pro tip: A little foil cover for the first 15 mins prevents drying out.*
Common Mistakes to Avoid
Don’t say I didn’t warn you! Learning from our (my) mistakes saves time and disappointment.
- **Overcrowding Your Containers:** Resist the urge to cram everything in. Air circulation is your friend, even in the freezer, and helps things cook evenly later. Leave a little room!
- **Not Seasoning Enough:** Remember, freezing can mute flavors slightly. Be bold with your herbs and spices! You want flavor, not bland mystery meat.
- **Forgetting to Preheat the Oven:** Rookies, assemble! Cooking frozen food in a cold oven is a recipe for soggy, sad disaster. **Always preheat!**
- **Unevenly Sized Chunks:** If your chicken is big and your broccoli is tiny, you’ll end up with overcooked broccoli or undercooked chicken. Uniformity is key here.
- **Using Containers Not Meant for Freezing/Heating:** Plastic that cracks in the freezer or melts in the microwave? No thank you. Invest in good quality, oven-safe (if you’re using the oven method) containers.
Alternatives & Substitutions
This is where you get to unleash your inner mad scientist (the fun kind, not the evil kind). The beauty of DIY is making it *yours*.
- **Protein Swap:** Not a chicken fan? No problem! Try cubed pork tenderloin, firm tofu, or even some sturdy fish like cod (though fish might be better pre-cooked and added post-thaw for best texture).
- **Veggie Remix:** Pretty much any sturdy vegetable works. Think sweet potato chunks, Brussels sprouts, green beans, or even corn. Avoid super watery veggies like tomatoes or mushrooms for freezing, as they can get mushy.
- **Spice It Up:** Want a different vibe? Ditch the Italian herbs and go for a **Taco Tuesday** blend (cumin, chili powder, oregano), an **Asian-inspired** mix (ginger powder, sesame oil, a splash of soy sauce), or a **Mediterranean** feel (oregano, dill, a touch of lemon zest).
- **Grain Power:** Want to add some carbs? Cooked quinoa or rice can be added *after* heating your chicken and veggies. Adding them *before* freezing can sometimes lead to mushy results.
FAQ (Frequently Asked Questions)
- **Can I freeze these in Ziploc bags?** Absolutely! Just make sure they’re freezer-safe and you squeeze out all the air before sealing. Lay them flat to freeze for easy stacking.
- **How long do these frozen dinners last in the freezer?** Generally, for best quality, aim for 2-3 months. Beyond that, they’re still safe to eat, but the texture or flavor might start to degrade a little.
- **Do I really have to thaw them first?** Nope! That’s the whole point of this magic! You can cook them straight from frozen. If you *do* thaw them, just reduce the cooking time slightly.
- **Can I use fresh herbs instead of dried?** You can, but dried herbs tend to hold up better to freezing and reheating. If using fresh, add them right before cooking for the best flavor impact.
- **My chicken is dry after reheating, what gives?** Chances are you either overcooked it, or didn’t cover it (especially if baking). Covering with foil for part of the baking time, or reducing microwave time, can help. Also, smaller chicken pieces cook faster!
- **Is this really cheaper than store-bought frozen meals?** **FYI**, almost always! You buy ingredients in bulk, avoid processing and packaging costs, and control the quality. Your wallet (and probably your body) will thank you.
Final Thoughts
There you have it, future meal prep superstar! You’re now equipped to fight off hunger pangs with delicious, homemade meals, even when your motivation is running on empty. It’s all about making life a little easier and a lot more delicious. So go forth, chop some veggies, season some chicken, and fill up that freezer. Now go impress someone—or yourself—with your new culinary skills. You’ve earned it!


