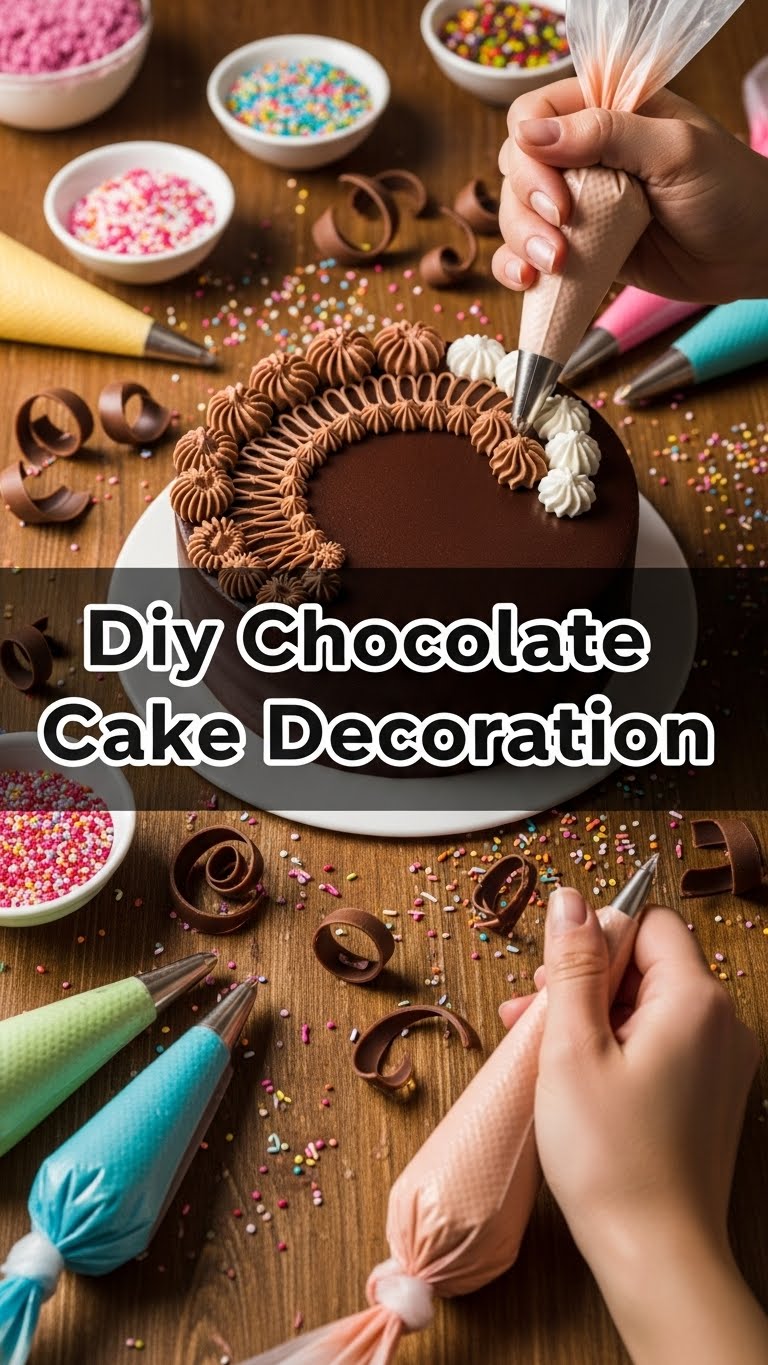
So, you’ve baked a chocolate cake (or, let’s be real, you gave in to temptation and bought a suspiciously perfect one from the supermarket). And now it’s just… brown. Brown is fine, but we’re here to elevate it from “just fine” to “OMG, you made this?!” without needing a culinary degree or a secret stash of fancy tools. Ready to unleash your inner cake Picasso with minimal fuss? Let’s get decorating!
Why This Recipe is Awesome
Because let’s face it, life’s too short for boring cakes. This isn’t about perfection; it’s about fun, chocolate, and making something that screams ‘I made this with love (and maybe a little help from Pinterest).’ This method is so **idiot-proof**, seriously, even *I* managed to make something presentable, and my artistic skills usually top out at stick figures. Plus, it gives you a fantastic excuse to play with sprinkles – an underrated joy of adulthood, IMO.
Ingredients You’ll Need
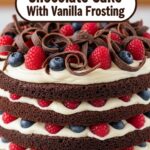
- Your Pre-baked Chocolate Cake: Your beautiful (or slightly lopsided, no judgment!) blank canvas. Doesn’t matter if it’s a layer cake or a simple sheet cake; we’re giving it a glow-up!
- Chocolate Frosting: Store-bought is totally fine, friend! Get a good quality one that you actually like the taste of. If you’re feeling ambitious, whip up a simple ganache – but remember, we’re keeping it chill here.
- Sprinkles (Any Kind!): The confetti of the dessert world! Nonpareils, jimmies, edible glitter – go wild. The more colors, the merrier.
- Chocolate Chips or Chunks: Because chocolate on chocolate is never, ever a bad idea. Milk, dark, white – whatever floats your cocoa boat.
- Optional Fun Stuff:
- Crushed Oreos: Instant fancy dirt cake vibes!
- Mini Marshmallows: For a cozy, hot cocoa feel.
- Fresh Berries: Strawberries, raspberries, or blueberries add a pop of color and freshness. And make it seem healthy, right?
- Melted Chocolate: For some artistic drizzles – a little goes a long way.
Step-by-Step Instructions
- Prep Your Canvas: Make sure your cake is completely cool. Like, really cool. Trying to frost a warm cake is a one-way ticket to a melty, crumbly disaster. Don’t do it! If it’s a layer cake, make sure your layers are level.
- First Frosting Layer (The “Crumb Coat”): Scoop a generous dollop of frosting onto the top of your cake. Using an offset spatula, butter knife, or even the back of a spoon, spread a thin, even layer over the top and sides. This thin layer is your **crumb coat** – it traps any loose crumbs so your final layer is super smooth. Chill the cake in the fridge for 15-20 minutes to set this coat.
- The Grand Frosting Finale: Once your crumb coat is firm, apply a thicker, more generous layer of frosting. Aim for a smooth finish, but honestly, don’t stress if it’s not picture-perfect. Rustic charm is totally in!
- Sprinkle Time! (The Best Time): Now for the fun part! Grab those sprinkles. For the sides, gently hold handfuls of sprinkles and press them into the frosting, rotating the cake as you go. For the top, just let them rain down like a colorful blizzard. More is always better, FYI.
- Chocolate on Chocolate Action: Arrange your chocolate chips or chunks artistically on top of the cake. Or just dump them in the middle for a charming pile. Your cake, your rules! If you’re using melted chocolate, drizzle it randomly over the top for an extra touch of pizzazz.
- Add Your Optional Flair: Sprinkle on those crushed Oreos, artfully place your berries, or dot with mini marshmallows. Step back, admire your work, and maybe take a picture before someone (probably you) eats it.
Common Mistakes to Avoid
- Trying to Frost a Warm Cake: This is literally the most common decorating mistake. It will just melt, smear, and create a crummy mess. Patience, young padawan!
- Overthinking It: Seriously, it’s cake. Not a science experiment. Don’t get hung up on perfection. Embrace the slightly imperfect, handmade look. It adds character!
- Not Enough Frosting: Don’t be shy! A generous amount of frosting is key for that lush, inviting look and for sprinkles to actually stick.
- Forgetting the Crumb Coat: Skipping this step often leads to a frustration-inducing battle with crumbs. Trust me, it’s worth the extra 15 minutes in the fridge.
- Trying to Do It All With One Tool: While we advocate simplicity, having a couple of different things (like a butter knife AND a spoon) can make spreading and shaping easier.
Alternatives & Substitutions
- No Chocolate Frosting? No Problem! Vanilla works just as well! Or, if you have plain buttercream, stir in a few tablespoons of cocoa powder for a DIY chocolate version. Whipped cream is also a lighter, delicious option, but it needs to be served immediately or kept chilled.
- Sprinkle Shortage? Crush up leftover candy bars (Kit Kat, Snickers, etc.), use crushed cookies (Oreos, Biscoff), or even toasted nuts like chopped almonds or pecans for a more sophisticated crunch.
- Feeling Fruity? If fresh berries aren’t available, sliced bananas or even canned peaches (drained well!) can add a different texture and flavor. Lemon zest is also a surprisingly zesty addition to chocolate!
- No Chocolate Chips? Chop up a regular chocolate bar or even use chocolate shavings from a block of chocolate. Dark chocolate curls look super fancy with minimal effort!
FAQ (Frequently Asked Questions)
- Do I need fancy tools for cake decorating? Heck no! A butter knife, the back of a spoon, and maybe a small spatula are truly all you need. Your hands are your best tools for sprinkles, honestly.
- My cake is crumbly and I’m losing my mind, help! Ah, the dreaded crumbs! Did you chill your cake properly? A **crumb coat** (that thin layer of frosting) is your best friend here. It locks all those sneaky crumbs into place so your final layer is smooth. If it’s still crumbly, try baking with a slightly higher fat content or a little less flour next time.
- Can I use margarine instead of butter in homemade frosting? Well, technically yes, but why hurt your soul like that? Butter just tastes better and gives a richer, smoother consistency. If you absolutely must, make sure it’s a good quality stick margarine.
- How do I get my frosting super smooth? A crumb coat is key! After that, dip your spatula in warm water and wipe it clean before doing your final pass. The warmth helps glide the frosting. But again, don’t stress perfection!
- Can I make this cake decoration vegan/dairy-free? Absolutely! Just use a vegan chocolate cake recipe, dairy-free chocolate frosting (many store-bought brands are), and ensure your sprinkles are vegan (some contain confectioner’s glaze derived from insects, FYI).
- How far in advance can I decorate the cake? You can usually decorate a cake a day or two in advance. Store it loosely covered in an airtight container or under a cake dome at room temperature (if your frosting is stable) or in the fridge if it’s cream cheese-based or a warmer climate.
- My sprinkles won’t stick to the sides! What gives? Your frosting might be too dry, or you waited too long after frosting. Make sure you apply sprinkles while the frosting is still fresh and tacky. Gently press them in!
Final Thoughts
See? You’re practically a pastry chef now! Who knew turning a plain chocolate cake into a showstopper could be so easy and, dare I say, therapeutic? The beauty of DIY cake decorating is that there are no wrong answers. It’s all about having fun and making something delicious that looks great (even if it’s just great to you!). Now go forth and impress someone—or yourself—with your new culinary *and* artistic skills. You’ve earned it!
