So you’ve had one of those days, huh? The kind where your brain cells are taking a nap and the thought of complex cooking sends shivers down your spine? Good news, my friend, because I’ve got your back. We’re making dirt pudding. And no, you don’t need a shovel. Or a green thumb. Just a sweet tooth and a willingness to do *very* minimal work for maximum deliciousness.
Why This Recipe is Awesome
Let’s be real, some recipes are for showing off. This one? This one is for surviving. It’s the culinary equivalent of putting on sweatpants after a long day. Here’s why it’s about to become your new best friend:
- No Oven Required! That’s right, step away from the inferno. This is a chill-in-the-fridge kind of dessert.
- Idiot-Proof: Seriously, if you can open a package and stir, you’re basically a Michelin-star chef for this one. Even I didn’t mess it up, and that’s saying something.
- Kid-Friendly (and Adult-Friendly): Who doesn’t love digging into a bowl of “dirt” with gummy worms? It’s pure nostalgia, and universally adored.
- Looks Impressive, Requires Zero Skill: Pop it in a clear bowl and stick some gummy worms in, and everyone will think you’re some kind of dessert wizard. Little do they know…
- Minimal Ingredients: You probably have half of these things lurking in your pantry already. Score!
Ingredients You’ll Need
Gather your troops, folks! This is the elite squad of yumminess you’ll be assembling.
- 1 package (14.3 oz) Chocolate Sandwich Cookies (like Oreos): Crushed dreams… I mean, cookies. The regular size, not the “family feast for 12” one, unless you’re REALLY hungry.
- 1 package (8 oz) Cream Cheese: Softened. Don’t be a hero and try to blend it cold; your mixer will hate you.
- 1/2 cup (1 stick) Unsalted Butter: Also softened. Because butter makes everything better, and this isn’t a diet recipe anyway, so embrace it.
- 1 cup Powdered Sugar: The fluffy stuff. Don’t confuse it with granulated, unless you want gritty pudding, which, trust me, you don’t.
- 3 cups Cold Milk: Please, *cold* milk. Not lukewarm. We’re aiming for creamy, not a science experiment.
- 2 packages (3.4 oz each) Instant Vanilla Pudding Mix: Make sure it’s INSTANT! The other kind takes forever and involves a stove, which defeats the “easy” purpose.
- 1 container (8 oz) Frozen Whipped Topping (like Cool Whip): Thawed. Again, read the instructions on the tub, it’s not rocket science.
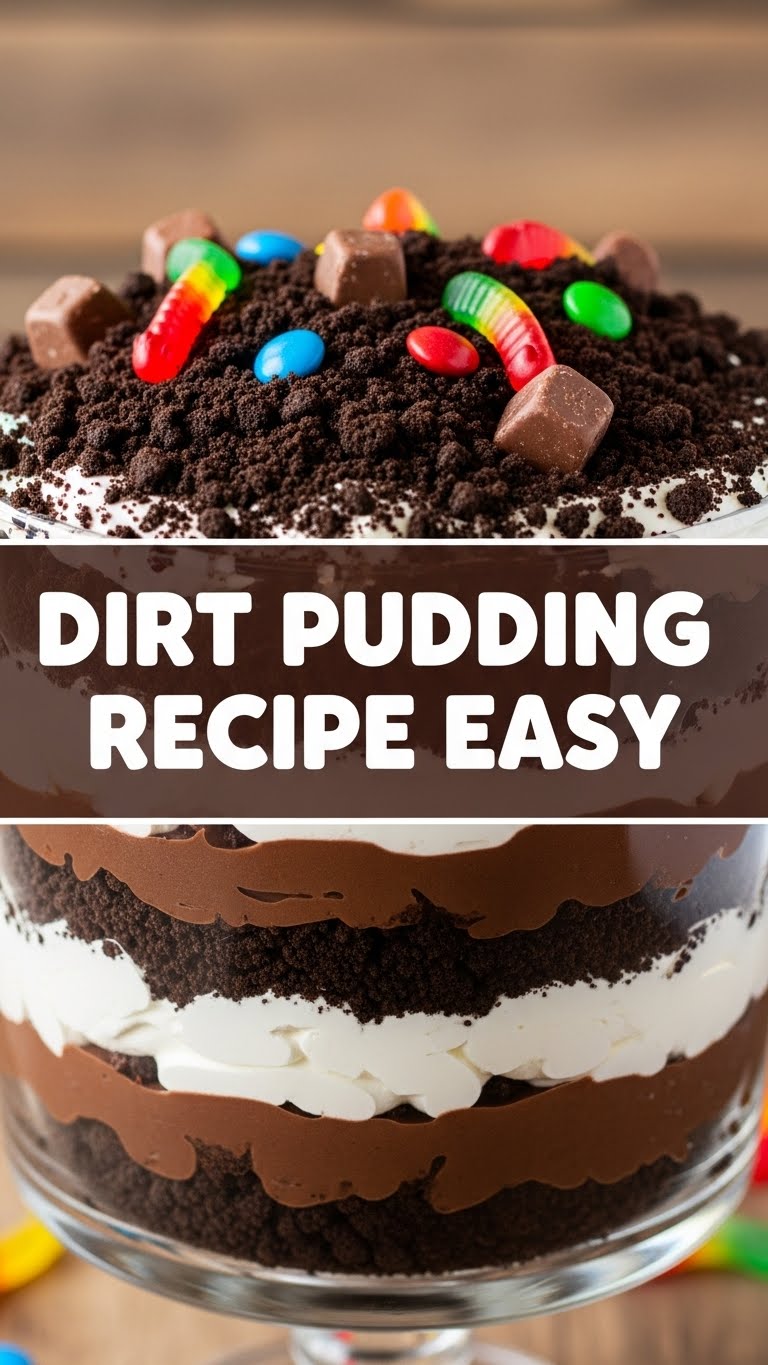
- Gummy Worms: For the ‘dirt’ aesthetic. Or any creepy-crawly candy you fancy. Optional, but highly recommended for maximum fun.
Step-by-Step Instructions
Alright, let’s get down to business. Follow these simple steps and you’ll be swimming in dirt pudding in no time.
- Crush Those Cookies: Grab about 3/4 of your Oreos (save the rest for topping!) and either put them in a Ziploc bag and smash with a rolling pin (therapeutic!) or use a food processor. You want fine crumbs, like, well, dirt. Set aside.
- Whip the Creamy Dream Base: In a large bowl, beat the softened cream cheese and butter with an electric mixer until smooth and fluffy. Then, add the powdered sugar and beat again until well combined. It should be light and airy.
- Pudding Party Time: In a separate, even larger bowl, whisk together the cold milk and the two packages of instant vanilla pudding mix. Whisk vigorously for a good 2-3 minutes until it starts to thicken. Don’t skimp on the whisking!
- Combine the Magic: Gently fold the thawed whipped topping into your cream cheese mixture. Once combined, gently fold in the thickened vanilla pudding. Don’t overmix; just combine until smooth and fluffy.
- Layer It Up: Now for the fun part! Get a large clear serving bowl (or individual cups for fancy people). Start with a layer of your crushed cookie “dirt” at the bottom.
- Add the Creamy Layer: Spoon about half of your pudding mixture over the cookie layer, spreading it gently.
- More Dirt! Sprinkle another generous layer of crushed cookies on top of the pudding.
- Repeat & Finish: Add the remaining pudding mixture, then top with the rest of your crushed cookie “dirt.”
- Chill Out: Cover your masterpiece and pop it in the fridge for at least 4 hours, or ideally overnight. This lets the flavors meld and the pudding set properly. Patience is key here!
- Worm It Up: Just before serving, stick those gummy worms in! Make it look like they’re crawling out of the dirt. Insta-gourmet!
Common Mistakes to Avoid
Even though this is super easy, a few rookie blunders can occur. Learn from my potential mistakes, folks!
- Not Softening Ingredients: Trying to beat cold cream cheese and butter is like trying to reason with a toddler – it won’t work, and you’ll just end up frustrated (and with lumpy pudding).
- Using Cooked Pudding Mix: Remember that ‘instant’ part? It’s there for a reason. Cooked pudding takes more effort than this recipe is designed for. Don’t make things hard on yourself.
- Not Chilling Long Enough: Patience, grasshopper. Pulling it out too early means a runny, sad ‘dirt soup’ instead of glorious ‘dirt pudding.’ Let it chill!
- Overmixing: Once the whipped topping and pudding are combined, stop. Overmixing can deflate the fluffiness. We want light and airy, not dense and sad.
Alternatives & Substitutions
Feeling creative? Or just missing an ingredient? No worries, we’ve got options!
- Cookie Variations: Instead of Oreos, try chocolate graham crackers, Nutter Butters (for a peanut butter twist), or even gluten-free chocolate cookies.
- Pudding Flavor: Vanilla is classic, but chocolate instant pudding works just as well if you want double chocolate intensity. Cheesecake instant pudding? Oh, fancy!
- Toppings Galore: Beyond gummy worms, consider mini chocolate chips, sprinkles, crushed candy bars, or even fresh mint leaves for a “plant” effect.
- Dairy-Free Version: Yep, you can totally do it! Look for dairy-free cream cheese, dairy-free whipped topping, and dairy-free instant pudding mixes. Just make sure your cookies are also dairy-free.
FAQ (Frequently Asked Questions)
Got questions? I’ve got (casual, humorous) answers!
- Can I make this ahead of time? Absolutely! In fact, it tastes even better the next day once all the flavors have had a slumber party together. Just add the gummy worms right before serving.
- What if my pudding doesn’t thicken? Did you use instant pudding mix? Did you whisk for long enough (at least 2 minutes)? Sometimes really cold milk helps. If it’s still a bit loose, a little more chilling time might do the trick. Or, just embrace the “dirt milkshake” vibe!
- Can I use real whipped cream instead of Cool Whip? You *can*, but Cool Whip generally holds its structure better and for longer in this kind of recipe, especially when chilling. If you use real whipped cream, add it closer to serving time or expect it to soften up a bit.
- My cream cheese/butter mixture is lumpy! Help! Ah, the “didn’t soften enough” mistake! Keep beating. If it’s really stubborn, a quick zap in the microwave for literally 5-10 seconds might help (watch it carefully!), then beat again. Lumps are fixable, FYI!
- What’s the best way to crush the cookies? Food processor for speed and fine crumbs. Ziploc bag + rolling pin for stress relief and a slightly chunkier “dirt” texture. Both are valid life choices, IMO.
Final Thoughts
See? I told you it was easy! Now you’ve got a ridiculously delicious, fun, and impressive dessert without breaking a sweat. Go forth and conquer your sweet tooth, my friend. Share it, don’t share it, I won’t judge. You’ve earned this win. Happy digging!


