So, you’ve conquered the mighty chocolate cake. Bravo! Give yourself a pat on the back, or maybe just lick the mixing bowl. But now, it’s just… a cake. A delicious, brown, slightly lopsided (no judgment!) cake. It’s like having a gorgeous outfit but forgetting the accessories. And honey, we’re here to accessorize that cake like it’s going to the Met Gala. Without, you know, needing a team of stylists.
Why This Decorating Guide is Awesome
Because let’s be real, you want that cake to look like it came from a fancy-pants bakery, not your slightly chaotic kitchen. This isn’t about becoming a pastry chef overnight (unless you want to, then go for it!). It’s about **making your chocolate creation look presentable, delicious, and Instagram-worthy** with minimal fuss and maximum impact. It’s practically idiot-proof. Seriously, if I can make it look decent, anyone can. Plus, imagine the bragging rights. “Oh, this old thing? Just whipped it up.” They’ll never know you spent five minutes finessing it and the rest of the time just eating the sprinkles.
Ingredients (aka Tools & Toppings) You’ll Need
Think of these as your cake’s glow-up kit. Most of this stuff you probably already have, or can grab with minimal effort. No fancy culinary school degree required!
- **Your magnificent Chocolate Cake:** The star of the show! Make sure it’s completely, utterly, undeniably *cool*. This is non-negotiable, unless you like a melted frosting disaster.
- **Frosting (Chocolate, Vanilla, or whatever floats your boat):** About 2-3 cups. Store-bought tub? Absolutely! Homemade buttercream? You fancy!
- **Offset Spatula or Butter Knife:** For spreading. An offset spatula is like a magic wand for smooth frosting, but a regular butter knife works in a pinch. Don’t stress.
- **Piping Bag & Large Star Tip (Optional, but fun!):** If you’re feeling a bit extra and want some pretty swirls. If not, no biggie. A Ziploc bag with a corner snipped off works too.
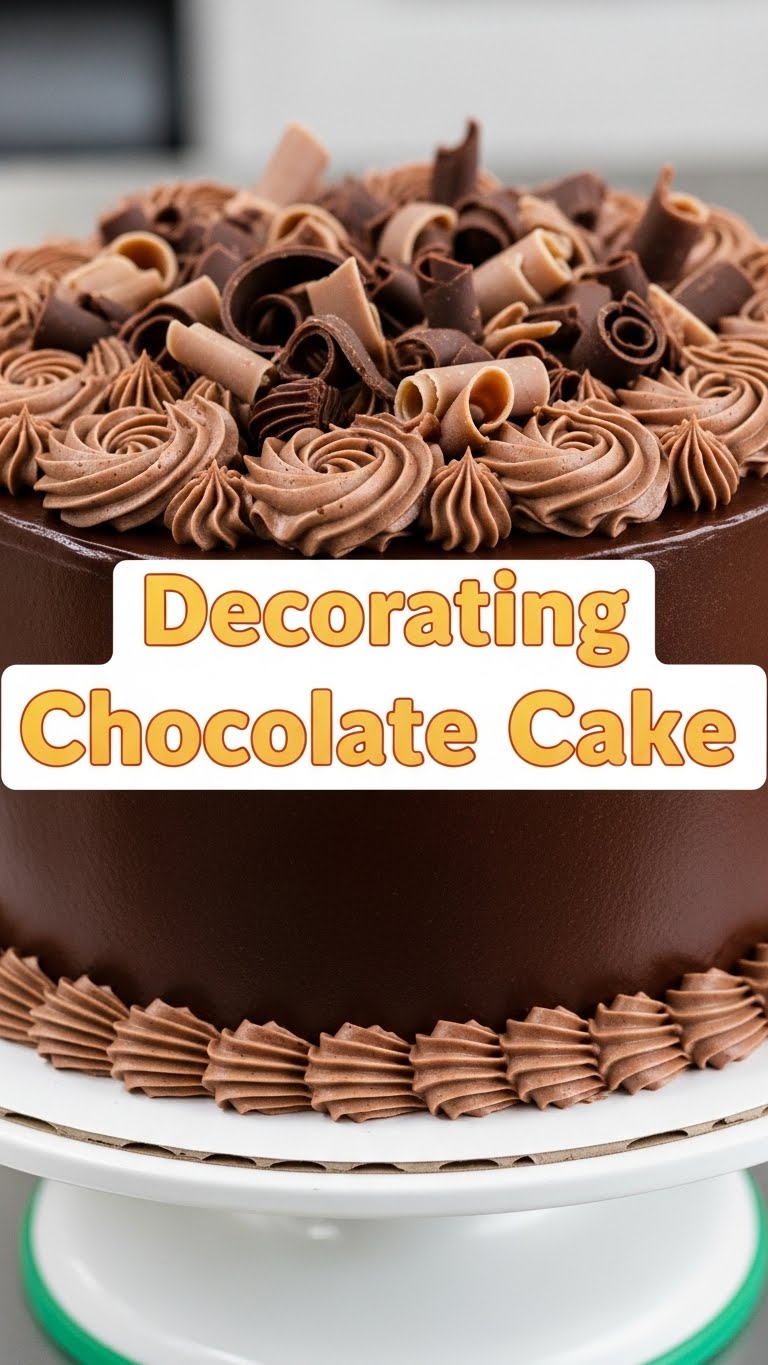
- **Sprinkles (Any color, any shape!):** The ultimate party starter. Go wild!
- **Chocolate Shavings or Mini Chocolate Chips:** Because, well, it’s a chocolate cake. More chocolate is always the answer.
- **Fresh Berries (Raspberries, Strawberries, Blueberries):** Adds a pop of color and a fresh zing. Plus, it makes it look healthy, right?
- **Powdered Sugar or Cocoa Powder:** For a delicate dusting that says, “I know what I’m doing.”
- **Edible Flowers (for the truly adventurous):** If you want to feel like you’re in a fairytale. Just make sure they’re actually edible, FYI.
Step-by-Step Instructions
- **Ensure Cake is Chilled Out:** Seriously, let your cake cool completely. Like, to room temperature, and then some. A slightly chilled cake is even better for frosting. This prevents crumbly, melty nightmares.
- **The Humble Crumb Coat:** This is your secret weapon, folks. Apply a very thin layer of frosting all over the cake – top and sides. Don’t worry about perfection; it’s just to trap any loose crumbs. **This step is crucial for a smooth final finish.** Pop the cake in the fridge for 15-20 minutes to let this coat set.
- **The Main Frosting Event:** Once your crumb coat is firm, apply a generous layer of frosting. Use your offset spatula or knife to spread it evenly over the top and sides. Aim for smooth, but a little rustic texture is totally in vogue. Don’t overwork it, or you’ll bring up those dreaded crumbs again.
- **Smooth or Swirl, Your Call:** For a smooth finish, dip your spatula in hot water, wipe it dry, and then smooth over the frosting. For a charming swirled look, gently make swirling motions with your spatula or knife on the top.
- **Sprinkle Attack!** Time for the fun part! Gently press sprinkles onto the sides of the cake with your hand, or pour them over the top edge and let them cascade down. For the top, just sprinkle ’em on like you’re feeding birds (very fancy, delicious birds).
- **Berry & Chocolate Bliss:** Artfully arrange your fresh berries on top. Cluster them, make a border, spell out your initial – whatever makes you happy. Then, sprinkle those chocolate shavings or chips around the berries, or just randomly across the cake. No wrong answers here.
- **The Flourish Finish:** For an extra touch of elegance, place a small amount of powdered sugar or cocoa powder into a fine-mesh sieve and gently dust over the top of the cake. It’s like a magical snow flurry! If you have edible flowers, strategically place them for that “wow” factor.
Common Mistakes to Avoid
- **Frosting a Warm Cake:** We talked about this. It’s a no-go. You’ll end up with a soupy mess and probably cry into your melting frosting.
- **Skipping the Crumb Coat:** Thinking you’re too cool for school and don’t need it? Rookie mistake. Your final frosting layer will look like it’s covered in tiny brown acne.
- **Over-Handling the Frosting:** The more you mess with frosting, the warmer it gets and the harder it is to work with. Get in, get out.
- **Aiming for Perfection:** Relax! It’s a homemade cake, not a competition. A little rustic charm is way more endearing than a stressed-out baker. Embrace the imperfections!
- **Running Out of Toppings:** Seriously, who wants a half-sprinkled cake? **Always have more toppings than you think you’ll need.** You can always snack on the leftovers.
Alternatives & Substitutions
No sprinkles? No problem! This is about working with what you’ve got and having fun.
- **No Piping Bag?** Use a sturdy Ziploc bag! Snip off a tiny corner, and boom, instant piping tool. It won’t be fancy, but it gets the job done.
- **Different Toppings:** Instead of sprinkles, consider chopped nuts (pecans, walnuts), crushed cookies (Oreos, Biscoff), candied orange peel, or even mini marshmallows. Get creative!
- **Fruity Fun:** Don’t have berries? Sliced bananas, kiwi, or even canned mandarins (drained well, please!) can add a nice touch. Just consider what pairs well with chocolate.
- **Melted Chocolate Drizzle:** Got some chocolate chips? Melt ’em down (microwave in 30-second bursts, stirring each time), put in a ziploc bag with a tiny snip, and drizzle over your cake. It adds a professional touch with zero effort.
- **Coconut Flakes:** Toasted or plain, they add great texture and a slightly tropical vibe.
FAQ (Frequently Asked Questions)
- **Do I *really* need to crumb coat?** Oh, you beautiful rebel. Yes, you do. It’s like wearing primer before foundation. Makes everything look better. Trust me on this one.
- **How do I get super smooth frosting?** A few tricks: use an offset spatula, warm your spatula (dip in hot water, wipe dry), and work quickly. But honestly, a little texture adds character, IMO.
- **What if my frosting is too stiff/too runny?** Too stiff? Add a tiny bit of milk or cream, a teaspoon at a time. Too runny? Pop it in the fridge for 15-20 minutes to firm up. Cake decorating is all about improvisation!
- **Can I use canned frosting?** Absolutely! Zero shame in that game. It’s convenient, tasty, and gets the job done. This isn’t a snobby kitchen.
- **How long can I store a decorated cake?** If it has fresh berries or dairy-based frosting, it’s best eaten within 2-3 days and stored in the fridge. Without those, a tightly covered cake can last 4-5 days at room temperature.
- **My cake looks… messy. What now?** Eat it. It’s chocolate cake. Even a messy chocolate cake is a delicious chocolate cake. You tried, you learned, and you still have dessert. Win-win-win!
Final Thoughts
Alright, superstar! You’ve officially leveled up your cake game. Remember, baking and decorating should be fun, not a stress-fest. Don’t aim for perfection; aim for deliciousness and a few happy “oohs” and “aahs” from your lucky eaters (or just from yourself, you deserve it). Now go impress someone—or yourself—with your new culinary skills. You’ve earned it!

