So you’re craving something warm, gooey, and utterly delicious but, like, without the dairy drama and with that incredible sourdough tang? And maybe you’re also wondering if you *really* need to spend all day on a baking project? You’re in luck, my friend! We’re diving headfirst into the glorious world of **Dairy-Free Sourdough Cinnamon Rolls**. Get ready to impress yourself (and anyone lucky enough to be in your kitchen) without losing your sanity. Promise.
Why This Recipe is Awesome
Okay, let’s be real. Sourdough can sometimes feel like a high-maintenance friend, and dairy-free baking can be… a journey. But guess what? This recipe is the chill, laid-back version of both. It’s seriously **idiot-proof**, even I didn’t mess it up, and my track record with delicate doughs is questionable, at best. It marries that irresistible tangy depth from your sourdough starter with the sweet, spicy comfort of a classic cinnamon roll, all while being completely dairy-free. No heavy cream, no butter, no problem! Plus, sourdough often makes baked goods easier to digest. So, you can totally justify having an extra one, right? 😉
Ingredients You’ll Need
Gather ’round, fellow kitchen adventurers! Here’s your treasure map to deliciousness. Don’t worry, it’s nothing too exotic.
- **Active Sourdough Starter:** About 100g. Your bubbly, fed friend that smells like fermented joy. If it’s looking sluggish, give it a pep talk and a snack (flour and water) first.
- **Dairy-Free Milk:** 200g (about 1 cup). Almond, oat, soy—whatever floats your boat. Just make sure it’s unsweetened, unless you want extra sweet rolls, which, no judgment.
- **All-Purpose Flour:** 400g (around 3 cups, but weigh it for accuracy!). The backbone of our rolls.
- **Granulated Sugar:** 50g (about 1/4 cup). Just enough to give the yeast a kick and keep things sweet.
- **Dairy-Free Butter (Melted):** 50g (about 1/4 cup). Look for a stick butter alternative; brands like Miyoko’s or Earth Balance work great.
- **Salt:** 7g (a little over 1 tsp). Essential for flavor, don’t skip it, even if you think you’re “reducing sodium.”
- **For the Filling:**
- **Dairy-Free Butter (Softened):** 60g (about 1/4 cup). Again, the good stuff.
- **Brown Sugar:** 80g (about 1/3 cup, packed). Hello, caramel-y goodness!
- **Ground Cinnamon:** 2 tbsp. Because it’s not a cinnamon roll without, well, cinnamon!
- **For the Frosting (the best part, IMO):**
- **Powdered Sugar:** 150g (about 1 and 1/4 cups). Sift it if you’re feeling fancy (or hate lumps).
- **Dairy-Free Milk:** 2-3 tbsp. Start with less, add more till it’s perfectly drizzly.
- **Vanilla Extract:** 1/2 tsp. Adds that “Mmm, what IS that amazing flavor?” vibe.
- **Dairy-Free Cream Cheese (Optional):** 50g (about 1/4 cup). If you want a richer, tangier cream cheese frosting. Miyoko’s is a winner here.
Step-by-Step Instructions
Let’s get this dough party started! Follow these steps, and you’ll be a dairy-free sourdough cinnamon roll guru in no time.
- **Mix the Dough:** In a large bowl, combine your active sourdough starter, dairy-free milk, sugar, melted dairy-free butter, and salt. Mix well. Then, gradually add the flour, mixing until a shaggy dough forms. Don’t worry if it looks a bit messy at this stage.
- **Knead It Out:** Turn the dough out onto a lightly floured surface. Knead for about 5-8 minutes until it’s smooth and elastic. If it’s sticky, resist the urge to add too much extra flour; a little stickiness is fine. **Pro Tip: A stand mixer with a dough hook makes this a breeze!**
- **First Rise (Bulk Fermentation):** Place the dough in a lightly oiled bowl, cover it with plastic wrap or a damp towel, and let it rise in a warm spot for 6-10 hours, or until it has roughly doubled in size. Sourdough takes its sweet time, so be patient! You can also pop it in the fridge overnight for a slower, colder rise (and better flavor!).
- **Roll It Out:** Once risen, gently punch down the dough (satisfying, right?). Turn it onto a lightly floured surface and roll it into a large rectangle, about 12×18 inches. Aim for an even thickness.
- **Spread the Filling Love:** In a small bowl, mix the softened dairy-free butter, brown sugar, and cinnamon until combined. Evenly spread this glorious mixture over your dough rectangle, leaving a small border on one of the long edges.
- **Roll ‘Em Up:** Starting from the long edge *opposite* the border, carefully roll the dough tightly into a log. Seal the seam by pinching it gently.
- **Slice and Dice:** Use a sharp knife or, even better, unflavored dental floss (seriously, it’s magic!) to cut the log into 12 equal-sized rolls, about 1.5 inches thick.
- **Second Rise (Proofing):** Arrange the rolls in a lightly greased 9×13 inch baking dish, leaving a little space between each. Cover loosely and let them rise again for another 1-3 hours in a warm spot, or until puffy and touching.
- **Bake ‘Em Baby!** Preheat your oven to 375°F (190°C). Bake the rolls for 25-30 minutes, or until golden brown and cooked through. If they start browning too quickly, you can tent them loosely with foil.
- **Frosting Time:** While the rolls cool slightly (but are still warm!), whisk together all the frosting ingredients until smooth. If using cream cheese, beat it first until creamy, then add the other ingredients.
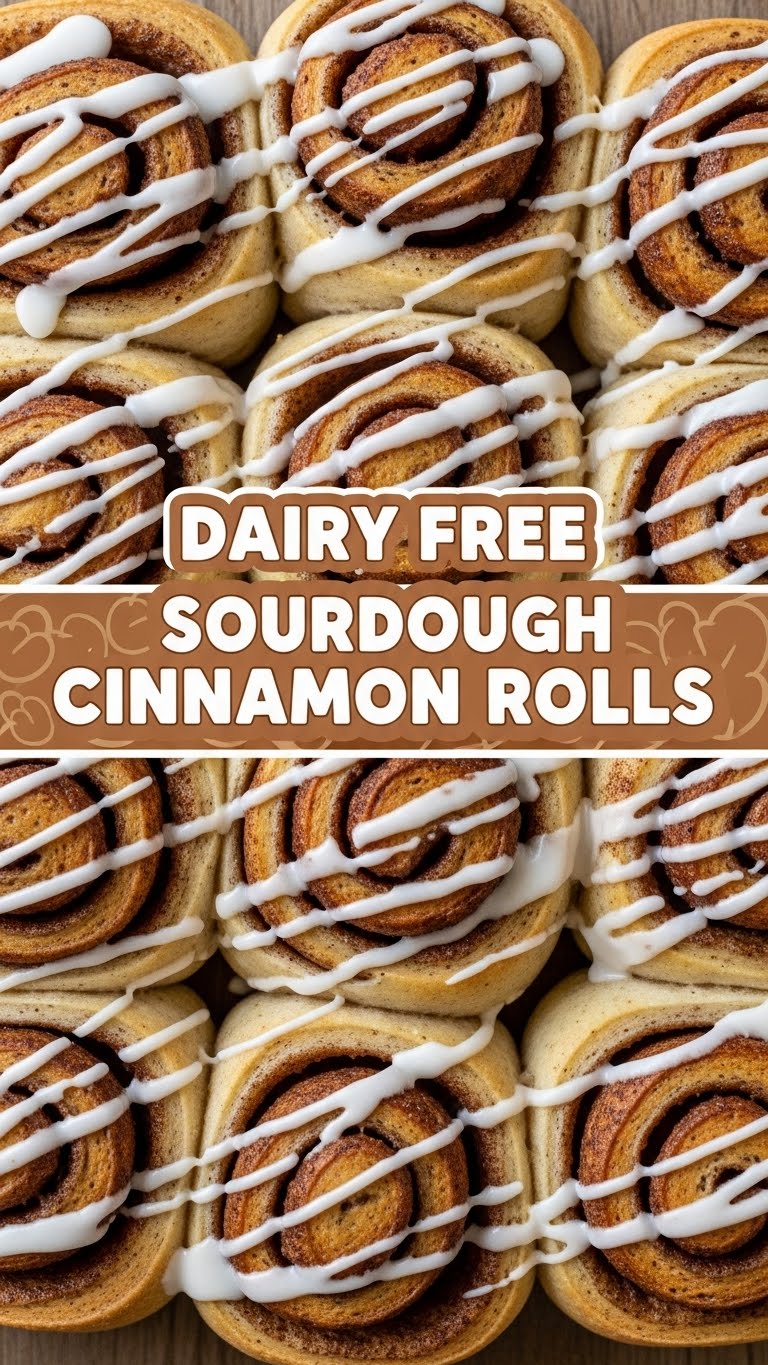
- **Serve and Devour:** Generously spread or drizzle the frosting over the warm rolls. Serve immediately and prepare for compliments!
Common Mistakes to Avoid
We all make ’em, so let’s try to avoid these classic blunders, shall we?
- **Impatient Sourdough Starter:** Using a sluggish or unfed starter. Your starter is literally the engine of this recipe. If it’s not bubbly and active, your rolls will be dense and sad. Don’t rush it; feed it, wait, then bake!
- **Over-flouring While Kneading:** Adding too much extra flour when the dough is sticky. This leads to dry, tough rolls. A little stickiness is normal; a bench scraper is your friend here.
- **Under-Proofing:** Not letting the dough rise enough during either stage. This is probably the most common rookie mistake. The rolls need time to develop flavor and that light, fluffy texture. Trust the process, even if it feels long.
- **Forgetting the Salt:** Seriously, don’t do it. Salt isn’t just for flavor; it also controls yeast activity and strengthens gluten. Without it, your rolls will taste bland and might be too airy.
- **Cutting Rolls Too Thin:** You want plump, substantial rolls, not delicate little coins. Aim for that 1.5-inch thickness for maximum gooey-to-fluffy ratio.
Alternatives & Substitutions
Feeling creative? Or just missing an ingredient? No worries, we’ve got options!
- **Dairy-Free Milk:** Any unsweetened plant-based milk will work. Almond, oat, soy, cashew—pick your fave! I personally love oat milk for its creamy texture.
- **Flour Power:** Want to make them a bit more “whole grain”? You can substitute up to 50g of the all-purpose flour with whole wheat or spelt flour. Just be aware the texture might be a little denser. Don’t go wild, though; these aren’t meant to be health food!
- **Sugar Swaps:** Brown sugar in the filling is key for that rich, molasses-y flavor, but you could try coconut sugar if you’re feeling adventurous. For the dough and frosting, granulated sugar is standard, but some people like maple syrup in the frosting for a different vibe.
- **Flavor Boosts:** Feeling a little extra? Add a pinch of nutmeg or cardamom to your cinnamon filling. Or, for a citrus twist, a little orange zest in the dough or frosting. Mmm, holiday vibes!
- **Frosting Fun:** If cream cheese frosting isn’t your jam, just omit the dairy-free cream cheese and make a simple vanilla glaze with powdered sugar, dairy-free milk, and vanilla extract. Still absolutely delicious!
FAQ (Frequently Asked Questions)
Got questions? I’ve got (casual) answers!
- **”My sourdough starter isn’t very active, can I still use it?”** Well, technically yes, but why hurt your soul with dense rolls? Give it a good feeding (equal parts starter, flour, water), let it hang out for 4-6 hours until it’s bubbly and at its peak, then use it. **Active starter is key!**
- **”Do I *really* need to knead it for that long?”** Yes, my friend, you do. Kneading develops the gluten, which is what gives your rolls their structure and chewiness. Think of it as a mini arm workout.
- **”Can I make these ahead of time?”** Absolutely! After the second rise, instead of baking, cover the dish tightly and pop it in the fridge overnight (up to 24 hours). In the morning, take them out while your oven preheats, then bake as usual. Fresh rolls for breakfast, FTW!
- **”My rolls aren’t browning properly. What gives?”** Check your oven temperature! An oven thermometer is a baker’s best friend. Also, sometimes dairy-free baked goods can be a little paler, but they should still be golden. If they’re raw inside, they probably need more time.
- **”These look huge! Can I make smaller ones?”** Sure, you can cut them into more rolls (say, 16 instead of 12) for a smaller portion. Just keep an eye on baking time; they might cook a little faster.
- **”What’s the best way to store leftovers?”** Ha! Leftovers? What are those? But if you *do* have any, store them in an airtight container at room temp for a day or two, or in the fridge for up to 4 days. Reheat gently in the microwave or oven.
Final Thoughts
Phew! You made it. You just conquered the glorious challenge of Dairy-Free Sourdough Cinnamon Rolls, and I’m practically high-fiving you through the screen. See? It wasn’t that scary, was it? Now go impress someone—or yourself—with your new culinary skills. You’ve earned it! Seriously, grab a warm roll (or three) and bask in your baking glory. You’re a rockstar. Enjoy every single bite!


