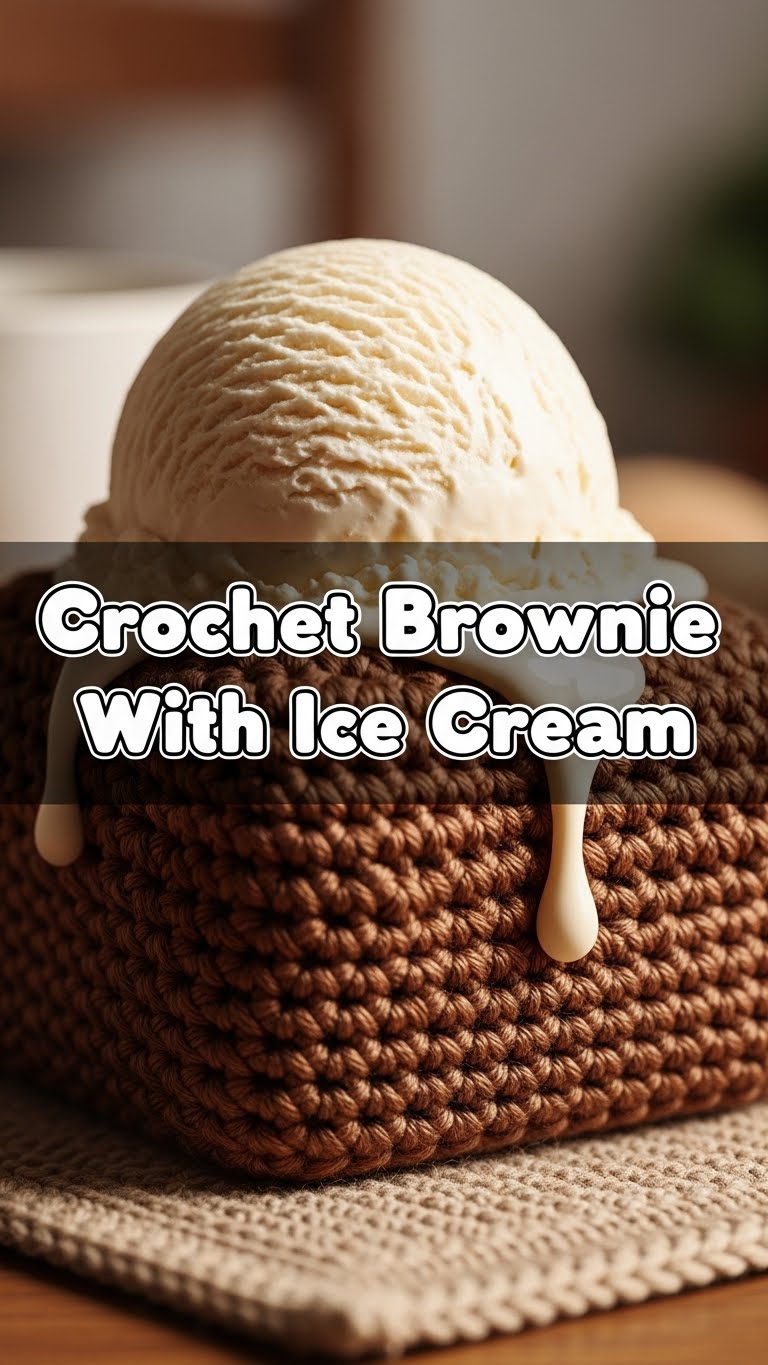
So you’re craving something tasty but too lazy to spend forever in the kitchen, huh? Same. But what if I told you there’s a brownie that’s **zero calories**, never goes stale, and *always* looks perfect? Yep, you heard that right! Forget the oven and grab your favorite comfy spot, because we’re about to “bake” the ultimate **Crochet Brownie with Ice Cream**.
Why This Recipe is Awesome
Okay, first off, it’s **idiot-proof**. Even I, who once mistook baking soda for sugar (don’t ask), can nail this one. It’s perfect for impressing literally no one but yourself (or maybe a very confused pet). Plus, it’s guaranteed not to burn, never goes stale, and *always* looks Instagram-ready. What’s not to love? It’s basically a culinary masterpiece for your eyes, not your stomach. Win-win, IMO.
Ingredients You’ll Need
No obscure spices here, just a few essentials to whip up your perfect (inedible) dessert:
- For the Brownie:
- Dark brown yarn (the fudgier the better!)
- A small amount of black yarn (for that rich, deep brownie crust look)
- For the Ice Cream:
- Cream or vanilla-colored yarn (your flavor choice, obviously!)
- A tiny bit of red yarn (for the cherry on top, duh!)
- The Tools (aka your kitchen gadgets):
- Crochet hook (matching your yarn, of course – no one wants a flimsy brownie!)
- Sharp scissors (for snipping those “loose ends” cleanly)
- Tapestry needle (for stitching it all together – like a super fine spatula!)
- Stuffing (the secret ingredient for plumpness!)
- Stitch marker (don’t lose your place, chef!)
Step-by-Step Instructions
- Whip Up the Brownie Base: Grab your dark brown yarn and your hook. Start with a magic ring and single crochet (sc) around to form your first layer. Think of it like mixing your dry ingredients – getting that foundation just right!
- Build the Layers: Continue increasing your stitches in rounds to create a flat square or rectangle – this is your brownie! Don’t be shy; make it as thick or thin as you like. We’re going for fudgy, right?
- Add that Deep Brownie Edge: Switch to the black yarn for the last couple of rounds. This gives it that perfect, slightly crusty edge. *Chef’s kiss!*
- Stuff and Close: Once your brownie is the desired size, stuff it lightly with fiberfill. Then, crochet the sides together to create a solid, squishy square. Make sure it’s nice and plump!
- “Churn” Out the Ice Cream Scoop: With your cream-colored yarn, make another magic ring and single crochet in increasing rounds to form a small, spherical shape. This is your perfectly rounded scoop of ice cream! Think of it like molding the perfect scoop.
- Cherry on Top: Use that tiny bit of red yarn to make a super small sphere or knot – that’s your cherry! Attach it securely to the top of your ice cream with your tapestry needle.
- Assemble the Masterpiece: Carefully stitch the ice cream scoop onto your brownie. Make sure it’s secure; no one wants their dessert falling apart prematurely!
Common Mistakes to Avoid
- Using the wrong size hook: It’s like trying to bake a cake in a teacup – just won’t work right. Your stitches will be either too loose (hello, saggy brownie!) or too tight (a brick, not a brownie).
- Forgetting your stitch marker: Ever lost your place counting cups of sugar? Same energy. You’ll end up with a wonky, lopsided brownie, and no one wants that.
- Not stuffing enough: A flat brownie is a sad brownie. Don’t be afraid to give it some plumpness! But don’t overstuff either, unless you want an exploding dessert.
- Ignoring gauge: Okay, maybe not a “mistake” in fun, but if you want it to look *exactly* like mine, checking your gauge is key. Otherwise, your brownie might be bigger than your head, FYI.
Alternatives & Substitutions
Feeling adventurous? This “recipe” is super flexible!
- Yarn Colors: Go wild! How about a **raspberry swirl brownie** with some pink yarn, or a **mint chocolate chip ice cream** with green yarn? Your imagination is the only limit!
- Toppings Galore: Instead of a simple cherry, why not stitch on some tiny **sprinkles** using embroidery floss? Or even a minuscule chocolate chip using a brown bead. Get fancy!
- Different Textures: Try a super fluffy chenille yarn for extra soft ice cream, or a chunky wool for a more rustic brownie feel. Mix it up for a truly gourmet experience!
FAQ (Frequently Asked Questions)
Got questions? I’ve got answers!
- Can I use acrylic yarn? Totally! Acrylic is usually super accessible and comes in tons of colors. Just make sure it’s not too scratchy for your “dessert” – nobody likes a rough brownie, even if it’s crochet!
- My brownie isn’t flat, it’s curling! What gives? Ah, you’re probably increasing too slowly. Add a few more stitches per round to keep it flat and happy. Think of it as adding more leavening!
- How long does this “recipe” take? Depends on your skill level, chef! A beginner might take a few hours, a seasoned pro could whip one up during a single episode of their favorite show. No rush, though, it won’t burn.
- Can I machine wash my crochet brownie? Hmm, tricky one. Spot clean is usually best. Imagine putting a real brownie in the wash – same vibe. You don’t want it to lose its shape or get fuzzy.
- What if I don’t have a tapestry needle? You can try to use your crochet hook to pull ends through, but a tapestry needle makes it much, *much* easier. It’s like trying to whisk without a whisk – possible, but inefficient.
Final Thoughts
And there you have it! Your very own, utterly delicious (to look at!) Crochet Brownie with Ice Cream. Perfect for decorating your space, gifting to a friend, or just having a cute, calorie-free snack buddy that never disappoints. Now go impress someone—or yourself—with your new culinary *and* crafting skills. You’ve earned it! Seriously, pat yourself on the back. That’s a masterpiece.


