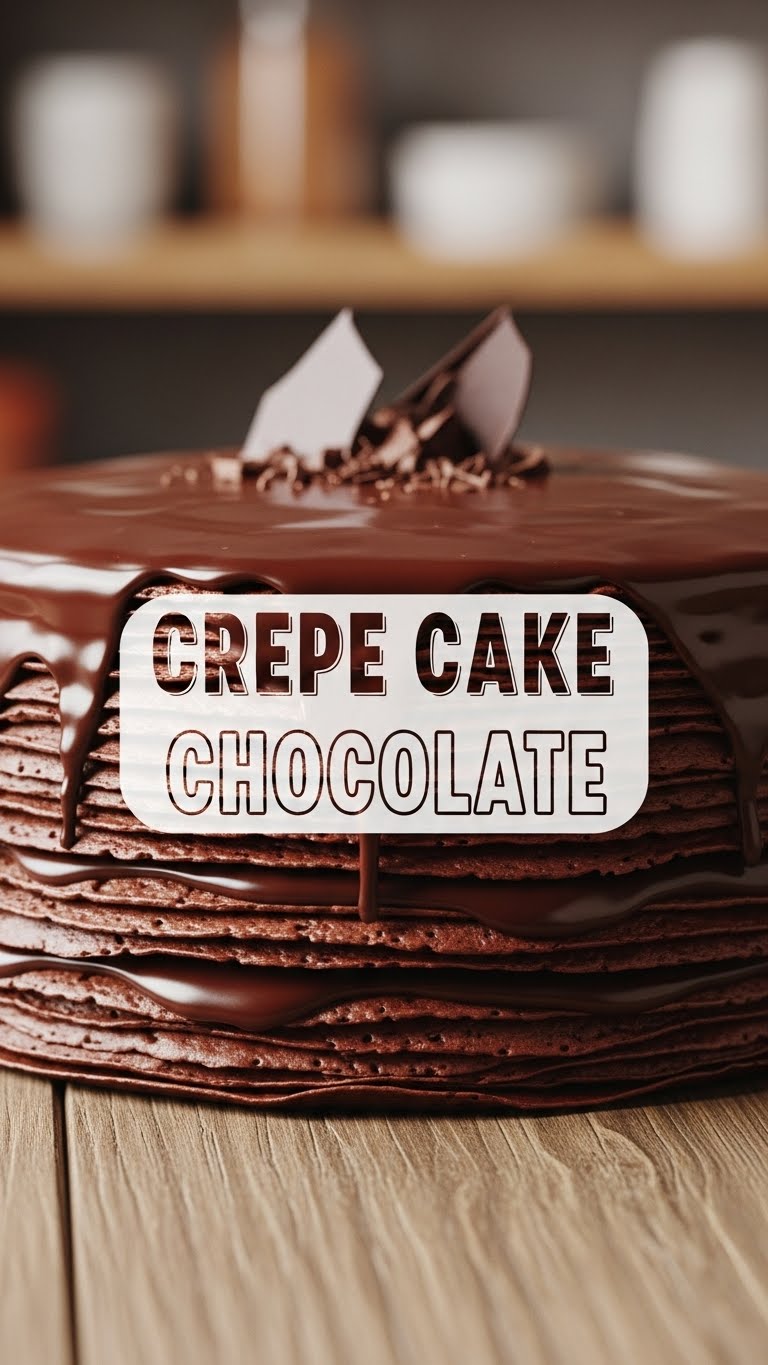
So, you’re eyeing that fancy, towering chocolate crepe cake at the cafe, thinking, “There’s no way I could make that masterpiece.” Guess what, my friend? You absolutely can! And the best part? It looks super impressive, but it’s secretly your new lazy-day-but-still-want-to-be-a-culinary-genius dessert. Seriously, put on your comfy pants, because we’re about to make magic with minimal effort.
Why This Recipe is Awesome
Okay, let’s be real. This isn’t just a recipe; it’s a life hack disguised as dessert. Why is it so awesome? First off, no oven required. That’s right, forget preheating, forget burnt edges, forget the whole “is it done yet?” anxiety. If you can flip a pancake, you can make this cake. It’s practically idiot-proof – and trust me, I’ve put that to the test.
Secondly, it screams “I tried really hard and I’m super sophisticated” while actually being a series of repetitive, meditative actions. Layering crepes and cream? That’s basically therapy. Plus, it’s chocolate. Do I even need to say more? It’s rich, it’s decadent, and it totally justifies eating multiple slices because, well, you made it from scratch!
Ingredients You’ll Need
Gather ’round, buttercups! Here’s your shopping list for a stack of chocolatey bliss. Nothing too wild, I promise!
- For the Crepes:
- 1 ½ cups all-purpose flour (the basic stuff, no need to get fancy unless you want to)
- ½ cup unsweetened cocoa powder (the darker, the dreamier!)
- ¼ cup granulated sugar (just enough sweetness for the crepes themselves)
- ½ teaspoon salt (don’t skip this, it makes everything taste better!)
- 4 large eggs (the glue that holds your culinary dreams together)
- 2 cups whole milk (or whatever milk you have, but whole is best for richness, IMO)
- 4 tablespoons unsalted butter, melted (liquid gold for flavor and pliability)
- 1 teaspoon vanilla extract (because vanilla and chocolate are soulmates)
- For the Chocolate Whipped Cream Filling:
- 2 cups heavy cream (must be cold!)
- ½ cup powdered sugar (also known as confectioners’ sugar, for silky smooth sweetness)
- ½ cup unsweetened cocoa powder (again, more chocolate, more happiness)
- 1 teaspoon vanilla extract (because we love vanilla)
- Optional Garnish (because presentation matters, sometimes):
- Chocolate shavings, fresh berries, or a dusting of extra cocoa powder. Go wild!
Step-by-Step Instructions
- Whisk Up the Batter: In a large bowl, whisk together the flour, cocoa powder, sugar, and salt. Make sure there are no lumps in your dry ingredients. In a separate bowl, whisk the eggs, then gradually whisk in the milk, melted butter, and vanilla extract.
- Combine & Chill: Pour the wet ingredients into the dry ingredients, whisking until just combined. A few small lumps are totally fine; don’t overmix! **Resting the batter is key!** Cover the bowl and refrigerate for at least 30 minutes, or even better, an hour. This lets the flour fully hydrate and the gluten relax, making your crepes super pliable and less likely to tear.
- Cook Those Crepes: Heat a 8-inch non-stick skillet or crepe pan over medium heat. Lightly butter or oil the pan. Pour about ¼ cup of batter into the hot pan, immediately tilting and swirling the pan to spread the batter thinly and evenly. Cook for 1-2 minutes until the edges start to crisp and the top looks set.
- Flip & Repeat: Gently loosen the edges with a spatula, then carefully flip the crepe and cook for another 30 seconds to 1 minute. Transfer the cooked crepe to a plate. Repeat this process with the remaining batter, stacking the finished crepes with parchment paper in between to prevent sticking. You should end up with around 15-20 beautiful crepes.
- Whip the Filling: In a large, chilled bowl, combine the cold heavy cream, powdered sugar, cocoa powder, and vanilla extract. Beat with an electric mixer on medium-high speed until firm peaks form. Be careful not to overbeat, or you’ll end up with butter (unless you want butter, then by all means!).
- Assemble Your Masterpiece: Lay one crepe flat on your serving plate. Spread a thin, even layer of chocolate whipped cream over the entire surface. Place another crepe on top and repeat the layering process. Keep stacking until you’ve used all your crepes and cream, ending with a final layer of cream on top.
- Chill Out: Cover the cake loosely and refrigerate for at least 2-3 hours. This lets the cake set beautifully and makes it much easier to slice. **Patience, my friend, it’s worth it!**
- Garnish & Serve: Once chilled, decorate with chocolate shavings, fresh berries, or a dusting of cocoa powder. Slice with a sharp knife and prepare for applause!
Common Mistakes to Avoid
- Skipping the Batter Rest: “Ugh, I’m too impatient!” Rookie move! Not resting the batter leads to tough, tear-prone crepes. Give it time, it’s worth it.
- Over-Thick Crepes: If you pour too much batter, you’ll have tiny pancakes, not elegant crepes. Thin is in! Less is more when it comes to batter in the pan.
- Impatience While Flipping: Trying to flip a crepe before it’s ready is a recipe for disaster (and torn crepes). Wait until those edges are clearly pulling away and the surface looks dry.
- Over-Beating the Cream: One minute it’s luscious whipped cream, the next it’s grainy and separating. Stop when it holds firm peaks. You’ll know.
- Not Chilling the Cake: Want a sad, slouchy cake that collapses when you slice it? Then don’t chill it! For a perfectly neat slice, give it ample fridge time.
Alternatives & Substitutions
Feeling adventurous? Here are some tweaks you can make:
- Gluten-Free: Swap out the all-purpose flour for a 1:1 gluten-free flour blend. The texture might be a *tad* different, but it’ll still be delicious.
- Dairy-Free: Use your favorite plant-based milk (almond, soy, oat). For the filling, you can try full-fat canned coconut cream (chilled, then scoop out the thick part and whip). Just note, the flavor and texture will definitely shift.
- Flavor Boost: Add a shot of espresso powder to your crepe batter or your whipped cream for a mocha twist. Or try a hint of almond extract instead of vanilla!
- Different Fillings: Not a fan of *that much* chocolate cream? You could alternate with a simple vanilla whipped cream, or even a cream cheese frosting layer. Nutella between some layers? Oh, yeah.
- Boozy Bliss: A splash of rum, Kahlúa, or orange liqueur in the whipped cream can elevate this to an adults-only treat. Just sayin’.
FAQ (Frequently Asked Questions)
- Can I make the crepes ahead of time? Absolutely! Cooked crepes can be stacked with parchment paper in between, wrapped tightly, and refrigerated for up to 2-3 days, or frozen for a month. Just thaw before assembling!
- My crepes keep sticking! What gives? Ugh, the worst, right? Make sure your pan is adequately greased (but not greasy!) between each crepe, or every other. Also, ensure your pan is properly hot. A non-stick surface is your best friend here.
- How long does this cake last? In the fridge, covered, it’ll last 3-4 days. In my house? About 3-4 *minutes* once sliced. Your mileage may vary.
- Can I use a stand mixer for the batter? You can, but be careful not to overmix! Hand whisking gives you more control and prevents over-developing the gluten, which leads to tough crepes.
- Why does my whipped cream feel grainy? You likely overbeat it. It’s on its way to becoming butter! Next time, stop as soon as it forms firm peaks. There’s a fine line!
- What if I don’t have an 8-inch pan? No worries! A 9 or 10-inch pan will work, your crepes will just be larger and you’ll yield fewer. Adjust your portion size and stacking accordingly.
Final Thoughts
There you have it! You just conquered a dessert that looks like it belongs in a fancy French pâtisserie but was born in your very own kitchen. Pretty cool, huh? Go ahead, take a bow. Snap a picture for the ‘gram. And then, most importantly, devour a slice (or two, I’m not judging). You’ve earned it, you culinary wizard, you! Now go impress someone – or just yourself – with your new crepe cake prowess. Enjoy every chocolatey, creamy, ridiculously impressive bite!


