So, you’re craving something ridiculously fancy but still want to feel like a culinary genius without actually *being* a culinary genius, huh? Same, friend, same. And let me tell you, there’s no dessert that screams “I’m sophisticated and I know things” quite like Creme Brulee. But wait, we’re not just doing *any* creme brulee today. Oh no, we’re elevating it, giving it a sun-kissed hug with some sweet, juicy peaches. Get ready to impress everyone (including yourself) with this Peachy Keen Creme Brulee!
Why This Recipe is Awesome
Alright, let’s get real. This isn’t just a dessert; it’s a *vibe*. First off, it looks super impressive, like you spent hours slaving away, when in reality, it’s pretty darn straightforward. It’s essentially fancy custard with a crunchy sugar hat, and the peaches? They just add this pop of fresh, summery goodness that cuts through the richness beautifully. Plus, it’s one of those desserts that tastes incredible cold, making it perfect for making ahead. It’s almost idiot-proof, I swear, even I didn’t mess it up, and my kitchen regularly witnesses culinary catastrophes. Prepare for applause!
Ingredients You’ll Need
- Heavy Cream (aka Double Cream): About 2 cups (480ml). This is where the magic happens, don’t skimp. No low-fat nonsense here, please.
- Egg Yolks: 5-6 large ones. The more yolks, the creamier the dreamier. Separate them carefully; we don’t want any whites crashing this party.
- Granulated Sugar: ½ cup (100g) for the custard, plus a little extra for that glorious crackly topping.
- Vanilla Extract: 1 teaspoon. Or a vanilla bean pod, if you’re feeling extra fancy (and rich). Vanilla paste works too!
- Salt: A tiny pinch. Seriously, it wakes everything up.
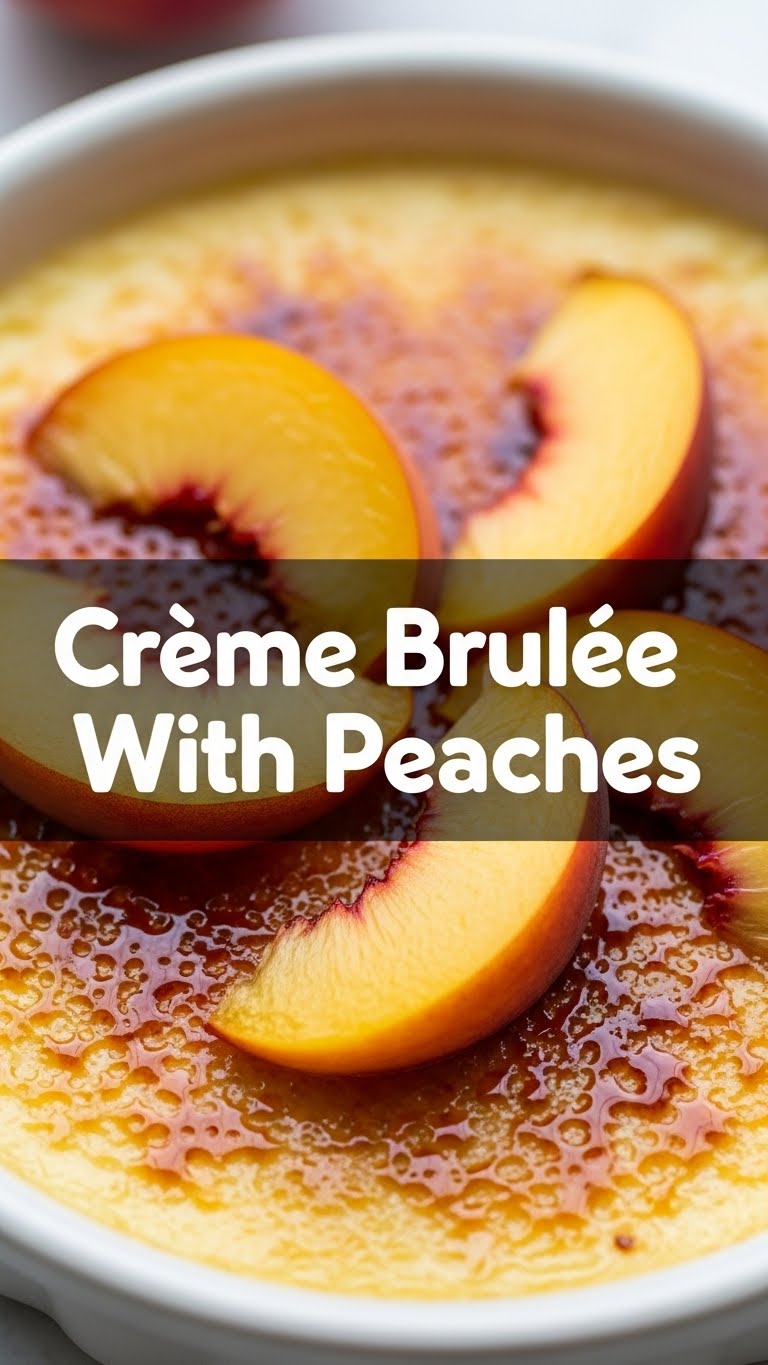
- Fresh Peaches: 2-3 ripe, juicy ones. Choose wisely, my friend. They’re the co-star here! You can dice ’em or slice ’em, your call.
- Optional but Recommended: A small bowl of cold water (for chilling the custard quickly), a kitchen torch (for the *brûlée* part, obviously!).
Step-by-Step Instructions
- Preheat & Prep: First things first, preheat your oven to a chill 325°F (160°C). Grab some ramekins (4-6 of ’em, depending on size) and find a baking dish that’s big enough to hold them. We’re going to give them a little water bath, FYI.
- Warm the Cream: Pour your heavy cream, vanilla, and that tiny pinch of salt into a saucepan. Heat it over medium heat until it’s just simmering around the edges – don’t let it boil! Remove it from the heat once it’s doing its gentle dance.
- Whisk the Yolks: In a separate, medium-sized bowl, whisk your egg yolks and ½ cup sugar together until they’re pale yellow and beautifully combined. You want them light and fluffy, almost like sunshine.
- Temper Like a Boss: This is the *fancy* part. Slowly, and I mean *slowly*, drizzle about half of the warm cream mixture into the egg yolk mixture while continuously whisking. This stops your eggs from scrambling. Once combined, pour the egg mixture back into the remaining warm cream in the saucepan. Whisk it all together until smooth.
- Strain & Fill: Now, for super silky custard, strain the mixture through a fine-mesh sieve into a liquid measuring cup or a clean bowl. This catches any little bits of cooked egg or vanilla bean specks. Then, divide the custard evenly among your ramekins.
- Water Bath Time: Place your filled ramekins into that larger baking dish. Carefully pour hot (but not boiling!) water into the baking dish, going about halfway up the sides of the ramekins. This water bath helps them cook gently and evenly.
- Bake & Chill: Carefully transfer the baking dish to your preheated oven. Bake for 30-40 minutes, or until the edges are set but the center still has a slight jiggle. Take them out of the water bath, let them cool on a wire rack, then cover and chill them in the fridge for at least 4 hours, or ideally, overnight. Patience is a virtue here!
- Peach Prep: When you’re ready to serve, dice or slice your fresh peaches. You can even give them a quick sauté in a tiny bit of butter and a pinch of sugar for extra caramelization, but raw is perfectly divine too!
- The Grand Finale (Brûlée!): Sprinkle a thin, even layer of granulated sugar (about a tablespoon) over the top of each chilled custard. Grab your kitchen torch and, holding it a few inches away, move the flame evenly over the sugar until it melts, bubbles, and turns into a beautiful, amber-colored, crackly crust. Work quickly to avoid burning!
- Serve & Devour: Immediately top with your fresh peaches and serve! Listen for that satisfying *crack* when you tap your spoon. Pure bliss!
Common Mistakes to Avoid
- Rushing the Tempering: Pouring hot cream into cold eggs too fast is a one-way ticket to scrambled egg custard. Don’t do it! Go slow and whisk constantly.
- Overbaking: If your creme brulee looks like a solid, jiggly mass from edge to center, you’ve gone too far. It should still have a slight jiggle in the middle. Overcooked custard is grainy, not creamy.
- Skipping the Strainer: Think you’re tough and don’t need a sieve? Think again, pal. That little step is the secret to a super smooth, velvety texture. Don’t be a hero, just strain it.
- Not Chilling Enough: Trying to brûlée a warm custard? It won’t work. The cold helps the sugar harden into that perfect crisp layer. Patience, padawan!
- Burning the Sugar: A little caramelization is great, but black, bitter sugar? Nope. Keep that torch moving!
Alternatives & Substitutions
Feeling adventurous? Good! Here are some fun twists:
- Other Fruits: Not a peach fan? (Gasp! But okay, I guess.) Try fresh berries (raspberries, blueberries, sliced strawberries), nectarines, or even some thinly sliced mango. Any fruit that brings a bit of tartness or freshness works wonders.
- Flavor Boosts: Instead of (or in addition to!) vanilla, try infusing the cream with a strip of orange zest, a cinnamon stick, or even a few cardamom pods. Just remember to strain them out before adding the egg yolks. Or, add a splash of almond extract or a shot of Grand Marnier for a grown-up twist!
- No Torch? No Problem (kinda): If you don’t have a kitchen torch (seriously, get one, they’re fun!), you *can* try placing the sugared custards under a very hot broiler for a minute or two. Watch it like a hawk, because sugar goes from perfect to burnt in a nanosecond. It won’t be quite as even, but it’ll do in a pinch.
- Dairy-Free? TBH, creme brulee relies heavily on the full-fat cream for its texture. While you *can* try coconut cream, the results will be different in flavor and consistency. If you’re going dairy-free, you might be venturing into a whole new dessert territory, but hey, experiment!
FAQ (Frequently Asked Questions)
Got questions? I’ve got answers (mostly good ones).
- Can I use low-fat cream? Well, technically you *can*, but why hurt your soul and your taste buds like that? For truly glorious creme brulee, stick to heavy cream. It’s a treat, not a diet food!
- What if I don’t have ramekins? You can use other oven-safe dishes, like small ceramic bowls or even teacups, as long as they hold about 4-6 oz. Just make sure they’re safe for the oven and the water bath.
- Can I make it ahead of time? Absolutely! In fact, it’s encouraged! You can make the custards, chill them for up to 2-3 days, and then brûlée right before serving. This makes it a fantastic dinner party dessert.
- My sugar topping didn’t get crunchy. What gives? Usually, this means the custard wasn’t cold enough, or you didn’t use enough sugar, or your torch isn’t hot enough. Make sure everything is super chilled and you’ve got an even, generous layer of sugar.
- Do I really need a kitchen torch? For the authentic, satisfying *crack* and even caramelization, yes, it’s highly recommended. It’s a fun gadget to have, IMO, and opens up a world of brûléed possibilities!
Final Thoughts
And there you have it, folks! Your very own, incredibly delicious, and deceptively easy Peachy Keen Creme Brulee. You’ve just whipped up a dessert that tastes like sunshine and sophistication had a baby. So go ahead, pat yourself on the back, bask in the glory, and enjoy every single creamy, peachy, crunchy bite. Now go impress someone – or just yourself – with your new culinary skills. You’ve earned it!


