So, you’re looking for a dessert that screams “I’m fancy and sophisticated!” but also whispers “I made this while wearing sweatpants and binging Netflix.” You’ve come to the right place, my friend. We’re diving headfirst into the creamy, dreamy world of Creme Brulee with a glorious caramel topping. And yes, you absolutely *can* make this at home without setting off the smoke detectors (probably).
Why This Recipe is Awesome
Let’s be real, creme brulee sounds intimidating. It has a French name, for crying out loud! But here’s the secret: it’s basically custard. And guess what? Custard is easy. This recipe is awesome because it’s **deceptively simple**, yet looks like you just graduated from a Parisian culinary school. Plus, you get to play with a torch, which is inherently fun. Who doesn’t want to char some sugar with a flaming wand? It’s like chemistry class, but delicious and with fewer explosions (hopefully).
It’s also super versatile and almost impossible to mess up completely. Even if your caramel isn’t perfect, it’s still sweet and delicious. Think of it as **idiot-proof gourmet** – if I can do it, you definitely can!
Ingredients You’ll Need
Gather ’round, fellow culinary adventurers! Here’s your treasure map to deliciousness:
- Heavy Cream (2 cups): Go for the good stuff. This is not the time for “light” anything. We’re making a dessert, not doing penance.
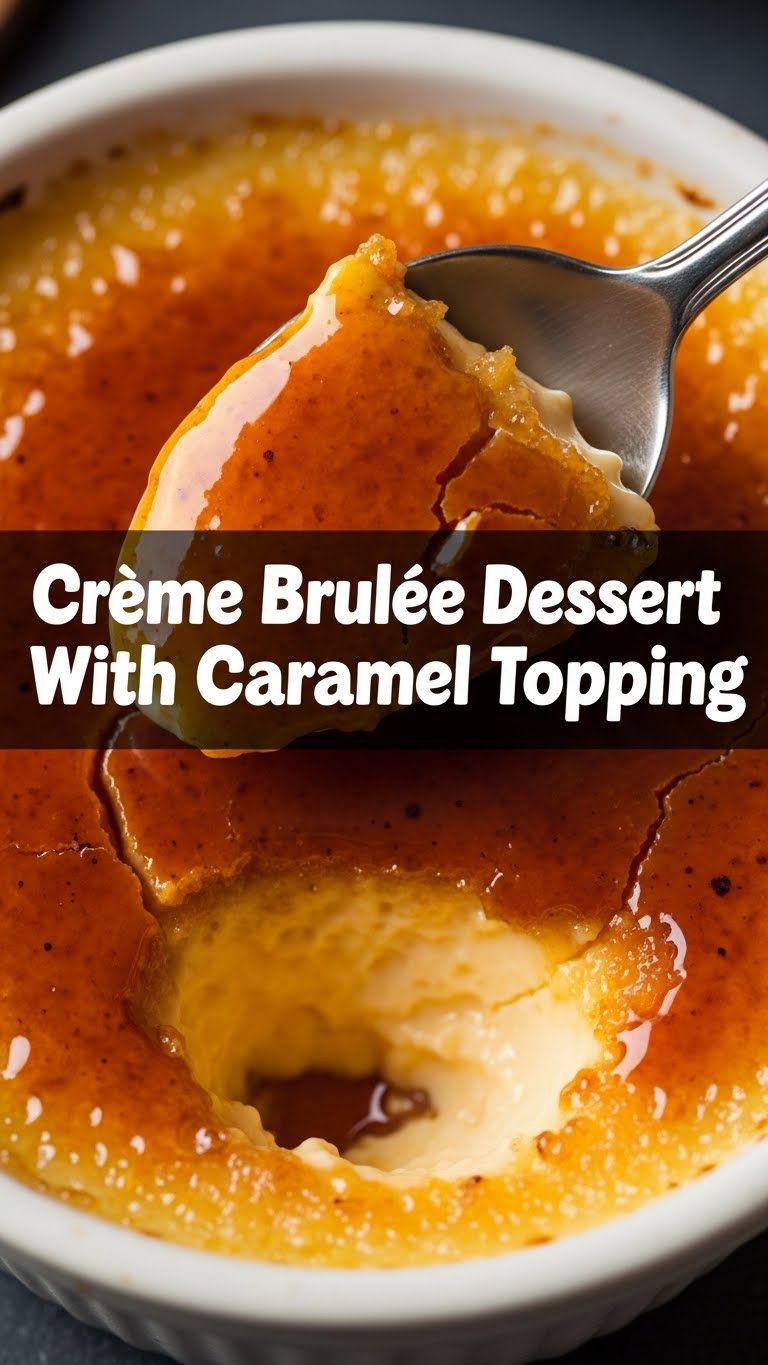
- Granulated Sugar (1/2 cup + 2-3 tbsp for topping): The first half for the custard, the second half for that glorious crackly crust. Don’t skimp, sugar makes everything better.
- Egg Yolks (5 large): Yes, just the yolks. Separate them carefully. Don’t even think about scrambling them for breakfast right now; their destiny is much grander.
- Vanilla Extract (1 tsp): Pure vanilla, please. Not the imitation stuff, unless you want your dessert to taste like a cheap candle.
- Pinch of Salt: Just a tiny bit to make all the other flavors sing. It’s like the backup singer that truly elevates the star.
Step-by-Step Instructions
Alright, apron on (or not, we don’t judge), let’s get cooking!
- Heat the Cream: Pour your heavy cream into a medium saucepan. Add the 1/2 cup of granulated sugar and a tiny pinch of salt. Heat over medium heat, stirring occasionally, until the sugar is dissolved and the cream is just simmering around the edges. **Don’t boil it!** We’re warming, not scalding.
- Temper the Yolks: While the cream is heating, whisk your 5 egg yolks in a separate bowl until they’re light yellow and slightly frothy. This is where the magic happens!
- Combine with Caution: Slowly, and I mean *slowly*, pour about half of the warm cream mixture into the whisked egg yolks, whisking constantly. This is called “tempering” and it prevents you from making sweet scrambled eggs. Now, pour the tempered egg mixture back into the saucepan with the remaining cream.
- Thicken the Custard: Cook the mixture over low heat, stirring constantly with a spatula, until it thickens slightly and coats the back of a spoon. It should be thick enough that if you run your finger across the spoon, it leaves a clear line. Remove from heat and stir in the vanilla extract.
- Strain and Pour: Strain the custard through a fine-mesh sieve into a measuring cup or pitcher. This step is crucial for an extra silky-smooth texture. Then, divide the custard evenly among your ramekins (usually 4-6, depending on size).
- Bake in a Water Bath: Place the ramekins in a larger baking dish. Carefully pour hot water into the baking dish around the ramekins, reaching about halfway up their sides. This “water bath” ensures even cooking and a super creamy custard. Bake in a preheated oven at 325°F (160°C) for 30-40 minutes, or until the edges are set but the centers still jiggle slightly.
- Cool and Chill: Carefully remove the ramekins from the water bath and let them cool completely on a wire rack. Once cooled, cover them loosely with plastic wrap and chill in the refrigerator for at least 4 hours, or preferably overnight. Patience is a virtue, especially when it comes to dessert.
- Caramelize Like a Boss: Right before serving, sprinkle 1-2 tablespoons of sugar evenly over the top of each chilled custard. Grab your kitchen torch and, holding it a few inches away, move the flame constantly over the sugar until it melts, bubbles, and turns a beautiful amber color. Voila! You’ve got that perfect crackly topping.
Common Mistakes to Avoid
We all make mistakes, but let’s try to dodge these common blunders:
- Scrambled Eggs, Anyone?: Pouring hot cream into the egg yolks too quickly without whisking furiously will result in lumpy, sad custard. **Temper slowly, whisk constantly!**
- Overcooking the Custard: If your custard is too firm or rubbery, you’ve overbaked it. Remember, it should still have a slight jiggle in the center when you pull it out.
- Uneven Caramelization: Holding the torch in one spot for too long will burn your sugar, making it bitter. Keep that flame moving like you’re conducting an orchestra!
- Skipping the Strain: Thinking you don’t need to strain the custard? Rookie mistake! It’s the secret to that velvety, smooth texture you crave. Don’t be lazy.
- Torch Too Close: If your flame is too close to the sugar, it’ll burn instantly rather than melting and caramelizing beautifully. Give it some space, my friend.
Alternatives & Substitutions
Feeling adventurous or missing an ingredient? Let’s get creative!
- Flavor Variations: Instead of (or in addition to) vanilla, try infusing the cream with lavender, a cinnamon stick, orange zest, or even coffee beans before straining. Get wild!
- Dairy-Free? Maybe?: Technically, you *could* try this with full-fat coconut cream, but the texture won’t be quite the same. It’ll be delicious in its own right, just not traditional creme brulee. **IMO, stick to dairy for the real deal.**
- No Torch? No Problem (Sort Of): You can try to caramelize the sugar under a very hot broiler. Keep a *very* close eye on it, and be prepared for less even results. **FYI, a torch is really worth the investment if you love this dessert.**
- Different Toppings: While classic caramel is king, you could also serve these with fresh berries, a dollop of whipped cream, or a sprinkle of cocoa powder.
FAQ (Frequently Asked Questions)
Got questions? I’ve got answers (and probably a few jokes).
- “Can I make this ahead of time?” Absolutely! The custard needs to chill anyway, so making it the day before is perfect. Just do the caramelization right before serving. Nobody likes a soggy topping!
- “What if I don’t have ramekins?” You can use any oven-safe, shallow, individual ceramic or glass dishes. Just make sure they’re similar in size so they bake evenly.
- “My caramel topping is rock-hard and impossible to crack. What gives?” You probably put too much sugar on top, or didn’t get it evenly melted. Less is more here, and a consistent flame is key.
- “Why is my custard watery?” Likely overcooked (which causes it to “weep”) or you didn’t thicken it enough on the stove before baking. Don’t rush that thickening stage!
- “Can I use brown sugar for the topping?” You *can*, but it doesn’t create the same clean, crisp crack as granulated sugar. It tends to melt differently and can burn faster. Stick with granulated for the classic effect.
Final Thoughts
And there you have it, folks! Your very own, incredibly impressive, and secretly simple creme brulee with that satisfying crack. You just leveled up your dessert game significantly. Now go impress someone – or, let’s be honest, just yourself – with your new culinary skills. You’ve earned it, you magnificent dessert wizard! Enjoy every creamy, crunchy bite!


