So, you’re trying to cut down on carbs but still crave that glorious, bready goodness, huh? Same, friend, same. We’ve all been there, staring longingly at a loaf of ciabatta while internally weeping. But what if I told you there’s a low-carb hero hiding in plain sight, just waiting to be transformed into fluffy, delicious bread? Enter: Cottage Cheese Bread. Yes, you read that right. Don’t run away! This isn’t some weird science experiment; it’s pure magic, and it’s about to blow your low-carb mind.
Why This Recipe is Awesome
Let’s be real, most low-carb bread recipes involve a gazillion obscure flours and a PhD in baking. Not this one. This recipe is **stupidly simple**, meaning even if your culinary skills are limited to boiling water (and sometimes burning it), you can nail this. It’s high in protein, low in carbs, and surprisingly versatile. Plus, it doesn’t taste like you’re eating a block of cottage cheese, which is a common fear, and a valid one, IMO. Think of it as your new best friend for sandwiches, toast, or just, you know, shoveling into your face. No judgment here.
Ingredients You’ll Need
Gather your troops, kitchen adventurer! We’re not asking for anything too wild here.
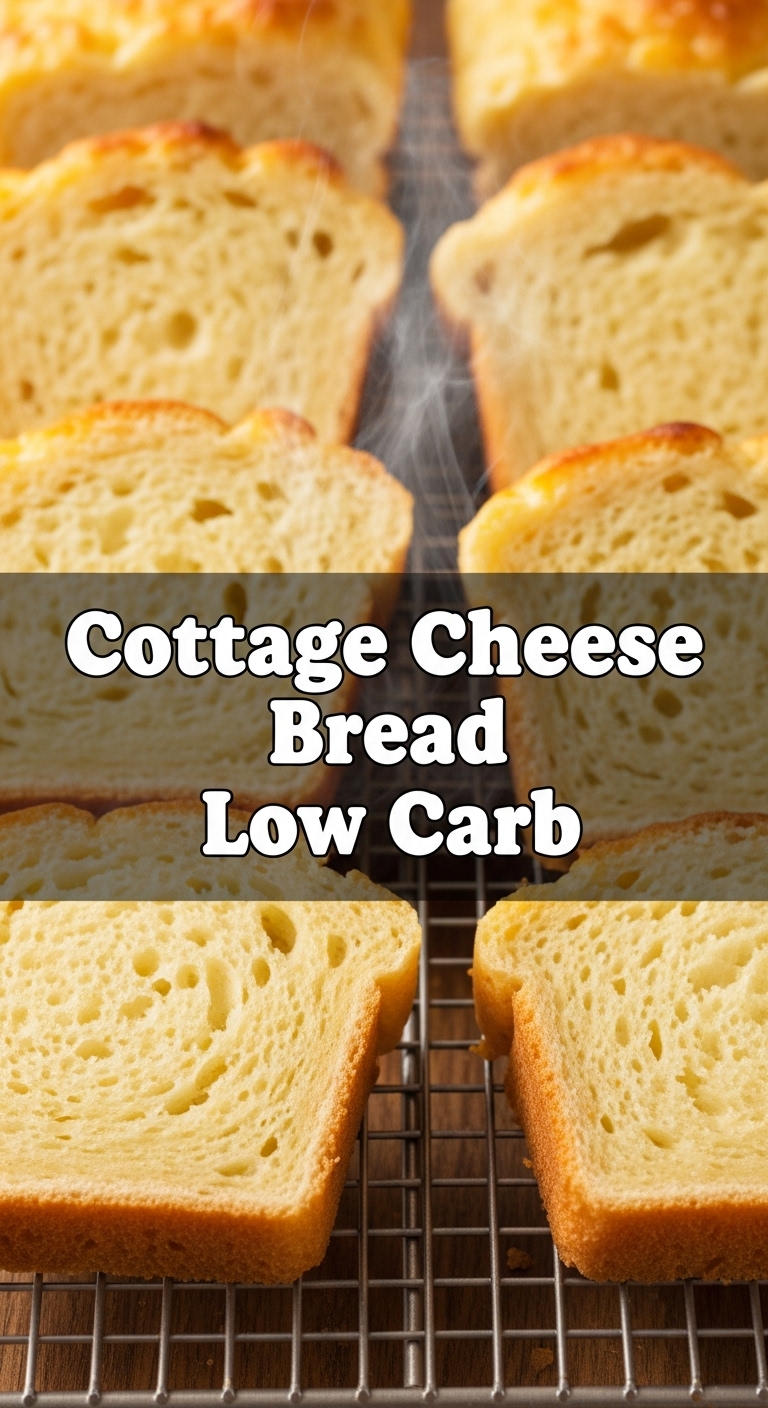
- **1 cup (225g) Cottage Cheese:** The star of our show! Full-fat, low-fat, whatever your heart desires. I usually go full-fat for that extra tenderness, but you do you.
- **2 large Eggs:** Our binding agents and a little extra protein boost.
- **3 tbsp Psyllium Husk Powder:** This is your secret weapon for that bread-like texture. Don’t substitute it unless you know what you’re doing – it’s crucial!
- **1 tsp Baking Powder:** For that lovely lift. We want bread, not a cracker.
- **½ tsp Salt:** Because everything needs a little sparkle, and flavor.
- **Optional Add-ins (choose your adventure!):** A pinch of garlic powder, onion powder, dried herbs (rosemary, oregano), or a sprinkle of everything bagel seasoning for extra pizzazz.
Step-by-Step Instructions
- **Preheat Power-Up:** First things first, get that oven fired up to **350°F (175°C)**. While it’s warming up, line a small baking sheet with parchment paper. This helps prevent sticking and makes cleanup a breeze.
- **Blend it Baby:** Grab your trusty blender or food processor. Toss in the cottage cheese and eggs. Blend until it’s super smooth, like a velvety dream. We’re talking no lumps here, folks. This is key for a good texture.
- **Dry Mix Magic:** In a separate medium bowl, whisk together the psyllium husk powder, baking powder, and salt. If you’re adding any optional seasonings, now’s the time to throw them in there too.
- **Combine & Conquer:** Pour the wet cottage cheese mixture into the bowl with the dry ingredients. Stir really well until everything is combined. It’ll look a bit like a thick batter.
- **The Waiting Game:** Let the mixture sit for **5-10 minutes**. This is important! The psyllium husk needs time to absorb the liquid and thicken, transforming your batter into a more dough-like consistency. It’ll get much easier to handle.
- **Shape It Up:** Once thickened, scoop the “dough” onto your prepared baking sheet. You can shape it into a small loaf, a few individual rolls, or even flatten it into a rustic-looking flatbread. Wetting your hands slightly can help prevent sticking when shaping.
- **Bake Until Golden:** Pop your creation into the preheated oven. Bake for **30-40 minutes**, or until it’s beautifully golden brown and sounds hollow when tapped. The exact time depends on your oven and the thickness of your bread.
- **Cool Down:** Once baked, take it out and let it cool completely on a wire rack. This step is crucial for the texture to set properly. Seriously, resist the urge to slice into it immediately!
Common Mistakes to Avoid
We all make mistakes, but let’s try to avoid these rookie errors, shall we?
- **Not Blending Enough:** Leaving cottage cheese lumps is a no-go. Blend until it’s smooth, or you’ll have weird little curds in your bread. Not cute.
- **Skipping the Rest:** That 5-10 minute rest for the psyllium husk? **Non-negotiable.** If you try to shape it too soon, it’ll be a sticky, unmanageable mess. Patience, grasshopper.
- **Cutting It Hot:** I know, the smell is intoxicating. But cutting into it while it’s still warm will make it gummy. Let it cool fully to achieve that perfect bread-like texture.
- **Expecting a Brioche:** This is low-carb bread. It’s awesome, but it’s not going to be identical to a traditional wheat loaf. Adjust your expectations, and you’ll love it for what it is!
Alternatives & Substitutions
Feeling adventurous? Here are a few ways to mix things up:
- **Flavor Boosts:** For savory bread, add a sprinkle of cheddar cheese, jalapeños, or sun-dried tomatoes before baking. For a slightly different twist, try a touch of cinnamon and a few drops of liquid stevia for a “sweet” bread.
- **Seed Power:** Mix in a tablespoon of chia seeds, flax seeds, or sesame seeds for added texture and nutrients. It’s like a secret healthy handshake for your bread.
- **Different Shapes:** Instead of a loaf, make smaller rolls for sliders or thin out the dough for a low-carb pizza crust. The world is your (low-carb) oyster!
- **Psyllium Husk Alternative?** Honestly, not really for this recipe without a major overhaul. Psyllium husk is unique in its binding and texture-creating abilities. If you don’t have it, maybe try a different recipe entirely!
FAQ (Frequently Asked Questions)
Got questions? I’ve got (casual) answers!
- **”Will my bread taste like cottage cheese?”** Nope! The blending and baking process transforms the flavor completely. It’s more of a mild, savory bread. Promise!
- **”Can I use fat-free cottage cheese?”** You can, but **full-fat often yields a moister, more tender crumb**. If you’re not strictly counting fat, give full-fat a try for a superior texture.
- **”My dough is super sticky even after resting. What gives?”** A little stickiness is normal, but if it’s unmanageable, you might need an extra teaspoon or two of psyllium husk powder. Sometimes cottage cheese can vary in moisture content.
- **”Can I freeze this bread?”** Absolutely! Once completely cooled, slice it up and freeze the slices in an airtight bag or container. They toast up beautifully straight from the freezer. Meal prep win, FYI!
- **”How long does it last?”** Stored in an airtight container at room temperature, it’s good for 2-3 days. In the fridge, it’ll last a bit longer, maybe up to a week.
- **”Can I make it in a bread pan?”** Yep! Just grease and flour (with a low-carb flour like almond flour) a small loaf pan, and bake as directed. It might take a little longer to bake through.
Final Thoughts
See? Told ya it was easy! Now go forth and conquer your carb cravings without the guilt trip. Slice it up, toast it, slather it with avocado, make a killer sandwich—your low-carb sandwich dreams just became reality. You’re basically a kitchen wizard now. Don’t forget to send me a slice when you’re done impressing everyone (or just yourself) with your new culinary superpowers. You’ve earned it!


