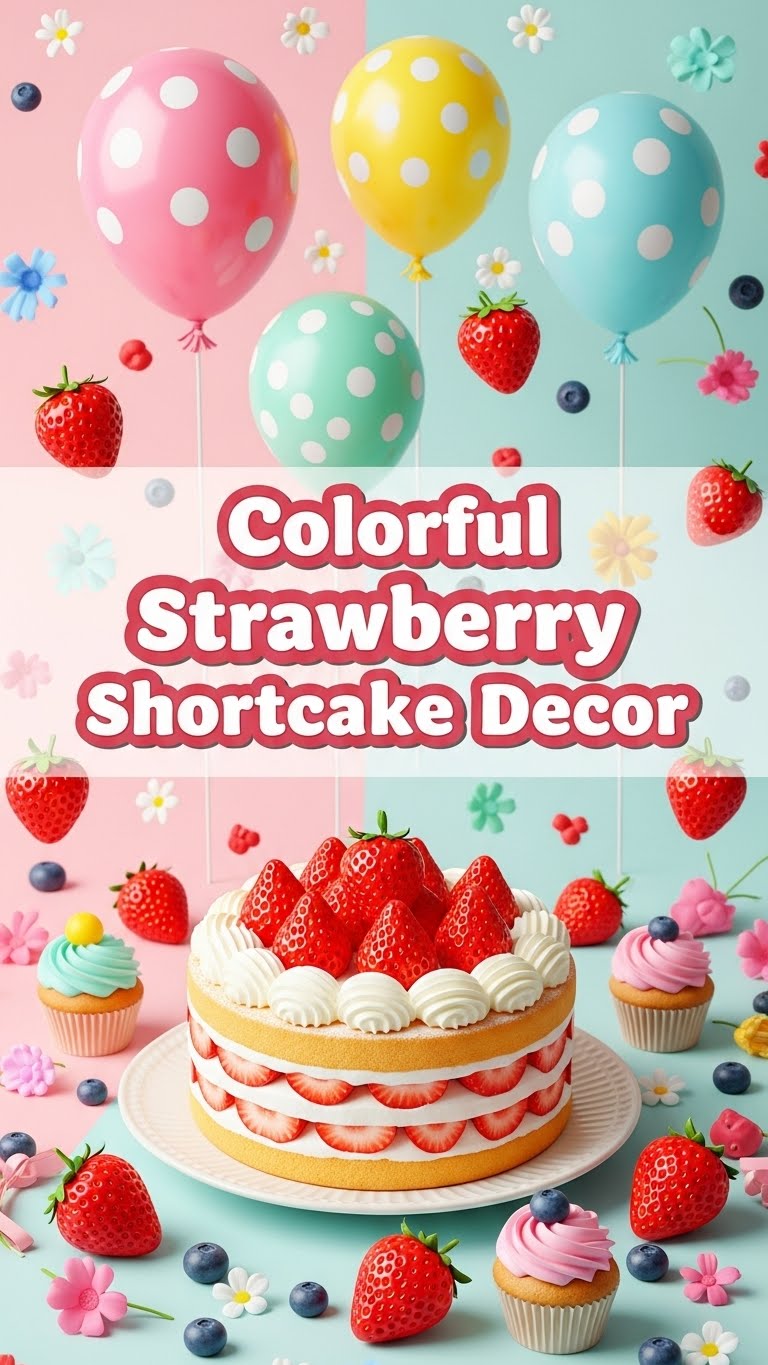
Ever stare at those Pinterest-perfect desserts and think, “My life is too short for that much effort?” Same, friend. But what if I told you we could make our strawberry shortcake look like it walked off a magazine cover without, you know, actually *stopping* your whole day? Let’s talk about making your shortcake look like a total showstopper, even if it just rolled out of your kitchen. Get ready to impress with minimal fuss!
Why This Recipe is Awesome
Because who wants boring shortcake? Not us! This isn’t about baking from scratch (unless you want to, you overachiever, you). This is about taking something already delicious and making it *pop*. It’s **super easy**, requires zero special skills, and will make everyone think you spent hours meticulously crafting culinary art. Spoiler alert: you didn’t. It’s basically art you can eat. Win-win!
Ingredients You’ll Need
We’re assuming you’ve got your shortcake biscuits/cake and some whipped cream ready to go. This list is all about the glorious decor!
- Fresh Strawberries: The undisputed star of the show! Go for the plumpest, reddest ones you can find. No sad, pale berries allowed—this is their moment to shine.
- Whipped Cream: Homemade or store-bought, I’m not judging. Just make sure it’s fluffy, stiff, and glorious enough to hold its shape.
- Fresh Mint Leaves: For that fancy restaurant vibe. Seriously, a few strategically placed green leaves make everything look bougie and fresh.
- Powdered Sugar (Optional): For a dusting of magic, like edible fairy dust. Also, a convenient way to hide any little smudges, shhh!
- Edible Flowers (Optional): If you’re feeling extra fancy. Think violas, pansies, or tiny rose petals. Just double-check they’re actually edible, folks!
- A Zester or Microplane (Optional, for citrus zest): Because sometimes a little zing of lemon or lime is just what the doctor ordered for a bright finish.
Step-by-Step Instructions
Alright, let’s get your shortcake looking like it belongs in a magazine spread. We’re focusing on the top, where all the magic happens!
- Prep Your Strawberries: First things first, give your berries a gentle wash and **pat them thoroughly dry**. Water is the enemy of fluffy whipped cream! Slice some for layering inside if you haven’t already, and leave some whole or halve them for your top garnish.
- Assemble Your Base: If you’re building individual shortcakes, layer your biscuit, a generous dollop of whipped cream, and some sliced strawberries. Repeat for another layer if desired. Now, we’re ready for the showstopping top.
- Craft the Strawberry Crown: This is where it gets fun! Arrange your whole or fanned-out strawberry halves artfully on top of your final layer of whipped cream. You can create a ring, a little mountain, or whatever feels right. Think “pretty, not piled high.”
- Minty Fresh Accent: Gently tuck a few individual mint leaves around your strawberries. **Less is often more** here, so don’t go overboard. A few well-placed leaves add a pop of color and freshness without overwhelming the main event.
- Dusting of Delight: If using, lightly dust the entire shortcake with powdered sugar. A small sieve or tea strainer works perfectly for this. It adds a delicate, snowy finish that looks oh-so-elegant.
- Flower Power (if using): Carefully place a couple of your edible flowers amongst the strawberries and mint. This adds an extra layer of visual charm and makes it look like you’re a professional patisserie artist.
- Zesty Zing (if using): For a final flourish, grate a tiny bit of lemon or lime zest over the top. The vibrant color and fresh aroma will elevate your shortcake even further.
Common Mistakes to Avoid
Look, we all make mistakes. But let’s try to avoid these rookie errors to keep our shortcake looking fabulous.
- Overcrowding: Don’t pile everything on like it’s a food mountain that’s about to collapse. Shortcake isn’t a hoarder. Give your beautiful decor room to breathe and shine.
- Wet Strawberries: Seriously, this is a biggie. Make sure your strawberries are bone dry before placing them on the whipped cream. Water makes whipped cream sad, droopy, and runny.
- Ignoring the Mint’s Purpose: Just tossing a whole sprig on top? Nah. **Pluck individual leaves!** We’re aiming for elegance, not a small shrubbery on our dessert.
- Using Non-Edible Decor: This seems obvious, but people mess it up! If you’re using flowers, make absolutely sure they are food-safe. You don’t want to poison your guests (or yourself!) with pretty but toxic petals.
Alternatives & Substitutions
Feeling adventurous? Or just out of mint? No worries, here are some easy swaps and additions!
- Other Berries: Why limit yourself? Raspberries, blueberries, or blackberries are fantastic. Mix ’em up for an even more vibrant and colorful look! IMO, a mix of red and blue berries is always a showstopper.
- Chocolate Shavings: A little dark chocolate never hurt anyone, right? Use a vegetable peeler or microplane to create delicate curls for a sophisticated touch.
- Lemon/Lime Zest: We mentioned it above, but it bears repeating! A tiny bit of zest adds a bright, fresh aroma and color without drastically altering the flavor profile.
- Colored Sprinkles: If you’re going for a super fun, party vibe, a light sprinkle of colorful jimmies can work wonders. Just don’t go overboard – we’re going for chic, not kids’ birthday party explosion.
- Non-Dairy Whipped Cream: Absolutely! If you’re catering to dietary restrictions, there are many excellent non-dairy whipped creams that hold their shape beautifully.
FAQ (Frequently Asked Questions)
Got questions? I’ve got (casual and humorous) answers!
- Do I *have* to use fresh strawberries? Well, you *could* use frozen, but they get a bit mushy when thawed and aren’t ideal for that crisp, fresh, gorgeous look we’re going for. **Fresh is best** for decor, FYI.
- My whipped cream is weeping! Help! Oh no! This usually happens if it’s overwhipped or not cold enough. Make sure your bowl and whisk are chilled before whipping, and stop whipping once it forms stiff, not grainy, peaks. A tiny bit of powdered sugar can help stabilize it too.
- How far in advance can I decorate? Ideally, **right before serving**. Strawberries will juice over time, and whipped cream can deflate. But if you *must*, maybe an hour or two in the fridge, very loosely covered.
- Can I use any edible flower? Nope! Some flowers are toxic. Stick to known edible varieties like pansies, violas, untreated rose petals, or lavender. **When in doubt, leave it out!** Safety first, pretty second.
- Is powdered sugar really necessary? Not strictly, but it adds that lovely ‘snow-kissed’ look and a hint of sweetness. Plus, it’s great for covering up those tiny smudges or uneven spots, just saying.
- I don’t have mint, what else for a green touch? You could try very finely chopped pistachio dust for a subtle green and nutty flavor, or even a tiny curl of lime zest for a different kind of fresh green.
Final Thoughts
See? You’re practically a pastry chef now! Who knew making something look fancy could be this chill? Go forth and create some stunning (and delicious) strawberry shortcake masterpieces. Your taste buds (and your Instagram feed, let’s be real) will thank you. Now go impress someone—or yourself—with your new culinary skills. You’ve earned it!

