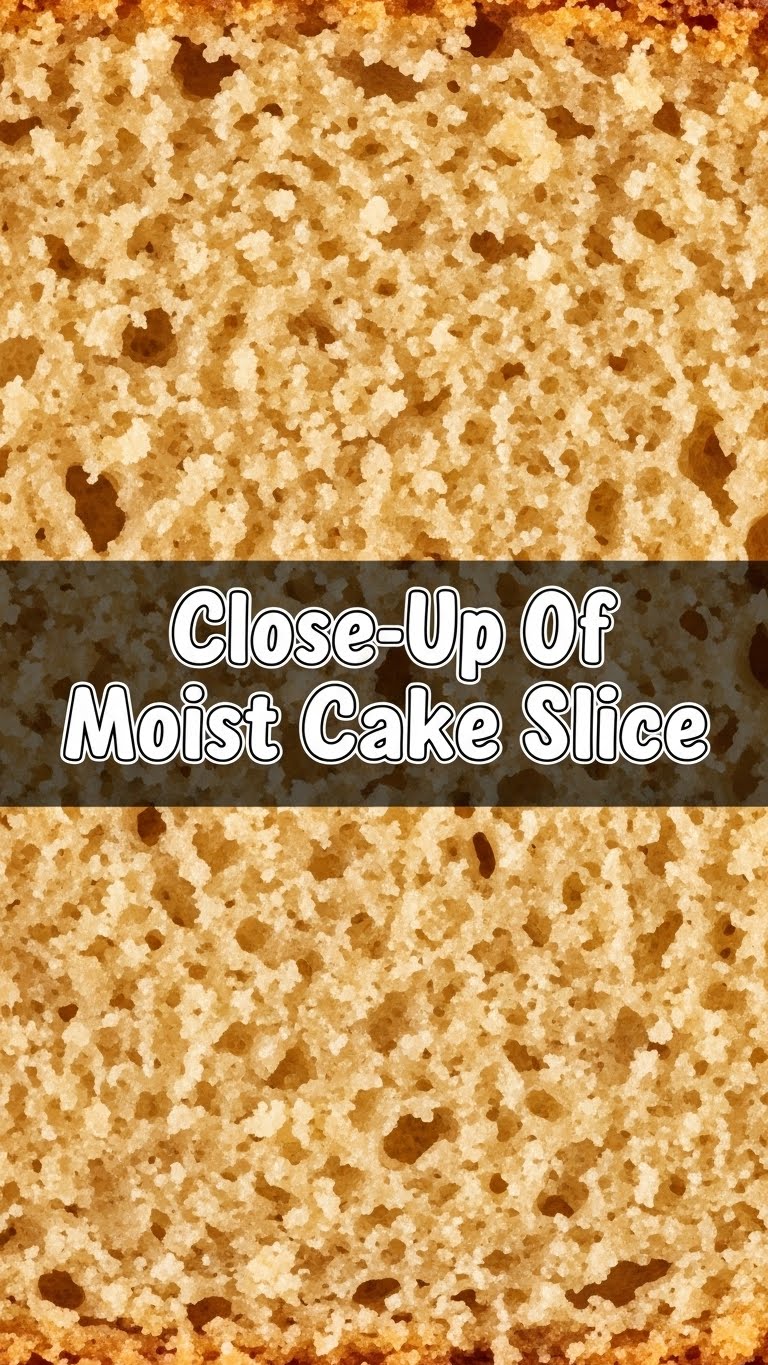
So you’re craving something so utterly delicious, so perfectly moist, it practically melts in your mouth? But also, you’re not trying to spend your entire weekend battling a complicated recipe, right? Same. Let’s be real, life’s too short for dry cake and even shorter for baking endeavors that require a degree in culinary science. We’re here for the good times, the easy wins, and that perfect, close-up-worthy slice of cake.
Why This Recipe is Awesome
Okay, so why should this recipe be your new go-to? Because it’s literally magic. Seriously. It’s the kind of recipe you pull out when you need to impress someone *without* breaking a sweat, or when you just need a serious chocolate (or vanilla, your call!) hug. It’s **foolproof** (and trust me, I’ve put it through its paces – if I can do it, you can do it). Plus, that ‘moist cake slice’ you’ve been dreaming of? This is it. No dry, crumbly sadness allowed here, folks. We’re chasing that ‘just-right’ texture that makes you go, “Mmmph!”
Ingredients You’ll Need
Get ready to gather your culinary arsenal! Most of these are probably already chilling in your pantry, waiting for their moment to shine.
- All-Purpose Flour: The backbone of our operation. Don’t overthink it.
- Granulated Sugar: For sweetness, obvs. Make sure it’s not the lumpy kind from ancient times.
- Unsweetened Cocoa Powder (for chocolate version): Go for the good stuff! Darker usually means richer. Trust me on this.
- Baking Soda & Baking Powder: The dynamic duo that makes things rise! Don’t mix them up, it’s not a puzzle.
- Salt: Just a pinch! It amplifies all the other flavors, like a tiny culinary cheerleader.
- Large Eggs: Room temperature, please! They mix better and contribute to a smoother batter. Don’t skip this detail, it’s important.
- Milk (or Buttermilk): For that extra *oomph* in moisture. Buttermilk is a secret weapon for tenderness.
- Vegetable Oil (or melted butter): Oil gives consistent moisture without fuss. Melted butter adds richness. Pick your fighter!
- Vanilla Extract: Non-negotiable. Makes everything taste like happiness and real cake.
- Hot Water (or coffee for chocolate): The secret ingredient for super moist chocolate cake. It blooms the cocoa and creates a tender crumb. Trust the process!
Step-by-Step Instructions
Ready to bake? Let’s get this party started. These steps are short, sweet, and to the point!
- **Preheat that oven!** Get it to 350°F (175°C). While it’s heating, grease and lightly flour an 8 or 9-inch round cake pan. Seriously, don’t skip the greasing unless you want a cake stuck to the pan, and nobody wants that kind of drama.
- In a large bowl, whisk together your dry ingredients: flour, sugar, cocoa powder (if using), baking soda, baking powder, and salt. Make sure there are no big lumps. It’s like a dry ingredient party, everyone gets along.
- In a separate, medium-sized bowl, combine your wet ingredients: eggs, milk, oil (or melted butter), and vanilla extract. Give them a good whisk until they’re all friends and evenly mixed. This is where the magic starts to happen!
- Pour the wet mixture into the dry ingredients. Mix with a spatula or whisk until *just combined*. **Do not overmix!** Overmixing is the enemy of moist cake. A few small lumps are totally okay, really!
- Carefully stir in the hot water (or hot coffee for chocolate cake). The batter will be thin, but that’s completely normal and actually a good thing for maximum moisture. It’s science, baby.
- Pour the thin batter into your prepared pan and slide it into the preheated oven. Bake for 30-35 minutes, or until a wooden skewer or toothpick inserted into the center comes out clean or with moist crumbs attached. **Keep an eye on it!**
- Let the cake cool in the pan for 10-15 minutes before carefully inverting it onto a wire rack to cool completely. Impatience is a virtue, but not here. Once cool, frost it, dust it, or eat it naked – your call! Revel in your moist masterpiece.
Common Mistakes to Avoid
We’ve all been there. Learn from my past (numerous) baking blunders!
- **Overmixing the batter:** This is the arch-nemesis of moist cake. You want to mix *just* until combined. Lumps are character, dry cake is tragedy. Embrace the lumps!
- **Not preheating your oven:** Seriously, folks. An oven needs to be at temperature before the cake goes in. Otherwise, you’re just putting it in a cold sauna, and it won’t rise properly. Rookie mistake, as mentioned!
- **Opening the oven door constantly:** Resist the urge! Every time you peek, the temperature drops, and your cake might sink. Be strong, warrior.
- **Baking too long:** Dry cake alert! Keep an eye on the clock and the toothpick test. When it’s clean (or has moist crumbs), it’s done. Don’t push it.
Alternatives & Substitutions
Feeling adventurous? Or just missing an ingredient? No stress, we’ve got options!
- **Buttermilk vs. Regular Milk:** If you want next-level moistness and a slightly tangy flavor, swap regular milk for buttermilk. The acidity does wonders for tenderness. No buttermilk? Add 1 tablespoon lemon juice or white vinegar to regular milk and let it sit for 5 minutes. Voila!
- **Coffee for Hot Water (Chocolate Cakes):** For chocolate cakes, using hot brewed coffee instead of hot water seriously amplifies the chocolate flavor without making it taste like coffee. Don’t knock it till you try it, it’s a game-changer!
- **Oil vs. Butter:** Vegetable oil gives a consistently moist crumb. Melted butter adds richness but can sometimes make a cake a tiny bit denser. Both work, pick your fighter!
- **Gluten-Free Flour:** You can totally use a 1:1 gluten-free baking blend. Just make sure it includes xanthan gum for structure. **FYI**, the texture might be slightly different, but still delicious!
FAQ (Frequently Asked Questions)
Got questions? I’ve got (casual) answers!
- Can I use margarine instead of butter? Well, technically yes, but why hurt your soul like that? Butter just tastes better, let’s be real. If you’re using oil, stick with that.
- My cake sank in the middle! What happened? Probably opened the oven door too early, or it wasn’t fully baked. Don’t worry, even pros do it. Just cover it with extra frosting and call it “rustic.”
- How do I know when it’s *really* done? The toothpick test is your best friend. If it comes out with moist crumbs, it needs a minute or two more. If it’s wet batter, definitely more time. Clean? You’re golden!
- Can I make this into cupcakes? Absolutely! Just reduce the baking time to about 18-22 minutes. Keep an eye on those little guys, they bake faster.
- How long does it stay moist? Stored properly in an airtight container at room temp, this cake stays wonderfully moist for 3-4 days. But let’s be honest, it probably won’t last that long.
- Do I need fancy equipment? Nah, a couple of bowls, a whisk, and a pan are pretty much all you need. Stand mixers are for show-offs (kidding! mostly).
Final Thoughts
So there you have it, folks! Your very own blueprint to a moist cake slice that’ll make you question all those dry, sad cakes from your past. You just conquered the kitchen, made something delicious, and probably learned a thing or two without even realizing it. Now go impress someone—or just yourself, honestly—with your new culinary skills. You’ve earned that slice (or two!). Happy baking, my friend!

