So, you’re officially craving something warm, gooey, and utterly delicious, but the thought of a sugar crash makes your teeth ache just imagining it? Been there, bought the T-shirt. You want the comfort of a cinnamon roll, but without that refined sugar guilt trip. Good news, my friend! We’re about to make some magic happen that’ll tickle your taste buds AND make you feel like a health guru (without actually having to *be* one). Forget the fancy, just bring your chill vibes and maybe a decent Spotify playlist.
Why This Recipe is Awesome
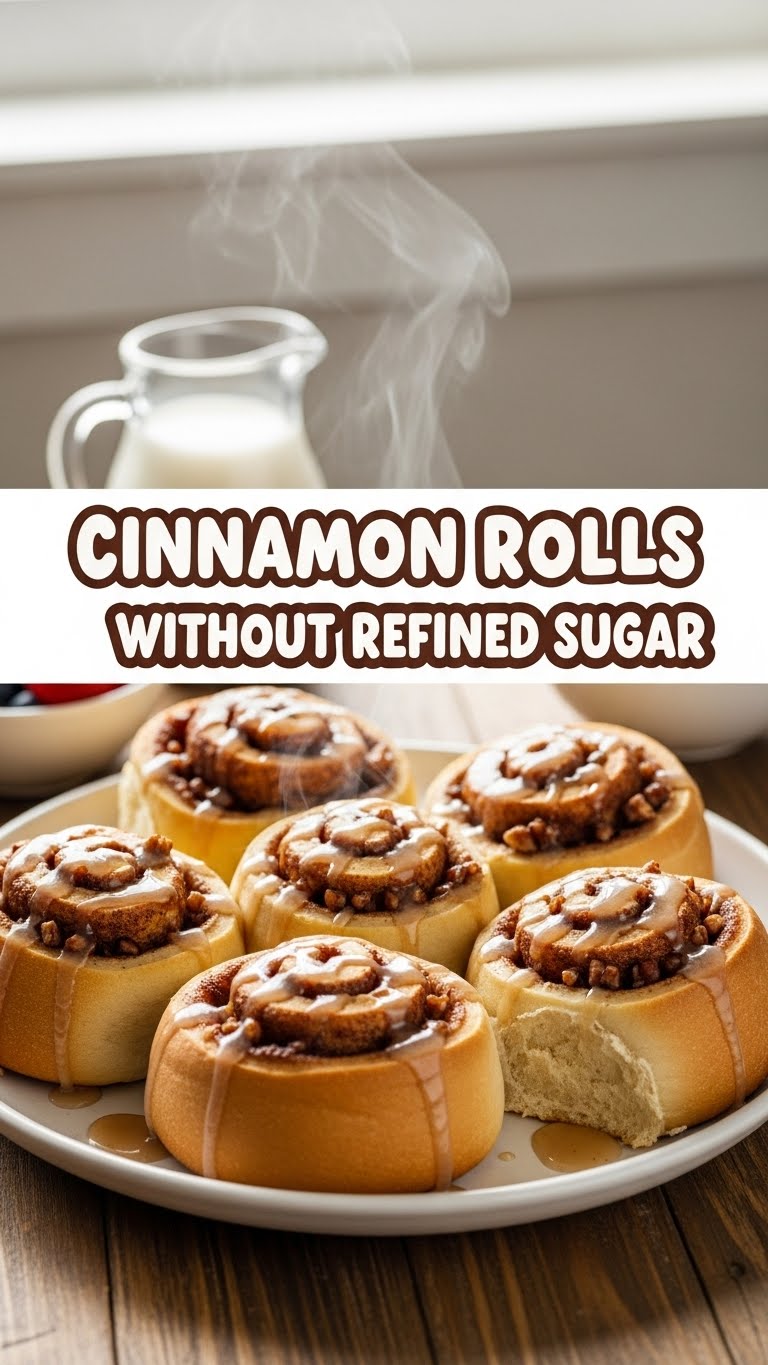
Okay, let’s be real. Most “healthy” versions of your favorite treats taste like regret and sadness. Not this one! This recipe for cinnamon rolls without refined sugar is genuinely a game-changer. Why? Because it’s:
- Seriously tasty: Like, “why haven’t I been doing this all my life?” tasty.
- Idiot-proof: If I, a person whose kitchen sometimes looks like a war zone after making toast, can nail these, you absolutely can too.
- Guilt-free(ish): We’re swapping out the processed stuff for natural sweeteners, so you can totally have seconds (or thirds, I’m not judging).
- Proof you’re basically a kitchen wizard: Imagine the look on your friends’ faces when you tell them these delightful rolls are *actually* good for them. Mind. Blown.
Plus, your house will smell like a dream. No, really. It’s better than any candle, FYI.
Ingredients You’ll Need
Time to gather our delicious arsenal! Don’t worry, nothing too obscure here. Just good, honest ingredients ready to party.
- For the Dough:
- 1 cup warm milk (dairy or non-dairy, your call! Just make sure it’s not boiling hot, unless you’re trying to kill the yeast, you monster).
- 2 ¼ teaspoons active dry yeast (one packet, for the non-bakers amongst us).
- ¼ cup maple syrup (the real deal, none of that corn syrup impostor stuff).
- 1 large egg (room temperature, if you’re feeling fancy).
- ¼ cup unsalted butter, melted (or coconut oil if you’re going dairy-free!).
- ½ teaspoon sea salt (because flavor!).
- 3 ½ – 4 cups all-purpose flour (start with 3 ½, add more if the dough is still super sticky, like trying to peel duct tape from a wet floor).
- For the Filling:
- ½ cup coconut sugar (it’s got a lovely caramel vibe and looks like brown sugar’s cool cousin).
- 2 tablespoons ground cinnamon (freshly ground, if you’re feeling extra. Otherwise, the jar is fine, nobody’s judging).
- ¼ cup unsalted butter, softened (NOT melted, unless you want a buttery puddle, which… isn’t ideal).
- For the Glaze (optional, but highly recommended, because YUM):
- 4 oz cream cheese, softened (full-fat for max deliciousness, IMO).
- 2 tablespoons maple syrup (again, the good stuff!).
- 1 tablespoon milk (to thin it out, because nobody likes glue).
- ½ teaspoon vanilla extract (the real stuff, don’t skimp!).
Step-by-Step Instructions
- Activate the Yeast: In a large bowl (or stand mixer bowl), combine the warm milk, yeast, and a tablespoon of that glorious maple syrup. Give it a gentle stir and let it sit for about 5-10 minutes. You should see it get all bubbly and foamy, meaning your yeast is alive and ready to party! If it doesn’t foam, your yeast is probably dead. Start over, sad but true.
- Mix the Wet Ingredients: To your bubbly yeast mixture, add the remaining maple syrup, egg, melted butter (or coconut oil), and salt. Whisk it all together until it’s beautifully combined.
- Add the Flour: Gradually add the flour, about a cup at a time, mixing after each addition. Once it starts to form a shaggy dough, switch to your hands or the dough hook on your stand mixer. Knead for 5-7 minutes until the dough is smooth and elastic. It should spring back when you poke it. Don’t over-knead, or you’ll end up with tough rolls!
- First Rise: Lightly oil a large bowl, place your dough ball in it, and turn to coat. Cover the bowl with a clean kitchen towel or plastic wrap and let it rise in a warm place for 1-1.5 hours, or until it has doubled in size. This is where patience pays off!
- Prepare the Filling: While your dough is rising, mix the softened butter, coconut sugar, and cinnamon in a small bowl until well combined. Set aside.
- Roll it Out: Once your dough has doubled, gently punch it down (it’s surprisingly satisfying!). Flour a clean surface and roll the dough into a large rectangle, about 18×12 inches. Aim for even thickness, like you’re rolling out a red carpet for your future cinnamon rolls.
- Spread the Filling: Evenly spread your cinnamon-sugar mixture over the entire surface of the dough, leaving a small ½-inch border on one of the long edges.
- Roll ‘Em Up: Starting from the opposite long edge (the one with the filling all the way to the edge), tightly roll the dough into a log. Be as snug as a bug in a rug!
- Slice and Arrange: Using a sharp knife or, even better, a piece of unflavored dental floss (seriously, try it!), slice the log into 12 even rolls, about 1 ½ inches thick. Arrange them in a greased 9×13 inch baking dish, leaving a little space between each one. They’re gonna grow!
- Second Rise: Cover the baking dish again and let the rolls rise in a warm spot for another 30-45 minutes, or until they’re puffy and snuggly looking. Preheat your oven to 375°F (190°C) during the last 15 minutes of this rise.
- Bake: Bake for 20-25 minutes, or until golden brown on top and cooked through. Keep an eye on them—nobody wants burnt bottoms!
- Make the Glaze (if you’re feeling extra): While the rolls are cooling slightly, whisk together all the glaze ingredients until smooth. If it’s too thick, add a tiny bit more milk; too thin, a tiny bit more cream cheese.
- Glaze and Devour: Once the rolls are out of the oven and have cooled for about 10 minutes (so the glaze doesn’t just melt away into oblivion), generously drizzle that creamy glaze over them. Serve warm and bask in the glory!
Common Mistakes to Avoid
We all make mistakes, it’s part of the human (and baking) experience! But let’s try to dodge these common blunders, shall we?
- Using Cold Milk/Egg: Rookie mistake! Cold ingredients can shock the yeast into a coma, meaning no rise for your rolls. Make sure your milk is warm (not hot!) and your egg is at room temp.
- Over-Kneading: Thinking more kneading means better dough? Nope! Too much kneading develops too much gluten, resulting in tough, chewy rolls instead of soft, pillowy ones. When the dough is smooth and elastic, stop!
- Not Letting Them Rise Enough: Impatient much? Cutting the rising time short means dense, small rolls. Give them their full time to puff up and get happy. Good things come to those who wait!
- Over-Baking: Leaving them in the oven too long will dry them out faster than my witty banter on a Monday morning. Keep an eye on the color—golden brown is your cue.
- Skimping on the Filling: This isn’t the time to be shy with butter, coconut sugar, and cinnamon. Go big or go home!
Alternatives & Substitutions
Feeling adventurous or just working with what you’ve got? No worries, we can totally get creative!
- Flour Power: You can totally experiment with different flours! A blend of whole wheat pastry flour and all-purpose can add a nice nutty flavor and extra fiber. Just know it might absorb liquid differently, so adjust as needed. I personally stick to all-purpose for max fluffiness, but you do you!
- Sweetener Swaps: If maple syrup isn’t your jam, you could try honey (same amount) or even date syrup. For the filling, brown sugar (if you don’t mind a little refined sugar or can find an unrefined version) or even more finely ground dates could work in a pinch, though the texture might be a little different.
- Dairy-Free/Vegan Vibes: Swap regular milk for almond, oat, or soy milk. Use coconut oil instead of butter in the dough, and a good vegan butter stick for the softened butter in the filling. For the glaze, use vegan cream cheese and a non-dairy milk. Easy peasy!
- Nut-Free Zone: Just make sure your milk alternative is nut-free (like oat or soy) and you’re good to go!
FAQ (Frequently Asked Questions)
Got questions? I’ve got answers (mostly, don’t ask me about quantum physics).
- Can I make the dough ahead of time? Absolutely! After the first rise, you can punch down the dough, cover it tightly, and refrigerate it overnight. Just let it come to room temperature for about 30-60 minutes before rolling and filling.
- What if my rolls don’t rise? Oh no! Most likely culprits: your milk was too hot (killed the yeast) or too cold (yeast stayed asleep), or your yeast was expired. Check the expiration date on your yeast, and always ensure your milk is warm, not scorching.
- Can I use margarine instead of butter? Well, technically yes, but why hurt your soul like that? Butter just tastes better and gives a richer texture. Unless you *really* can’t have dairy, stick to butter. Your taste buds will thank you.
- How do I store leftovers? If there ARE leftovers (a big IF!), store them in an airtight container at room temperature for up to 2 days, or in the fridge for up to 5 days. Reheat gently in the microwave or oven.
- Can I freeze these cinnamon rolls? You betcha! You can freeze the baked and glazed rolls, or even freeze the unbaked rolls after the second rise. For unbaked, freeze them on a baking sheet, then transfer to a freezer bag. Thaw overnight in the fridge and then let them rise at room temp before baking.
- Is coconut sugar actually better for me? While it’s still sugar, it does retain some nutrients and has a slightly lower glycemic index than refined sugar. So, “better” is relative, but it’s generally considered a less processed alternative. Plus, the flavor is divine!
Final Thoughts
And there you have it, folks! Your very own batch of mind-blowingly delicious cinnamon rolls, sans the refined sugar hangover. You’ve just achieved culinary greatness, my friend. Whether you share them or hoard them all for yourself (I support either decision, no judgment here), know that you’ve earned every single bite. Now go impress someone—or yourself—with your new kitchen prowess. You’ve earned it!


