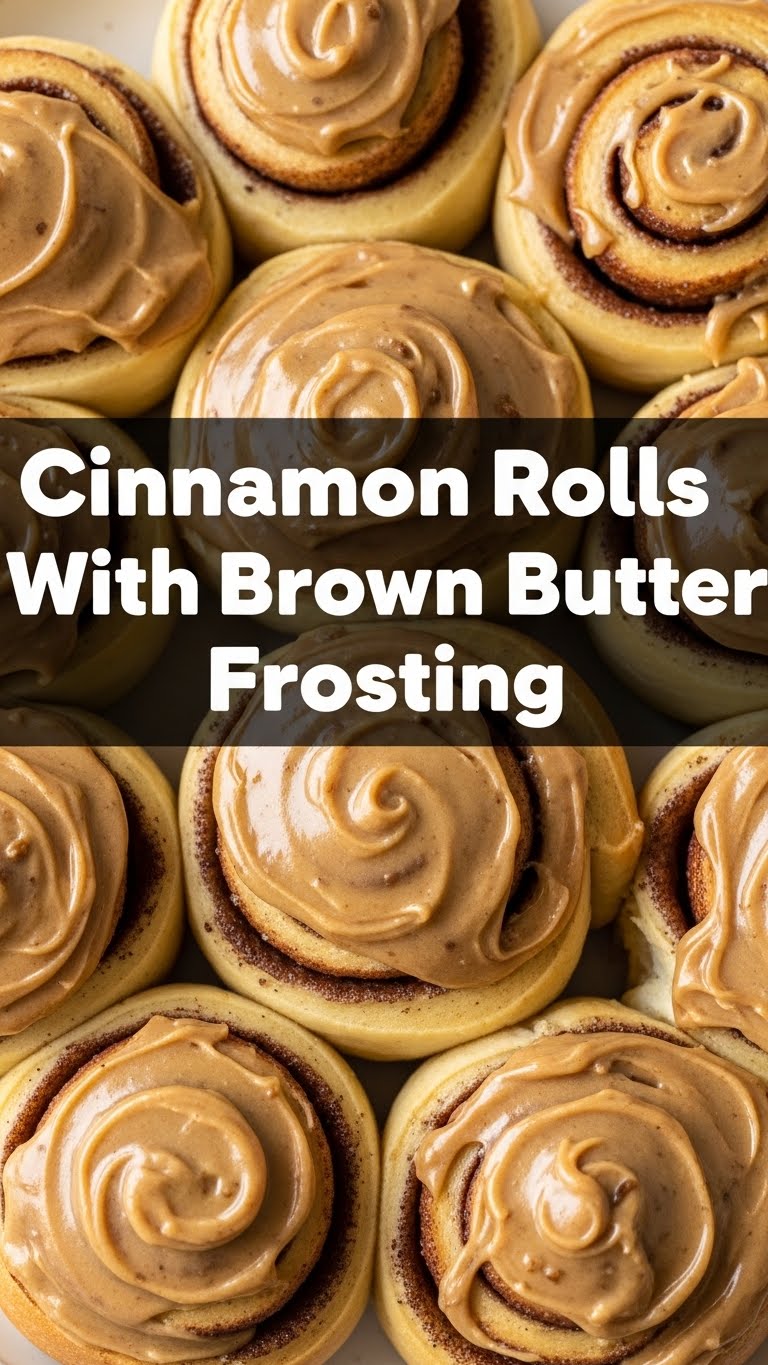
So, your sweet tooth is doing a little jig, but your patience for complex baking projects is, well, non-existent? Been there, baked that, got the sticky fingers to prove it. If you’re anything like me, you want max flavor for minimum fuss, and a dessert that screams “I love you” (or “I love me”) without requiring an advanced pastry degree. Enter: Cinnamon Rolls with Brown Butter Frosting. This isn’t just a recipe; it’s a warm, sticky, heavenly hug for your soul.
Why This Recipe is Awesome
Let’s be real, most cinnamon roll recipes involve a journey to the center of the earth and back. Not this one. This recipe is your fast-pass to fluffy, cinnamony nirvana. We’re talking about a dough that’s surprisingly easy to handle, a filling that’s pure joy, and a brown butter frosting that will make you question every life decision you made before discovering its existence. Seriously, it’s idiot-proof—even I didn’t mess it up, and my kitchen has seen some things. **The brown butter frosting is the real MVP here**, taking these from “good” to “I might cry a little” levels of deliciousness.
Ingredients You’ll Need
Alright, gather your troops! No exotic spices or ancient grains needed, just good old pantry staples with a little buttery flair.
For the Rolls:
- **1 cup whole milk:** Warm, but not scorching. Think warm bath, not hot tub.
- **2 ¼ teaspoons active dry yeast:** One packet, please. Make sure it’s not expired, or your rolls will just sit there, judging you.
- **¼ cup granulated sugar:** Just enough to sweeten the deal.
- **1 large egg:** Room temp, because happy eggs make happy dough.
- **¼ cup unsalted butter:** Melted and cooled slightly.
- **½ teaspoon salt:** Balances everything out. Trust me.
- **3 cups all-purpose flour:** Plus a little extra for dusting. Don’t go crazy with the flour, though, or your rolls will be brick-like.
For the Filling:
- **½ cup unsalted butter:** Melted. This is what makes it all stick together.
- **¾ cup packed light brown sugar:** Dark brown works too, for a deeper caramel note.
- **1 tablespoon ground cinnamon:** The star of the show. Don’t skimp!
For the Brown Butter Frosting:
- **½ cup unsalted butter:** Yes, more butter. Don’t look at me like that; it’s essential for the “brown butter” part.
- **2 cups powdered sugar:** Sifted, if you’re fancy (or hate lumps).
- **1 teaspoon vanilla extract:** The good stuff, please. No imitation vanilla in this masterpiece.
- **2-3 tablespoons milk or cream:** Just a splash to get that perfect drizzly consistency.
Step-by-Step Instructions
Let’s get baking! Follow these steps, and you’ll be a cinnamon roll wizard in no time.
- **Wake up the yeast:** In a large bowl, whisk together the warm milk, yeast, and a pinch of that granulated sugar. Let it sit for about 5-10 minutes until it gets foamy. This means your yeast is alive and ready to party!
- **Mix the wet and dry:** To your foamy yeast mixture, add the remaining granulated sugar, egg, melted butter, and salt. Give it a good whisk. Gradually add the flour, mixing with a wooden spoon or a stand mixer with a dough hook until a shaggy dough forms.
- **Knead (a little):** Turn the dough out onto a lightly floured surface. Knead for about 3-5 minutes until it’s smooth and elastic. It shouldn’t be super sticky. If it is, add a tiny bit more flour, but be conservative!
- **Let it rise:** Lightly grease your bowl, put the dough in, and turn it once to coat. Cover with plastic wrap or a damp towel and let it rise in a warm place for about 1 hour, or until doubled in size. This is a great time to scroll through social media or make coffee.
- **Prep the filling:** While the dough is doing its thing, melt ½ cup butter for the filling. In a small bowl, mix the brown sugar and cinnamon together. Set aside.
- **Roll it out:** Once the dough has doubled, punch it down gently (it’s satisfying, I know). Roll it out on a lightly floured surface into a rectangle, roughly 12×18 inches.
- **Fill ‘er up:** Spread the melted butter evenly over the dough rectangle, leaving a small ½-inch border on one of the long edges. Sprinkle the brown sugar and cinnamon mixture all over the butter.
- **Roll ’em up tight:** Starting from the long edge opposite your clean border, roll the dough up tightly into a log. Press the seam to seal it.
- **Slice and dice:** Now for the fun part! You can use a very sharp knife, but I highly recommend unflavored dental floss for clean cuts. Slide a piece of floss under the log, cross it over the top, and pull to cut 1 ½-inch thick rolls. You should get about 12 rolls.
- **Second rise:** Arrange the rolls in a lightly greased 9×13 inch baking dish. Cover and let them rise again for another 30-45 minutes, or until puffy.
- **Bake time!** Preheat your oven to 375°F (190°C). Bake the rolls for 20-25 minutes, or until golden brown and cooked through. They should be lightly browned on top and firm to the touch.
- **Make the brown butter frosting:** While the rolls are baking, make the magic happen. Melt ½ cup butter in a light-colored saucepan over medium heat. Cook, stirring occasionally, until the butter turns golden brown and smells wonderfully nutty. You’ll see tiny brown bits at the bottom. **Watch it like a hawk—it goes from perfect to burnt in seconds!** Remove from heat and immediately pour into a heatproof bowl to stop it from cooking further.
- **Finish the frosting:** Let the brown butter cool slightly (just a few minutes). Add the powdered sugar, vanilla extract, and 2 tablespoons of milk/cream. Whisk until smooth. If it’s too thick, add more milk a teaspoon at a time until you reach a luscious, drizzly consistency.
- **Frost and devour:** As soon as the rolls come out of the oven, slather that glorious brown butter frosting all over them. The warmth of the rolls will melt the frosting into every nook and cranny. Serve warm and bask in the glory!
Common Mistakes to Avoid
We all make mistakes, especially when deliciousness is on the line. Learn from my oopsies:
- **Killing the Yeast:** If your milk is too hot (over 115°F/46°C), you’ve basically cooked your yeast. Too cold, and it won’t activate. Aim for lukewarm—like bathwater for a baby.
- **Too Much Flour:** This is a common rookie mistake. Resist the urge to add all the flour just because the dough feels sticky. A slightly sticky dough leads to tender rolls; too much flour leads to hockey pucks.
- **Over-Kneading:** While some kneading is good, going overboard can make your rolls tough. Just a few minutes until smooth is plenty for this recipe.
- **Under-Baking:** Nobody wants a doughy center! Make sure they’re golden brown and baked through. When in doubt, give it another 2-3 minutes.
- **Burning the Brown Butter:** This is the most crucial step for the frosting. **Seriously, do NOT walk away from that saucepan.** It happens fast. If it smells burnt, start over. Burnt butter frosting is a sad, sad thing.
- **Not Using Floss to Cut:** Okay, it’s not a “mistake,” but a sharp knife can squish your perfectly rolled dough. Dental floss (unflavored, please!) gives you clean, professional-looking cuts. FYI, it’s a game changer.
Alternatives & Substitutions
Feeling a little adventurous, or missing an ingredient? No stress, we can totally adapt!
- **Milk:** While whole milk provides the best richness, you can absolutely use 2% or even a non-dairy milk like oat or almond. The texture might be slightly different, but still delish.
- **Butter (Gasp!):** For the dough, if you’re out of butter, a neutral oil like vegetable or canola could work in a pinch, but the flavor won’t be as rich. For the frosting? **No. Just no.** Don’t try to brown margarine. Your soul deserves better.
- **Filling Flavor Boosters:** Want to get fancy? Add a pinch of cardamom to your cinnamon sugar, or some orange zest for a brighter flavor. Chopped pecans or walnuts also make a great addition.
- **Different Frosting:** If brown butter isn’t your jam (or you’re feeling lazy), a classic cream cheese frosting (cream cheese, butter, powdered sugar, vanilla) is always a winner. Or, a simple glaze of powdered sugar and a splash of milk works too. But IMO, brown butter frosting is non-negotiable for maximum happiness.
FAQ (Frequently Asked Questions)
Got questions? I’ve got answers (and maybe some more sarcasm).
- **Can I make these ahead of time?** Absolutely! After placing the cut rolls in the baking dish for their second rise, cover them tightly with plastic wrap and pop them in the fridge overnight (up to 12 hours). Take them out 30-60 minutes before baking to come to room temp, then bake as usual. **Genius, right?**
- **My yeast didn’t foam. What went wrong?** Oh no! Most likely, your liquid was too hot and killed the yeast, or too cold and didn’t activate it. Or, your yeast might be expired. Always check the date! Unfortunately, you’ll need to start fresh with new yeast and correctly tempered milk.
- **How do I know when the brown butter is ready?** It’ll smell nutty, turn a lovely amber color, and you’ll see tiny browned bits at the bottom of the pan. The moment it smells burnt, it is. **Again, stand over it!**
- **Can I freeze these?** Yep! You can freeze them unbaked (after the second rise, wrap well) or baked (cool completely, then wrap well). Reheat frozen baked rolls in the oven until warmed through. Thaw unbaked rolls in the fridge overnight before baking.
- **I don’t have dental floss. What then?** While floss is magic, a very sharp, un-serrated knife will work. Just be gentle and try not to squish your beautiful roll.
- **Are these healthy?** *Giggles uncontrollably.* Friend, these are cinnamon rolls with brown butter frosting. They are healthy for your soul, your happiness, and your immediate need for comfort. For your diet, not so much. Enjoy the indulgence!
Final Thoughts
You did it! You’ve brought forth a batch of the most gloriously gooey, tender, and outrageously delicious cinnamon rolls. Go on, brag a little. Share (or don’t, no judgment here, I probably wouldn’t either). You’re basically a pastry chef now, and your kitchen smells like a dream. Now go impress someone—or yourself—with your new culinary skills. You’ve earned it!

