So you’re craving something warm, gooey, and absolutely soul-hugging, but the thought of a complicated recipe makes you want to just… nap? Same, friend, same. We’re talking cinnamon rolls here. Not the sad, dry kind, but the *sticker-worthy* kind – the ones that make you go, “Wait, *I* made this?” Yes, you did. And it’s easier than finding matching socks.
Why This Recipe is Awesome
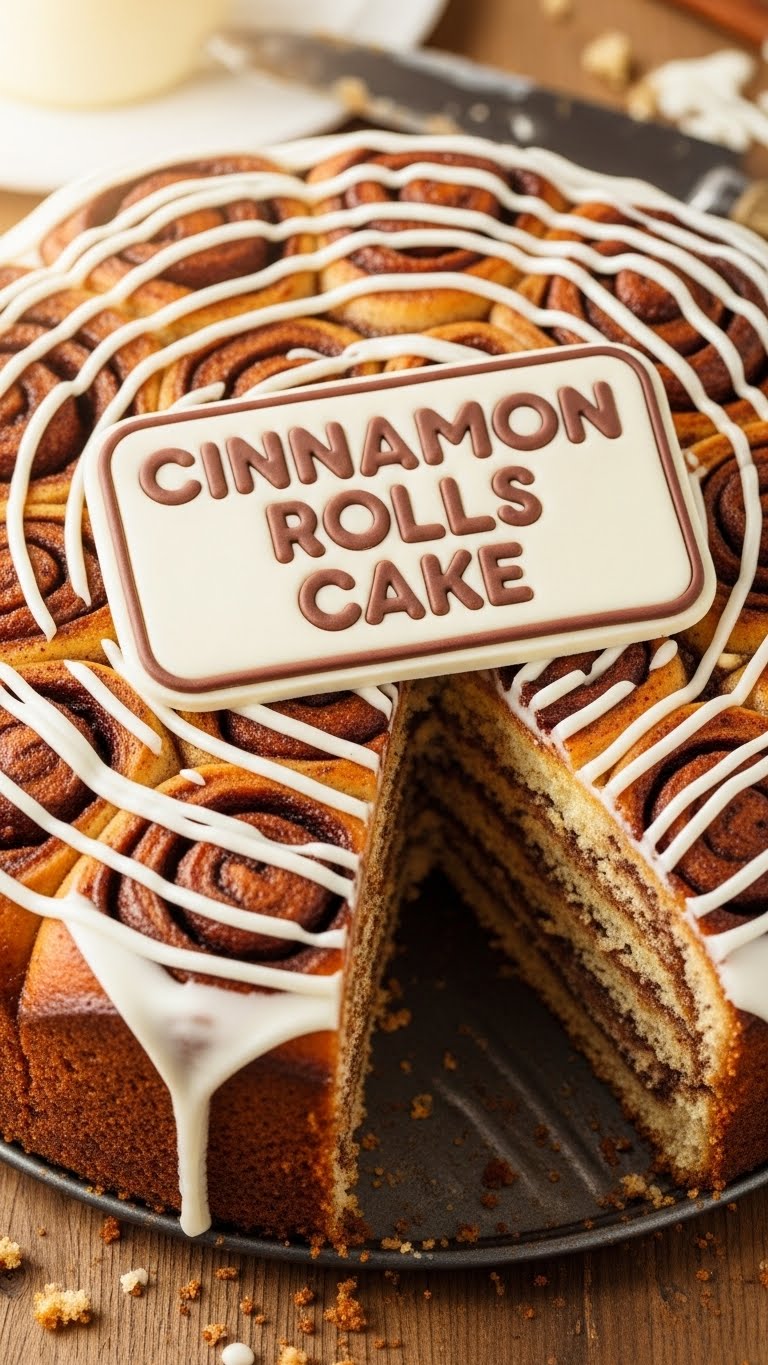
Alright, buckle up buttercup, because this isn’t just *a* cinnamon roll recipe. This is THE cinnamon roll recipe. Why? Because it’s practically **fail-proof**. Seriously, if I, a person who once set off a smoke alarm making toast, can nail these, you’re golden. It delivers that perfect balance of fluffy dough, spicy-sweet filling, and luscious cream cheese frosting that just screams ‘happy place.’ Plus, your kitchen will smell divine, which is basically free aromatherapy. You’re welcome. Also, they look so good, you’ll want to print a picture and stick it everywhere. Hence, the ‘sticker’ vibe.
Ingredients You’ll Need
Gather ’round, fellow culinary adventurers! Here’s what you’ll need for your sticker-worthy cinnamon roll quest. No exotic ingredients, just the good stuff.
- For the Dough (the fluffy hug part):
- Milk: About 1 cup. Warm it up, but don’t boil it. Unless you’re into scalding milk, which… don’t.
- Active Dry Yeast: 2 ¼ teaspoons (one packet). This is your magic fairy dust.
- Granulated Sugar: ¼ cup, plus a pinch for the yeast. Sweetness for the dough itself.
- Unsalted Butter: ⅓ cup, melted. Because everything’s better with butter.
- Large Egg: 1, at room temperature. Gives it richness and color.
- All-Purpose Flour: 3 to 3 ½ cups. Your dough’s backbone.
- Salt: ½ teaspoon. Balances all that sweet goodness.
- For the Filling (the sticky, spicy heart):
- Unsalted Butter: ½ cup (1 stick), softened. Don’t melt it for this part, we need it spreadable.
- Brown Sugar: ¾ cup, packed. Deep, caramelly sweetness.
- Ground Cinnamon: 2 tablespoons. Don’t skimp! This is *cinnamon* rolls.
- For the Frosting (the glorious crown):
- Cream Cheese: 4 ounces, softened. The star of the show. Full-fat, please.
- Unsalted Butter: ¼ cup (½ stick), softened. Team butter again!
- Powdered Sugar: 1 ½ cups. For that smooth, dreamy finish.
- Vanilla Extract: ½ teaspoon. A little touch of fancy.
- Milk (or cream): 1-2 tablespoons. To get that perfect drizzly consistency.
Step-by-Step Instructions
Alright, let’s get those hands doughy! Follow these simple steps, and you’ll be a cinnamon roll wizard in no time.
- Activate the Yeast: In a large bowl, combine the warm milk (think bathwater temp, not lava), a pinch of sugar, and the yeast. Give it a gentle stir. Let it hang out for about 5-10 minutes until it gets foamy and bubbly. This means your yeast is alive and ready to party! If it doesn’t foam, your yeast might be dead. RIP. Start over.
- Mix the Dough: Add the ¼ cup sugar, melted butter, and egg to the yeast mixture. Whisk it all together until well combined. Gradually add 2 cups of the flour and the salt, mixing until just combined. Then, slowly add the remaining flour, ½ cup at a time, until a soft, slightly sticky dough forms. You might not need all the flour, so trust your gut!
- Knead it Out: Turn the dough out onto a lightly floured surface. Knead for 5-7 minutes until it’s smooth and elastic. It should spring back when you poke it. Don’t over-knead, or you’ll end up with tough rolls. We want soft hugs, not wrestling matches.
- First Rise (the Nap Time): Lightly grease your large bowl with a little oil. Place the dough in the bowl, turning it once to coat. Cover the bowl with plastic wrap or a clean kitchen towel. Let it rise in a warm, draft-free place for 1-1 ½ hours, or until it has doubled in size. This is where the magic happens!
- Prep the Filling & Roll it Out: While your dough is rising, mix the softened butter, brown sugar, and cinnamon for the filling in a small bowl. Once the dough has doubled, punch it down gently to release the air. Turn it out onto a lightly floured surface and roll it into a large rectangle, about 18×12 inches. **Aim for an even thickness** here, folks, for consistent rolls.
- Spread & Roll: Evenly spread the cinnamon-sugar mixture all over the dough, leaving a small border (about ½ inch) along one of the long edges. Starting from the opposite long edge, carefully roll the dough into a tight log. **Tight is key** to prevent gaps!
- Slice ’em Up: Using a sharp knife or, even better, unflavored dental floss (seriously, try it!), slice the log into 12 equal pieces, about 1 ½ inches thick. Place these beautiful spirals into a lightly greased 9×13 inch baking dish.
- Second Rise (more Nap Time): Cover the baking dish again and let the rolls rise in a warm place for another 30-45 minutes, or until they look puffy and snug against each other.
- Bake ’em! Preheat your oven to 375°F (190°C) during the last 15 minutes of the second rise. Bake for 20-25 minutes, or until they’re golden brown and irresistible. **Don’t overbake!** We want gooey centers, not hockey pucks.
- Whip up the Frosting: While the rolls are cooling slightly (but still warm!), beat the softened cream cheese and butter together until smooth. Add the powdered sugar, vanilla, and 1 tablespoon of milk/cream. Beat until creamy and smooth, adding more milk if needed to reach your desired drizzly consistency.
- Frost & Devour: Generously spread that glorious frosting over the warm (not hot, or it’ll melt everywhere!) cinnamon rolls. Now, go forth and enjoy your masterpiece!
Common Mistakes to Avoid
Look, we all make mistakes. It’s part of the journey. But some are easily dodged when baking cinnamon rolls. Pay attention, grasshopper.
- Killing the Yeast: Water that’s too hot? Yeast dies. Too cold? It sleeps forever. **Aim for 105-115°F (40-46°C)**.
- Not Kneading Enough (or Too Much): Under-kneading means dense, sad rolls. Over-kneading means tough, chewy ones. You want it smooth and elastic, but not stressed out.
- Rolling Too Loosely: If your dough log isn’t tight, you’ll end up with big gaps and the filling will ooze out. **Roll tightly from one end to the other!**
- Overbaking: This is the cardinal sin! Dry rolls are nobody’s friend. Pull them out when they’re golden brown and just barely set in the middle. The residual heat will finish them off.
- Frosting Cold Rolls: Why would you do that to yourself? The frosting is meant to get slightly melty and gooey into those nooks and crannies. Apply it when they’re warm, but not fresh-out-of-the-oven-boiling.
Alternatives & Substitutions
Feeling a little rebellious? Want to put your own spin on things? I respect that. Here are some ideas:
- No Butter? No Problem (kinda): For the dough, you *could* use a neutral oil, but honestly, butter just tastes better. For the filling, margarine could work, but again, butter is queen. **IMO, stick with butter for maximum deliciousness.**
- Dairy-Free Dough: Swap regular milk for a plant-based alternative (almond, oat, soy). Make sure it’s unsweetened. You’ll need to use a dairy-free butter substitute for the dough and filling, and a plant-based cream cheese for the frosting.
- Gluten-Free Flour: This one is trickier. You’d need a good GF all-purpose blend, probably with xanthan gum. Expect a slightly different texture, but still tasty!
- Spice it Up: Add a pinch of nutmeg or cardamom to your cinnamon filling for an extra layer of warmth.
- Nutty Rolls: Sprinkle some finely chopped pecans or walnuts over the cinnamon filling before rolling. A little crunch never hurt anyone.
- Orange Zest in the Frosting: A little brightness can cut through the sweetness. Grate some fresh orange zest into your cream cheese frosting. Trust me on this one.
FAQ (Frequently Asked Questions)
Got questions? I probably do too. But I’ll pretend to know the answers to yours.
- Q: My rolls didn’t rise, what went wrong?
A: Uh oh! Was your milk too hot or too cold? Yeast is picky. Or maybe your yeast was old. Always check the expiration date! **FYI, good yeast is happy yeast.** - Q: Can I make these ahead of time?
A: Absolutely! You have a couple of options:- Make the dough and let it do its first rise, then punch it down and refrigerate overnight. Take it out and let it warm up for an hour or so before rolling and shaping.
- Shape the rolls and place them in the baking dish, then cover tightly and refrigerate overnight. In the morning, take them out and let them rise at room temp for 1-1.5 hours before baking. This is my go-to for breakfast glory!
- Q: What if I don’t have a stand mixer?
A: No problem, your arm muscles are your best friend! You can knead the dough by hand. It’s a good workout, right? - Q: My frosting is too thick/thin! Help!
A: Too thick? Add a tiny splash more milk (or cream). Too thin? Whisk in a bit more powdered sugar. It’s all about finding *your* perfect consistency. - Q: Can I use margarine instead of butter?
A: Well, technically yes, but why hurt your soul like that? Butter just brings a richness that margarine can’t quite replicate. If you’re going for sticker-worthy, go butter all the way! - Q: How do I store leftovers?
A: Leftovers? What are those? Kidding! Keep them in an airtight container at room temperature for a day or two, or in the fridge for up to 5 days. Warm them up slightly in the microwave or oven for that fresh-baked feel.
Final Thoughts
Phew! You made it. You’ve now unlocked the secret to creating cinnamon rolls so good, they belong on a sticker. Or maybe just directly into your mouth. Whatever your preference. Baking should be fun, a little messy, and always rewarding. So go forth, embrace the sticky fingers, and bask in the glory of your homemade deliciousness. Now go impress someone—or yourself—with your new culinary skills. You’ve earned it! Seriously, share a pic if you make them. I wanna see those sticker-worthy beauties!


