So you’ve just whipped up a batch of glorious, gooey cinnamon rolls, huh? High five! Seriously, the smell alone is enough to make you feel like a culinary wizard. But now what? Just dump those beauties in a sad plastic bag or, gasp, leave them exposed on the counter? Uh-uh, not on my watch. We’re gonna talk about making those rolls look as good as they taste because, let’s be real, presentation is *everything* when you’re flexing your baking muscles (or gifting to someone you actually like). It’s time to give those swirly delights the red-carpet treatment they deserve!
Why This “Recipe” (for Packaging!) is Awesome
Because your cinnamon rolls aren’t just food; they’re an experience! And this “recipe” for packaging them? It’s basically the glow-up guide for your baked goods. Think about it: you put all that love and effort into making them, so why stop short at the finish line? This isn’t just about pretty boxes; it’s about elevating the entire vibe. It’s idiot-proof, honestly. Even I, notorious for wrapping gifts like a cat playing with a ball of yarn, can nail this. Plus, imagine the look on your friend’s face when they receive a beautifully packaged treat instead of something that looks like it survived a wrestling match with your counter. It’s a game-changer, trust me. **First impressions totally count, even for baked goods!**
Ingredients You’ll Need (for Packaging, of Course!)
- Your Amazing Cinnamon Rolls (Duh): Obviously, you’ve already got these on lock. Make sure they’re completely cool, though, unless you’re aiming for a soggy mess.
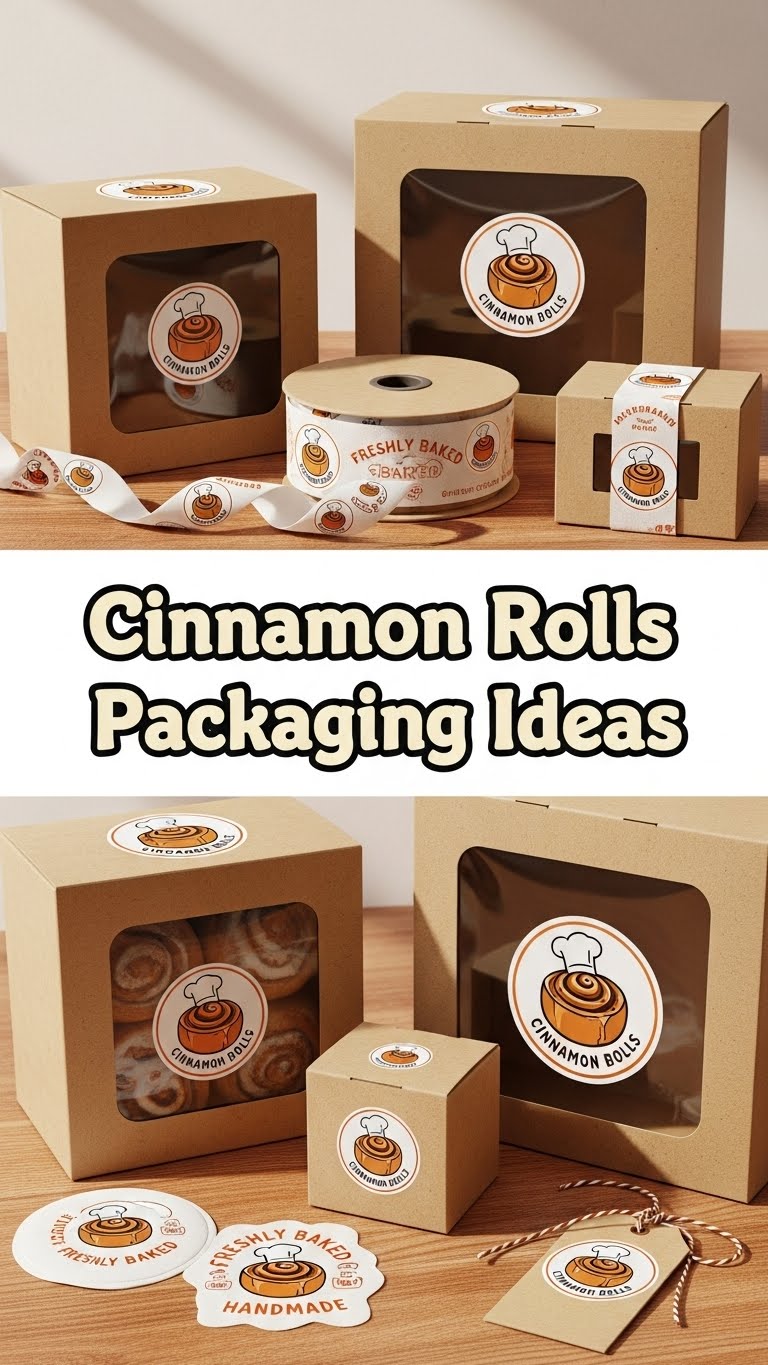
- Cute Boxes, Tins, or Jars: This is your main event! Think sturdy cardboard bakery boxes, reusable metal tins, or even wide-mouth mason jars for individual servings. Pick something that screams “I care!”
- Parchment Paper or Wax Paper: The unsung hero! This protects your rolls from sticking to the container and keeps them fresh. Don’t skip it, seriously.
- Ribbons, Twine, or Decorative String: Add a pop of color or rustic charm. Jute twine, satin ribbon, or even a strip of pretty fabric works wonders.
- Labels or Tags: Go custom with printed labels, or keep it rustic with handwritten tags. A simple “Enjoy!” or “Made with Love (and Butter)” always hits different.
- Optional Bling (but highly recommended):
- Dried Orange Slices or Cinnamon Sticks: For that “I’m fancy” vibe.
- Small Sprig of Rosemary or Bay Leaf: Adds a fresh, sophisticated touch (don’t knock it till you try it!).
- Glitter (Edible, obvs!): If you’re feeling extra. Sparkle never hurt anyone, right?
- A Small Handwritten Note: Because a personal touch always wins.
Step-by-Step Instructions
- Cool Them Down (Like, All the Way Down): This is step one, and it’s non-negotiable. Packaging warm rolls traps steam, making them soggy and sad. Let them chill out on a wire rack until they’re room temp.
- Choose Your Vessel Wisely: Got a sturdy box? A pretty tin? A charming jar? Lay it out. Make sure it’s clean and dry. No one wants cinnamon rolls that smell like last week’s cookies.
- Line It Up: Cut a piece of parchment or wax paper to fit the bottom of your container, with some extra to fold up the sides if needed. This creates a barrier and makes the rolls easier to remove.
- Arrange Those Beauties: Carefully place your cooled cinnamon rolls inside. Try not to squish them! If you’re using a box, arranging them snugly prevents them from bouncing around. For jars, one or two rolls usually fit perfectly.
- Seal the Deal (and Make it Pretty): Close your box or tin securely. Now for the fun part: wrap your chosen ribbon or twine around it. Tie a pretty bow or a simple knot. If you’re using jars, a piece of fabric under the lid and a tie around the neck looks super cute.
- Add Your Personal Flair: Attach your label or tag to the ribbon. If you’re using dried fruit or cinnamon sticks, tuck them under the ribbon or place them artfully on top of the container. A handwritten note can be tucked inside or taped to the lid. **Don’t overdo it, though—sometimes less is more!**
Common Mistakes to Avoid
- Packaging Hot Rolls: Rookie mistake! We talked about this. Steam = soggy disaster. Just don’t do it.
- Using Flimsy Containers: Nothing screams “I don’t care” like squished rolls. Invest in decent packaging. Your rolls deserve better.
- Forgetting a Liner: Parchment paper is your friend. Without it, your rolls might stick to the bottom, leaving half their goodness behind. Total bummer.
- Over-Decorating: It’s packaging, not a Christmas tree. A simple ribbon and tag are often more elegant than a mountain of embellishments.
- Not Securing the Lid Properly: A loose lid means stale rolls. Make sure it’s snug!
Alternatives & Substitutions
No fancy bakery boxes? No problem, superstar! We’re all about resourcefulness here:
- Instead of Boxes/Tins:
- Mason Jars: Perfect for individual servings or mini rolls. Just stack ’em up!
- Baskets: Line a small basket with a cute tea towel or fabric napkin, then place your rolls inside. Tie the corners of the fabric over the rolls to keep them covered. Very rustic chic!
- Foil Pans with Lids: If you’re making a huge batch for a crowd, these are super practical and can often go straight into the oven for reheating instructions.
- Instead of Fancy Ribbons:
- Twine or Jute String: Gives a lovely natural, farmhouse feel.
- Fabric Scraps: Cut up old bandanas, pretty tea towels, or even leftover quilting fabric for unique ties.
- Washi Tape: A few strips of decorative washi tape can seal a simple paper bag with style.
- For Labels/Tags:
- Cardstock & Hole Punch: Write your message, punch a hole, and tie it on. Easy peasy!
- Stamps: If you have alphabet stamps, you can create custom messages on plain paper tags.
- Just a Cute Sticker: Sometimes, that’s all you need.
FAQ (Frequently Asked Questions)
Got questions? I’ve got (mostly) sarcastic answers!
Can I use plastic wrap instead of a box? Well, technically yes, but why hurt your soul like that? It lacks *pizzazz*. For short-term storage at home, it’s fine, but for gifting, let’s aim higher, shall we?
How long will my cinnamon rolls stay fresh in this fancy packaging? The packaging itself won’t magically extend shelf life, sadly. They’ll generally be best for 1-2 days at room temperature, or up to a week in the fridge. **Always aim to give them fresh!**
Should I include the frosting separately? YES! This is a pro move, IMO. Pack the frosting in a small sealed container (like a tiny condiment cup or a mini mason jar) and attach it to your main package. This keeps the rolls from getting soggy and lets the recipient frost them fresh.
What if I don’t have any of these fancy things? Can I still make it look good? Absolutely! A simple brown paper bag (like a lunch bag) folded neatly, sealed with a colorful sticker or a bit of masking tape, and a handwritten “Enjoy!” can be super charming. It’s about the effort, not the expense.
Can I package them individually? You totally can, and it’s brilliant for parties or office treats! Wrap each roll in parchment or wax paper, then tie with a ribbon. Pop them all into a bigger basket or box.
Does the type of ribbon really matter? Does it *really* matter if you use fancy sprinkles versus regular ones? No, but it *feels* better! A nice ribbon just elevates the whole darn thing. It’s the small details that make a big impact.
Final Thoughts
So there you have it, folks! Packaging your glorious cinnamon rolls doesn’t have to be a chore; it can be another fun extension of your baking creativity. It shows you care, makes your gifts even more special, and honestly, makes those rolls look even more irresistible. Now go forth and make those cinnamon rolls not just taste good, but look *spectacular*. You’ve earned it, and so have those delicious swirls! Happy packaging!


