Ever stared at a beautiful cake and thought, “Man, I wish I could write ‘Happy Birthday’ on that without it looking like a toddler’s first finger painting?” Yep, me too. And guess what? It’s not as scary as it looks! Today, we’re diving into the ridiculously simple, yet oh-so-impressive art of chocolate writing on cake. Get ready to ditch those shaky hands and unleash your inner cake artist!
Why This Recipe is Awesome
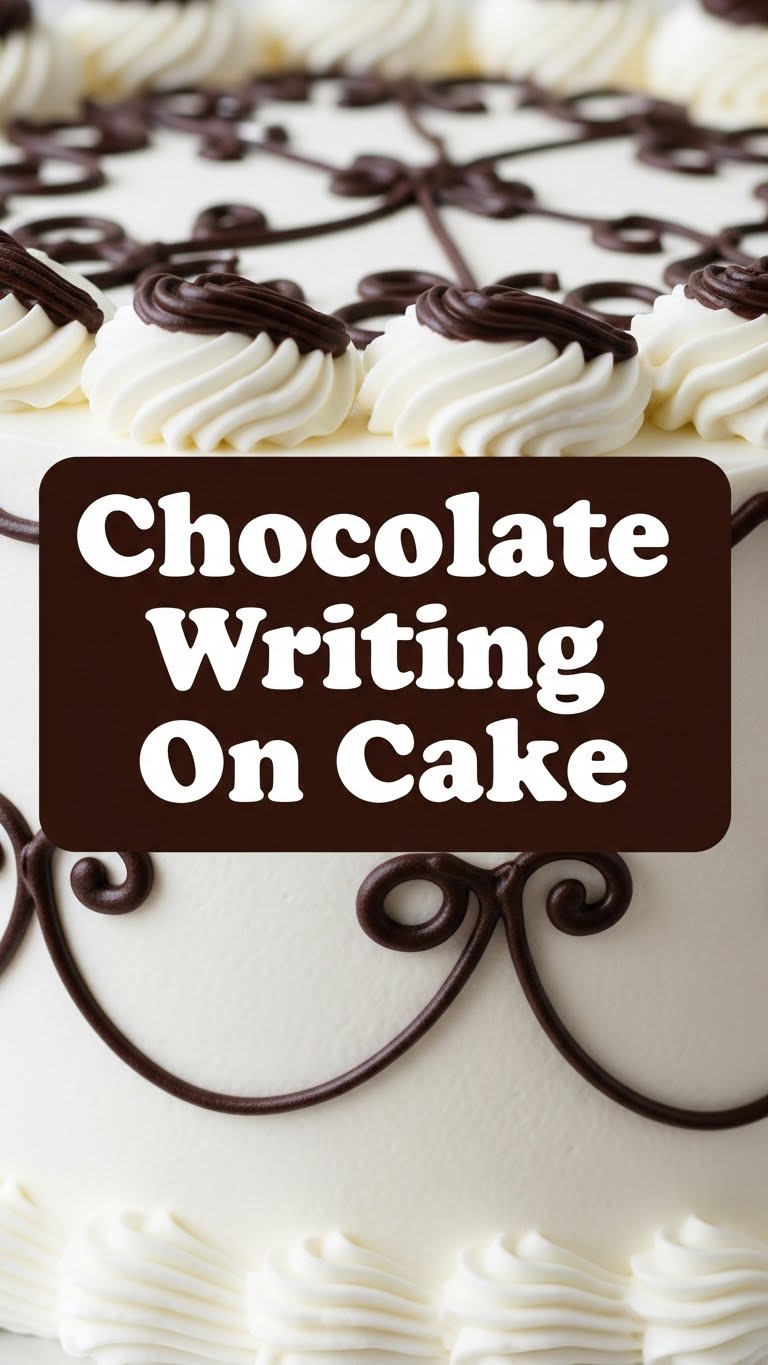
Because, let’s be real, you’ve probably tried to pipe chocolate before and ended up with a melted blob that vaguely resembled a sad worm. This method? It’s so foolproof, even I didn’t cry. Plus, it instantly makes any cake look ten times fancier with minimal effort. Hello, instant gratification! This isn’t just about writing; it’s about adding that personal, “I-totally-made-this-look-amazing-on-purpose” touch that’ll make everyone go, “Ooh, fancy!”
Ingredients You’ll Need
- Good Quality Chocolate: About 1/2 cup of chips or chopped bar. Whatever your chocoholic heart desires – dark, milk, or white! Just make sure it’s decent; your cake deserves better than waxy discount stuff, trust me.
- A Tiny Pat of Butter or Coconut Oil: We’re talking like, half a teaspoon. Think of it as chocolate’s personal lubricant to make it super smooth and pipe-able.
- Piping Bag or Sturdy Ziploc Bag: Your magic wand! Or, you know, a sandwich bag if you’re feeling scrappy. No judgment here.
- Small Scissors: For snipping, not for cutting corners on taste, obvs.
- Your Cake or Cupcakes: The beautiful blank canvas! Hopefully, you already have this part sorted, unless you’re just writing on your hand, which, hey, no judgment.
Step-by-Step Instructions
- Melt the Chocolate Like a Boss: Chop your chocolate into small, uniform pieces. This helps it melt evenly and prevents burnt bits. Place it in a microwave-safe bowl with your tiny pat of butter or coconut oil. Microwave in 30-second bursts, stirring vigorously in between, until smooth, glossy, and luscious. Don’t overheat it! We want smooth, not scorched.
- Prep Your Piping Bag: Spoon the glorious melted chocolate into your piping bag or Ziploc. Push all the chocolate down to one corner. Pro Tip: Don’t fill it too full, or you’ll have a chocolate explosion when you try to pipe, and nobody wants that sticky mess.
- Snip the Teeniest Tip: This is where precision counts! Using your scissors, snip the tiniest, *tiniest* little bit off the very end of the bag. We’re talking a millimeter or two, just enough for a fine line. You can always make the hole bigger, but you can’t make it smaller! Practice makes perfect, so maybe test the flow on a piece of parchment paper first.
- Write Your Masterpiece: Hold the bag like a pen, hovering slightly above your *cool* cake. Apply gentle, even pressure and start writing or drawing your message. Take your time! If it helps, you can even trace letters lightly onto the cake with a toothpick first. It’s like training wheels for your chocolate writing!
- Let it Set and Shine: Once your message is complete, pop the cake in the fridge for about 10-15 minutes to let the chocolate harden completely. This prevents smudges and makes your work look super professional and ready for its close-up!
Common Mistakes to Avoid
- Overheating the Chocolate: Burnt chocolate is a tragedy and tastes bitter. Low and slow is the way to go, my friend. Don’t rush perfection.
- Cutting Too Big a Hole: This is the number one rookie error! Remember, start tiny. A giant hole means thick, blobby letters that look like they’ve been written by an enthusiastic but clumsy giant. Not the elegant vibe we’re going for.
- Squeezing Too Hard: Gentle pressure, grasshopper. You’re not milking a cow; you’re elegantly piping chocolate. Too much force equals chocolate splatters and uneven lines.
- Writing on a Warm Cake: Oh, honey, no. Your beautiful chocolate will melt and smudge into oblivion. Always make sure your cake is cool (or even chilled) before you start decorating.
Alternatives & Substitutions
- Different Chocolates: Feel free to mix and match! White chocolate looks awesome on dark cakes, dark on light. You do you. You can even add a tiny drop of gel food coloring to white chocolate for fun, vibrant colors (avoid liquid colors, they can seize the chocolate).
- No Piping Bag? No Problem! A sturdy Ziploc bag works wonders in a pinch. You can also try a small cone made from parchment paper for super fine details, though that’s a bit more advanced, IMO.
- Butter Alternatives: Vegan? Coconut oil is your best buddy here, or any neutral-flavored oil. Just a tiny amount for that silky smooth consistency.
- Design Alternatives: Don’t just write! You can draw little hearts, dots, swirls, or even use stencils if you’re feeling extra fancy. Your cake, your rules. Get creative!
FAQ (Frequently Asked Questions)
- “My chocolate seized up! What gives?” Ah, the dreaded seize! This usually happens if even a tiny drop of water gets into your melting chocolate. Try adding a teaspoon of vegetable oil or melted butter and stir vigorously. Sometimes it saves it, sometimes it’s a lost cause. Learn from your mistakes, but don’t cry over spilt (or seized) chocolate!
- “Can I use chocolate syrup or frosting for this?” Not really for fine writing. Chocolate syrup is too thin and runny. Frosting can work if it’s stiff enough, but it won’t give you that crisp, shiny chocolate finish. Stick to the real deal for best results, unless you’re aiming for a super “rustic” look.
- “How can I make my writing super neat?” Practice, practice, practice! Seriously, grab a piece of parchment paper and practice your letters first. Also, make sure your chocolate isn’t too hot (too runny) or too cool (too stiff). Consistency is key!
- “My hand gets shaky when I’m writing. Any tips?” Totally normal! Try resting your writing hand’s elbow on the table, or even use your non-dominant hand to steady your writing hand. Deep breaths also help. Think of yourself as an artist, not a surgeon under pressure.
- “What if I mess up a letter?” Don’t panic! If the chocolate hasn’t set, you can often gently scrape it off with a thin knife or toothpick and try again. If it’s set, sometimes you can carefully chip it off. Worst case? Embrace the ‘handmade charm’ – it’s unique!
- “How long does the chocolate writing last on a cake?” It’ll last as long as your cake does, basically! Just keep your cake stored appropriately (usually covered, in the fridge) and the chocolate will be fine. It might soften a tiny bit at room temp, but it won’t melt off unless it’s super hot.
Final Thoughts
See? That wasn’t so scary, was it? Now you’re officially a cake-writing wizard! Go forth and personalize all the things. Impress your friends, make a witty statement, or just write ‘Mine!’ on your leftover cake so no one dares touch it. You’ve earned those bragging rights! Happy decorating!


