So you’re craving something tasty but too lazy to spend forever in the kitchen, huh? Same. What if I told you there’s a dessert that screams ‘I tried hard!’ but actually only requires about 15 minutes of *actual* work? Say hello to your new best friend: The Chocolate Wafer Icebox Cake. Get ready to impress everyone with zero oven time and minimal fuss.
Why This Recipe is Awesome
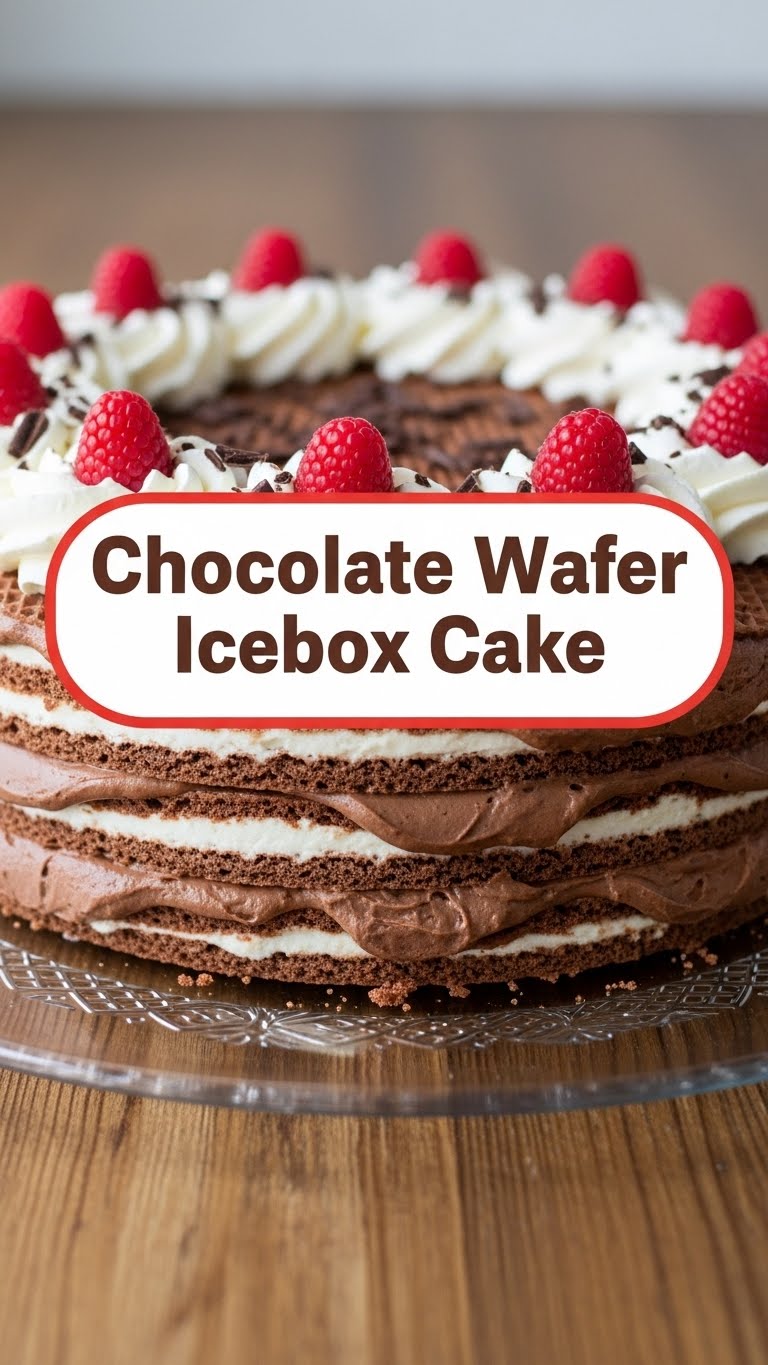
Okay, first off, no baking. Let that sink in. NO. BAKING. It’s basically magic. This cake is so ridiculously simple, it’s practically idiot-proof. Seriously, if *I* can’t mess it up, you’re golden. You just layer, chill, and boom! Dessert is served. Plus, it looks fancy enough to fool your in-laws into thinking you’re a culinary genius, and trust me, that alone is worth gold. It’s the ultimate “effortless elegance” dessert.
Ingredients You’ll Need
Gather ’round, my sweet-toothed friend. Here’s what you’ll need for this no-bake masterpiece:
- Heavy Cream: About 2 cups (one pint). This is the star of the show, baby. Get the good stuff, you deserve it.
- Granulated Sugar: A mere 1/4 cup. Just a touch to sweeten things up. Don’t go wild, we’re not making simple syrup here.
- Vanilla Extract: 1 teaspoon. A splash of magic. Don’t skip it; it makes everything taste better.
- Chocolate Wafer Cookies: One 9-ounce package (or about 36 cookies). Think Nabisco Famous Chocolate Wafers. These are the backbone, the structure, the *chocolatey goodness*. You might need a few extra if you’re a “tester.” 😉
- A Pinch of Salt (optional but recommended): Balances out the sweetness, like your cool friend who keeps you grounded.
Step-by-Step Instructions
Let’s get this party started! These steps are so easy, you could probably do them blindfolded (but please don’t).
- Chill Your Bowl: Pop your mixing bowl and whisk attachment (if using a stand mixer) into the fridge for 10-15 minutes. Cold is key for fluffy whipped cream! Trust me on this.
- Whip It Good: Pour the super-cold heavy cream into your chilled bowl. Add the sugar and vanilla (and that pinch of salt if you’re feeling fancy). Start on low speed, then gradually increase to high. Whip until soft peaks form, then continue until you get stiff peaks. Don’t overmix, or you’ll have butter… which isn’t the goal here. Unless you’re also making toast.
- Assemble the Layers: Grab a serving platter or a loaf pan. Spread a thin layer of whipped cream on the bottom. This acts as the sticky base for your cookie tower.
- Wafer Wonderland: Start layering your chocolate wafers on top of the cream. Don’t be shy; make it a solid layer. You can overlap them slightly if needed to fit.
- Cream On Top: Spread another generous layer of whipped cream evenly over the wafers. Think of it as giving each cookie a cozy blanket.
- Repeat, Repeat, Repeat: Keep layering wafers and cream until you run out of wafers or reach your desired height. Usually, you’ll get about 5-6 layers. Finish with a grand flourish of whipped cream on top, making it look all swirly and pretty.
- Chill Out: This is the most important step! Cover your masterpiece with plastic wrap and refrigerate for at least 4-6 hours, or even better, overnight. This gives the wafers time to soften and meld into cake-like perfection. Patience, grasshopper!
- Garnish (Optional): Before serving, sprinkle with some crushed wafers, chocolate shavings, or cocoa powder for that *chef’s kiss* moment. Instant pro status!
Common Mistakes to Avoid
We all make ’em, but here’s how to sidestep the most common icebox cake snafus:
- Not Chilling Enough: Trying to slice it before the wafers have softened is like trying to eat a rock. Be patient, my friend. **Patience is a virtue, especially with icebox cakes.** It needs that time in the fridge to transform.
- Over-Whipping the Cream: Remember that butter comment? Yeah, don’t do that. Keep an eye on it. Stiff peaks, not butter mountain. Once it looks firm, stop.
- Skimping on the Cream: Each wafer needs its creamy hug to transform into a cake-like texture. Don’t be stingy! Generous layers mean a moist, delicious cake.
- Using Stale Wafers: Fresh wafers mean a fresher cake. Duh. Check the expiration date.
Alternatives & Substitutions
Feeling adventurous? Here are some simple ways to switch things up:
- Chocolate Wafers: Oreos are classic, but any thin chocolate cookie will do. Graham crackers could work for a different vibe, but IMO, chocolate is king here. Some people even use gingersnaps for a spiced version!
- Cream Flavor: Want to jazz it up? Add a tablespoon of cocoa powder to the cream for a double chocolate hit, or a splash of coffee liqueur for a grown-up twist. A hint of almond extract could also be fun.
- Toppings: Crushed peppermint for the holidays? Sliced berries for a summer feel? Go wild! This cake is your canvas. Chocolate syrup drizzle? Yes, please.
FAQ (Frequently Asked Questions)
Got questions? I’ve got answers. Mostly.
- “Can I make this ahead of time?” Absolutely! In fact, it gets better with time, like a fine wine… but, you know, dessert. Overnight is ideal.
- “What if I don’t have heavy cream?” Honestly, you *need* heavy cream for this. Whipping cream just won’t give you the same structure or richness. Don’t compromise the mission!
- “My whipped cream isn’t getting stiff, help!” Did you chill your bowl and whisk? Is your cream super cold? If not, that’s likely the culprit. Sometimes adding a tiny bit of cream cheese can help stabilize it, but usually, temperature is the issue.
- “How long does it last?” Covered in the fridge, it’s good for 2-3 days. The wafers will get softer and softer, which some people love even more!
- “Can I freeze it?” You can, but the texture might change a bit when thawed. The wafers get *really* soft, almost mushy. If you’re into that, go for it! Otherwise, best eaten fresh from the fridge.
- “Is this really a ‘cake’?” Well, it transforms into a cake-like consistency. It slices like a cake, eats like a cake, and definitely makes you happy like a cake. So, yes, it’s a cake. Don’t overthink it.
Final Thoughts
See? I told you it was easy peasy lemon squeezy (minus the lemons, obviously). You just whipped up a dessert that tastes incredible and required minimal effort. Now go impress someone—or yourself—with your new culinary skills. You’ve earned it! Seriously, pour yourself a cuppa, grab a slice, and bask in your effortless dessert glory. You’re basically a dessert ninja. Enjoy!


