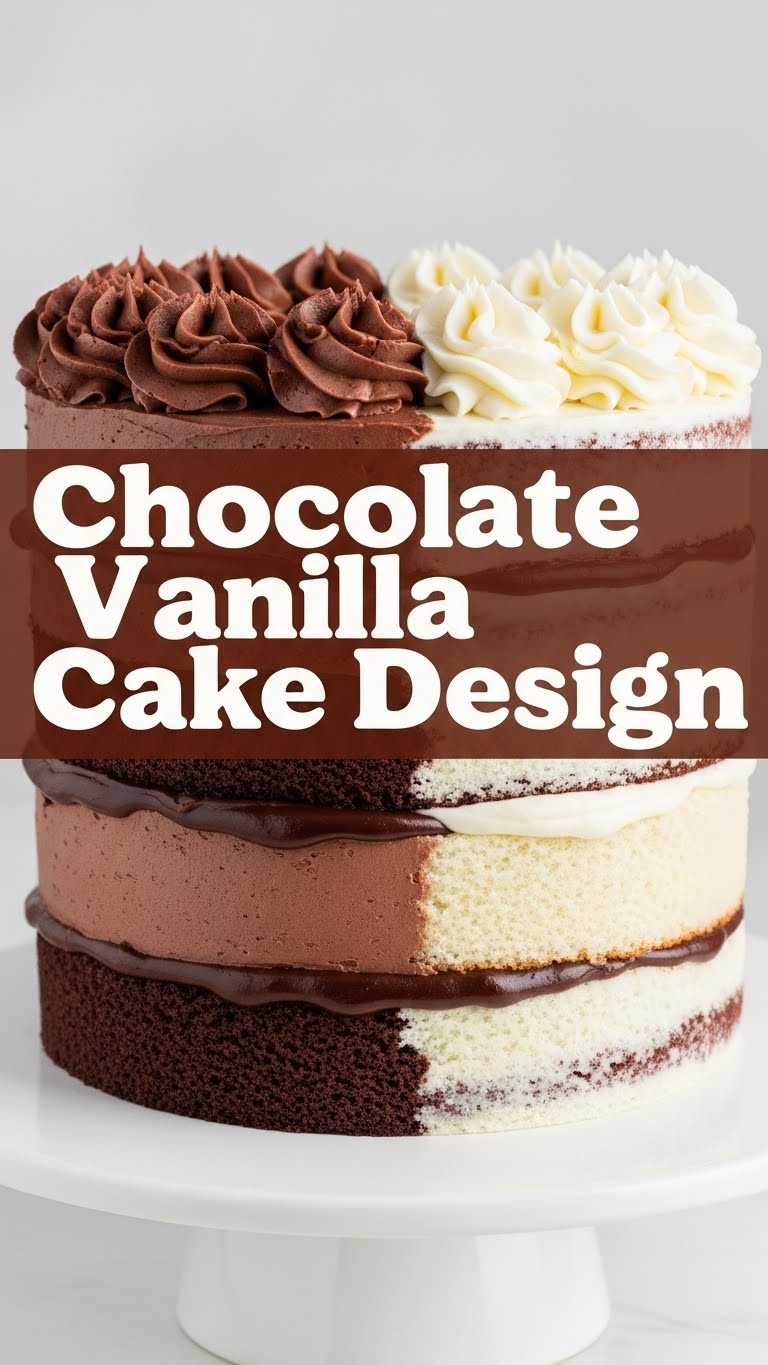
So, you’ve got that craving, right? The one that whispers ‘chocolate… and vanilla… and something fabulous!’ but also screams ‘don’t make me work too hard!’ Yep, totally get it. This isn’t just any cake; it’s the Beyoncé of cakes: flawless, show-stopping, and surprisingly easy to achieve. We’re talking chocolate and vanilla, together in one glorious, designed masterpiece without needing a culinary degree. Get ready to bake like a boss!
Why This Recipe is Awesome
Because life’s too short for boring cake, right? This bad boy isn’t just delicious; it’s a looker. Imagine a cake that screams ‘I tried!’ but secretly, you barely broke a sweat. Seriously, it’s idiot-proof. Even I managed to make it look Pinterest-worthy without setting off the smoke detector. Plus, you get the best of both worlds: rich chocolate AND creamy vanilla. No more choosing sides!
Ingredients You’ll Need
For the Chocolate Cake Layers (because one layer is never enough):
- 1 ½ cups all-purpose flour (the basic building block of happiness)
- 1 ½ cups granulated sugar (sweetness overload, in the best way)
- ¾ cup unsweetened cocoa powder (the dark, mysterious part of our saga)
- 1 ½ teaspoons baking soda (our little lifter-upper)
- ¾ teaspoon baking powder (its trusty sidekick)
- ¾ teaspoon salt (just a pinch to make things pop)
- ¾ cup buttermilk (secret weapon for tenderness, don’t skip!)
- ¾ cup warm water (or lukewarm coffee for extra depth – your call, rebel)
- ¾ cup vegetable oil (or canola – keeps things moist)
- 2 large eggs (the binders of our delicious destiny)
- 1 ½ teaspoons vanilla extract (because vanilla makes everything better, even chocolate)
For the Vanilla Buttercream (the cloud of dreams):
- 2 cups (4 sticks) unsalted butter, softened (room temp is key, no rock-hard butter here!)
- 6-8 cups powdered sugar (sifted, unless you like lumpy frosting, you monster)
- 1 tablespoon vanilla extract (the star of the show!)
- ¼ cup heavy cream or milk (to get that dreamy, spreadable consistency)
- Pinch of salt (balances the sweetness, trust me)
Step-by-Step Instructions
Get Ready, Get Set, Bake! Preheat your oven to 350°F (175°C). Grease and flour two 8-inch round cake pans. Don’t be lazy here; parchment paper circles on the bottom are a lifesaver.
Dry Mix Magic: In a large bowl, whisk together the flour, sugar, cocoa powder, baking soda, baking powder, and salt. Make sure it’s all nicely combined – no pockets of dry ingredients lurking!
Wet Mix Wonders: In a separate medium bowl, whisk together the buttermilk, warm water (or coffee!), vegetable oil, eggs, and vanilla extract.
Combine Forces: Slowly pour the wet ingredients into the dry ingredients. Mix until just combined. Don’t overmix! A few lumps are fine; you’re not trying to make cement.
Divide and Conquer: Divide the batter evenly between your two prepared cake pans. Pop them into the preheated oven for 30-35 minutes, or until a toothpick inserted into the center comes out clean.
Cool Down: Let those glorious cakes cool in their pans for about 10-15 minutes before carefully inverting them onto a wire rack to cool completely. Patience, grasshopper! Don’t try to frost a warm cake unless you enjoy a melted mess.
Buttercream Bliss: While the cakes cool, get started on your buttercream. In a large bowl, beat the softened butter with an electric mixer until light and fluffy (about 2-3 minutes).
Sweeten It Up: Gradually add the sifted powdered sugar, one cup at a time, beating well after each addition. Once it starts to look like frosting, beat in the vanilla extract and salt.
Creamy Dreamy: Add the heavy cream or milk, one tablespoon at a time, until you reach your desired consistency. You want it smooth and spreadable, but not runny. Beat for another 2-3 minutes until super light and fluffy.
Assemble Your Masterpiece: Once the cakes are completely cool, level them if needed (a serrated knife works wonders). Place one layer on your serving plate, slather with a generous amount of vanilla buttercream. Top with the second cake layer. Now, frost the top and sides of the entire cake.
Design Time! This is where the “design” part comes in. You can go simple with a smooth finish, or get fancy! Swirl the frosting with an offset spatula, or use a piping bag with a fun tip to add borders, rosettes, or whatever makes your heart sing. Maybe even sprinkle with chocolate shavings or mini chocolate chips for extra flair. This is your cake, own it!
Common Mistakes to Avoid
Impatience with Cooling: Frosting a warm cake is like trying to ice skate on a mud puddle. It’s gonna be a disaster. Wait for it!
Overmixing the Batter: This makes for a tough, dense cake. You want light and airy, not a hockey puck.
Not Sifting Powdered Sugar: Unless you enjoy discovering mysterious lumps of sugar in your otherwise perfect buttercream, grab that sifter. Seriously, it’s worth the extra minute.
Forgetting to Grease/Flour Pans: Unless you enjoy a cake that’s permanently attached to its pan, do not skip this step. Non-stick spray with flour works like a charm.
Alternatives & Substitutions
Coffee for Water? Absolutely! Using lukewarm coffee instead of water in the chocolate cake recipe deepens the chocolate flavor without making it taste like coffee. It’s a chef’s secret, shhh!
No Buttermilk? No Problem! You can make your own! Just add 1 tablespoon of white vinegar or lemon juice to a measuring cup, then fill the rest with regular milk until it reaches ¾ cup. Let it sit for 5 minutes. Voila! Instant buttermilk-ish.
Different Frosting? Feeling adventurous? You could do a chocolate fudge frosting, or even a cream cheese frosting (though that’s a whole different vibe). But honestly, the vanilla buttercream is the perfect balance for this cake, IMO.
FAQ (Frequently Asked Questions)
Can I make this as cupcakes? Heck yeah! Just divide the batter into cupcake liners and bake for about 18-22 minutes. Keep an eye on them!
My buttercream is too stiff/too runny, help! If it’s too stiff, add a tiny bit more heavy cream (half a teaspoon at a time) and beat. Too runny? Add a bit more sifted powdered sugar, a tablespoon at a time. It’s all about finding that sweet spot.
Can I use oil instead of butter in the cake? This recipe already uses oil for the cake, which keeps it super moist! But if you’re thinking of subbing butter for oil, I’d stick with the recipe’s ratio for best results.
How long does this cake last? Covered at room temperature, it’s good for 2-3 days. In the fridge, maybe up to 5 days. But honestly, it rarely lasts that long!
Can I add sprinkles or other decorations? Um, yes! Sprinkles, chocolate shavings, fresh berries, edible glitter – go wild! This is your canvas!
Do I have to preheat the oven? Rookie mistake! Yes, absolutely. A properly preheated oven ensures even baking and prevents your cake from sinking in the middle.
Final Thoughts
And there you have it, folks! Your very own Chocolate Vanilla Cake Design masterpiece. You’ve conquered two flavors, tackled frosting, and probably impressed yourself a little. So go on, slice into that beauty, grab a fork (or just your fingers, I won’t judge), and enjoy the fruits of your not-so-laborious labor. Now go impress someone—or yourself—with your new culinary skills. You’ve earned it!

