So, Valentine’s Day is peeking around the corner, and you’re thinking, “Ugh, another excuse to spend money on overpriced flowers?” Or maybe, “Time to impress someone (or just myself!) with something decadently chocolatey and homemade, without actually breaking a sweat?” If you’re nodding along, you’ve come to the right place, friend. Because today, we’re whipping up a Chocolate Valentine’s Cake that’s so good, so easy, and so impressive, it practically bakes itself. (Okay, maybe not *that* easy, but close!) Forget store-bought sadness; we’re going for homemade happiness with a side of “I totally nailed this.”
Why This Recipe is Awesome
Listen, I get it. You want something delicious, something that screams “I love you” (or “I love chocolate, and by extension, myself”), but you don’t want to turn your kitchen into a disaster zone. This recipe? It’s a total rockstar. It’s **idiot-proof**, honestly. Even I, a person who once set off the fire alarm microwaving popcorn, manage to make this without a hitch. It’s moist, it’s rich, it’s got that deep chocolate flavor that just hugs your soul, and the frosting is ridiculously simple. Plus, it looks super fancy with minimal effort. Think maximum impact for minimal fuss. You’re welcome.
Ingredients You’ll Need
Time to gather your culinary arsenal! Don’t worry, nothing too wild here. Just the good stuff.
For the Cake:
- 1 ½ cups All-Purpose Flour: The backbone of our cakey dreams.
- 1 ½ cups Granulated Sugar: Sweetness, baby! Don’t skimp, it’s Valentine’s Day!
- ¾ cup Unsweetened Cocoa Powder: The star of the show. Go for good quality; it really makes a difference.
- 1 ½ teaspoons Baking Soda: Our lift-off agent!
- ¾ teaspoon Baking Powder: Double the lift, double the fun.
- 1 teaspoon Salt: Balances everything out, trust me.
- 1 cup Milk: Any kind works, but whole milk gives it that extra lusciousness.
- ½ cup Vegetable Oil: Keeps things moist and tender.
- 2 Large Eggs: Binders and richness providers.
- 1 teaspoon Vanilla Extract: The secret weapon for *everything*.
- 1 cup Boiling Water: This is the magic touch for super moist chocolate cake. Don’t be scared!
For the Valentine’s Cream Cheese Frosting:
- 8 ounces Cream Cheese: Softened, please! Take it out a bit early.
- ½ cup Unsalted Butter: Also softened. Because cold butter is the enemy of smooth frosting.
- 3-4 cups Powdered Sugar: Sifted, if you’re feeling fancy (and want no lumps).
- 1 teaspoon Vanilla Extract: More vanilla, because why not?
- Pinch of Salt: To cut through the sweetness.
- Red or Pink Food Coloring (optional): For that festive Valentine’s vibe!
Step-by-Step Instructions
Alright, apron on, game face ready! Let’s do this.
- Prep Your Pan: First things first, preheat your oven to **350°F (175°C)**. Grease and flour two 8-inch round cake pans. You can also line the bottoms with parchment paper for extra insurance against sticking.
- Mix the Dry: In a large bowl, whisk together the flour, sugar, cocoa powder, baking soda, baking powder, and salt. Give it a good whisk until everything looks happily combined.
- Add the Wet: Now, add the milk, oil, eggs, and vanilla extract to the dry ingredients. Beat with an electric mixer on medium speed for about 2 minutes. The batter will be thick.
- The Magic Water: Carefully pour in the boiling water. The batter will become very thin, almost watery. Don’t panic! This is exactly what we want for a super moist cake. Mix on low speed until just combined. Don’t overmix.
- Bake It Up: Divide the batter evenly between your two prepared cake pans. Bake for 30-35 minutes, or until a wooden skewer inserted into the center comes out clean.
- Cool Down: Let the cakes cool in their pans on a wire rack for about 10-15 minutes. Then, carefully invert them onto the wire rack to cool completely. **Patience is a virtue here!** Trying to frost a warm cake is a one-way ticket to a melted mess.
- Whip the Frosting: While the cakes are cooling, get started on your frosting. In a medium bowl, beat the softened cream cheese and butter together until smooth and creamy.
- Sweeten Things Up: Gradually add the powdered sugar, one cup at a time, beating until smooth after each addition. Mix in the vanilla extract and a pinch of salt. If using, add a few drops of red or pink food coloring until you reach your desired Valentine’s hue. Beat until light and fluffy.
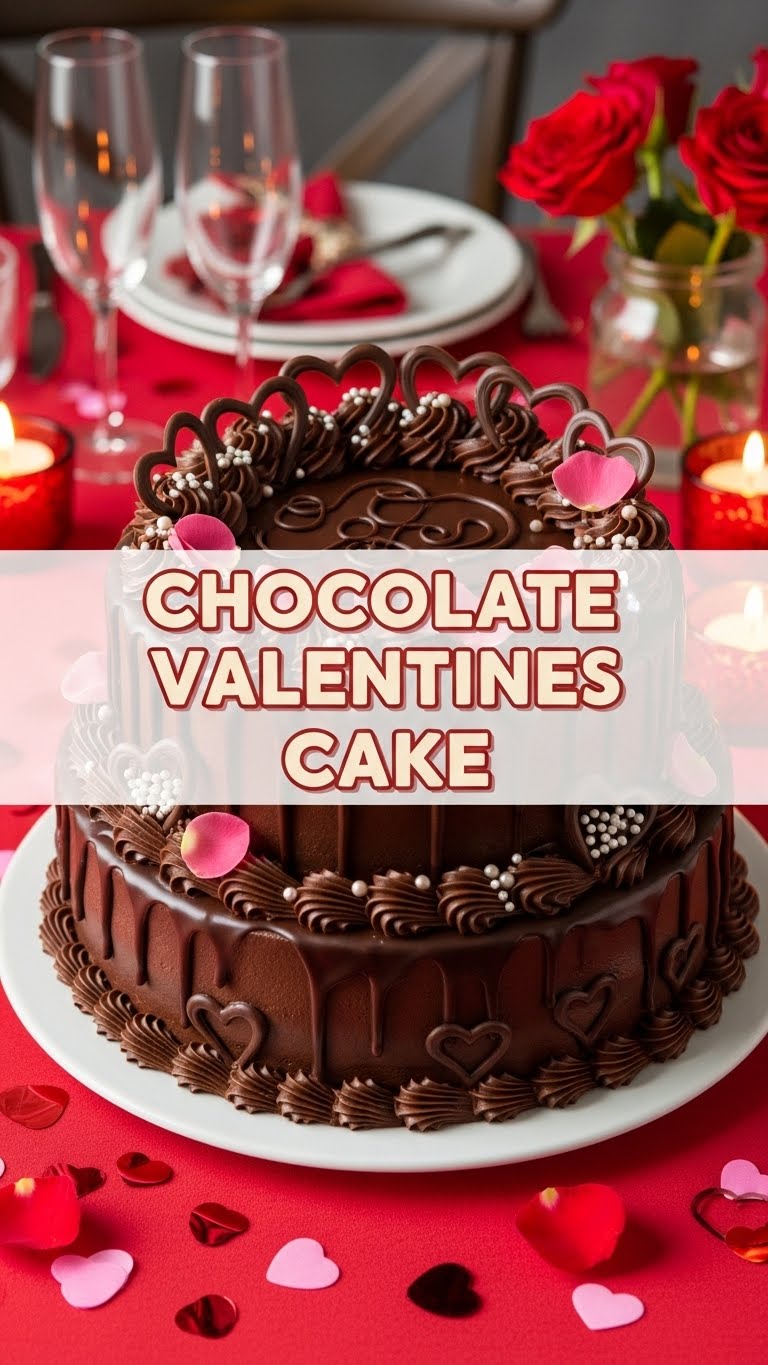
- Assemble & Decorate: Once your cakes are *completely* cool, place one layer on your serving plate. Spread about a third of the frosting evenly over the top. Carefully place the second cake layer on top. Frost the top and sides of the entire cake. Get creative with sprinkles, chocolate shavings, or fresh berries!
Common Mistakes to Avoid
Nobody’s perfect, but we can avoid the most common pitfalls, right?
- Thinking you don’t need to preheat the oven: Rookie mistake! A properly preheated oven ensures even baking from the get-go. Otherwise, your cake might be sad and dense.
- Overmixing the batter: Once you add the wet ingredients, mix until just combined. Overmixing develops the gluten too much, leading to a tough, dry cake. Nobody wants that.
- **Not letting the cakes cool completely:** Seriously, this is probably the most common mistake. Warm cake + frosting = sad, sliding, melting disaster. **Be patient!** Go watch an episode of your favorite show while they chill out.
- **Ignoring the “softened butter/cream cheese” instruction:** If your butter and cream cheese are cold, your frosting will be lumpy and difficult to spread. Plan ahead, people!
Alternatives & Substitutions
Feeling a little rebellious? Or maybe you’re just out of milk? No worries, we’ve got options!
- **Dairy-Free Delight:** Swap regular milk for your favorite plant-based milk (almond, soy, oat all work great!). For the frosting, use dairy-free cream cheese and a good quality vegan butter alternative. FYI, it’s pretty impressive how good these taste now!
- **Oil Swap:** If you’re out of vegetable oil, any neutral-flavored oil like canola or even melted coconut oil (if you don’t mind a slight coconut flavor) will do the trick.
- **Frosting Flair:** Not a cream cheese fan? No problem! A simple chocolate ganache (melted chocolate and cream) or even a classic buttercream would be delish. Or, for a super quick fix, just dust with powdered sugar and serve with berries.
- **Spice It Up:** Add a tiny pinch of cayenne pepper to the cake batter for a subtle, intriguing “Mexican hot chocolate” kick. Trust me, it’s divine!
FAQ (Frequently Asked Questions)
Got questions? I’ve got answers (and maybe a little sass).
- **Can I use margarine instead of butter in the frosting?** Well, technically yes, but why hurt your soul (and your taste buds) like that? For the best flavor and texture, stick with good old butter, IMO.
- **My cake layers are domed in the middle, what gives?** Probably your oven is a little hot, or you filled the pans a bit too much. You can gently level them off with a serrated knife once cooled. No one will ever know!
- **Can I make this as cupcakes?** Absolutely! Just line a muffin tin and reduce the baking time to about 18-22 minutes, or until a skewer comes out clean. Perfect for individual portions!
- **How long does this cake last?** Covered tightly and refrigerated, it’s usually good for 3-4 days. But let’s be real, it rarely lasts that long!
- **Can I make the cake ahead of time?** Yes! You can bake the layers a day in advance, wrap them tightly in plastic wrap, and store them at room temperature. Frost the day you plan to serve.
- **I don’t have boiling water, can I just use hot tap water?** Nah, stick to boiling water. The heat helps the cocoa bloom and creates that wonderfully tender crumb. Don’t cut corners on this one!
Final Thoughts
So there you have it! Your very own Chocolate Valentine’s Cake, ready to make hearts flutter (or just make you really, really happy). This isn’t just a recipe; it’s a declaration of love… for chocolate, for easy baking, and for yourself. Now go impress someone—or yourself—with your new culinary skills. You’ve earned it! And hey, if you end up eating half of it yourself, I won’t tell. We’re friends, remember?

