So you’re craving something tasty but too lazy to spend forever in the kitchen, huh? Same. We’ve all been there – staring into the fridge, wondering if a cheese stick counts as dessert, or contemplating ordering a triple-chocolate fudge something-or-other because effort is overrated. But what if I told you there’s a magical little treat that’s ridiculously easy, looks super fancy, and tastes like a winter wonderland explosion in your mouth? Enter: Chocolate Truffles with Peppermint Sprinkles. Your new best friend.
Why This Recipe is Awesome
Let’s be real, you clicked this because you want something delicious that won’t require a culinary degree or an entire Saturday afternoon. And guess what? This recipe delivers. It’s practically **idiot-proof** (and trust me, I’ve put that to the test). You basically melt stuff, chill stuff, roll stuff, and then devour stuff. There’s no oven involved, which means less cleanup and zero risk of burning down your kitchen (unless you get *really* distracted). Plus, these little bites of heaven are incredibly festive, making them perfect for impressing guests, gifting to friends, or just hoarding all to yourself. No judgment here.
Ingredients You’ll Need
Gather ’round, my fellow lazy gourmands! Here’s your hit list for pepperminty chocolate bliss:
- Good Quality Chocolate (10-12 oz / 280-340g): This is the star of the show, so don’t cheap out! Dark chocolate (60-70% cocoa) works wonders, but milk or even a mix is fine if that’s your jam. Not that waxy mystery chocolate bar, please.
- Heavy Cream (2/3 cup / 160ml): Because “light cream” is just sad. We’re making truffles, not a diet snack.
- Unsalted Butter (2 tablespoons / 28g): Cold, please. Adds richness and a lovely silky texture. Like my ex’s heart, but more delicious.
- Vanilla Extract (1/2 teaspoon): A dash of classic fancy.
- Peppermint Extract (1/4 to 1/2 teaspoon): The secret weapon for that festive kick. **Start with 1/4 teaspoon and taste**, unless you want a toothpaste truffle. Seriously, less is more here.
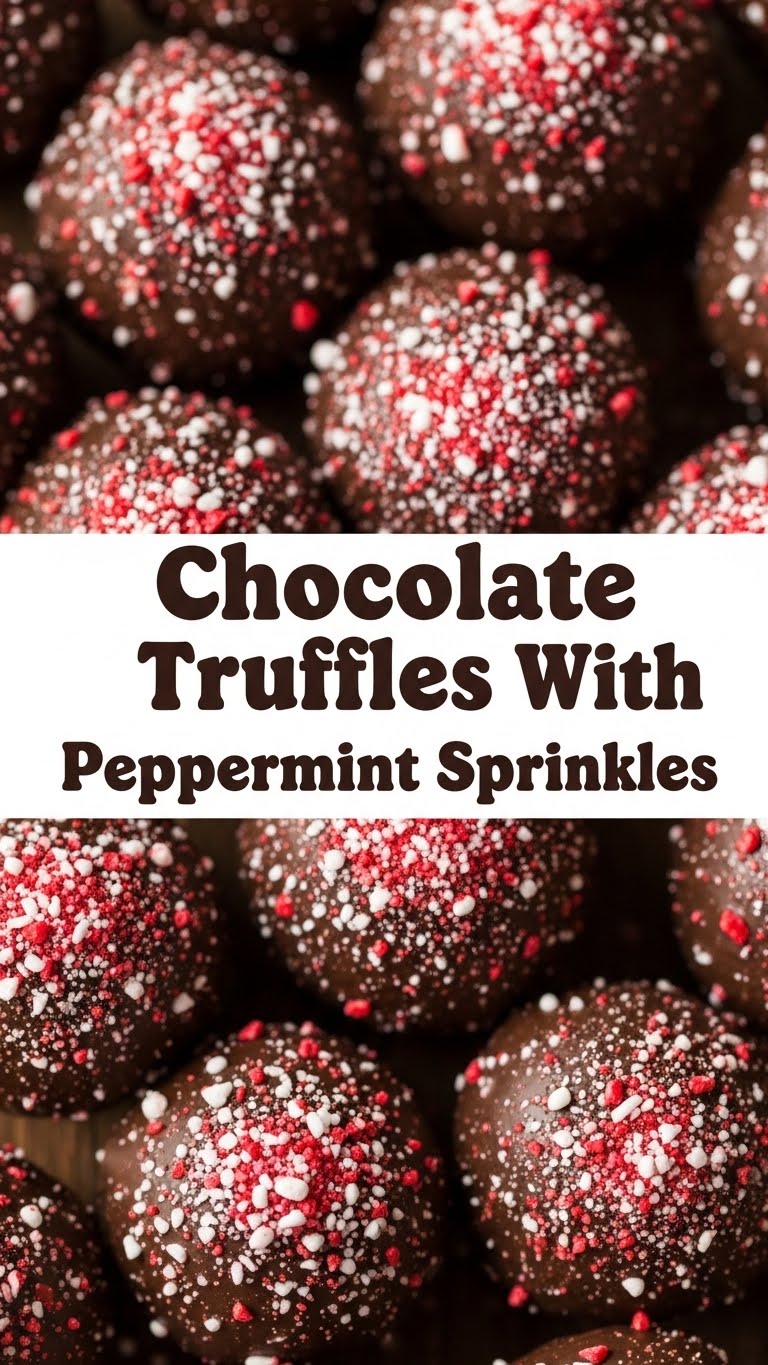
- Crushed Peppermint Candies or Candy Canes (1/2 cup or more): The glorious sprinkles! Get a little aggressive with a rolling pin or use a food processor for perfectly crushed chaos.
Step-by-Step Instructions
- Chop That Chocolate: Get your chocolate bar (or chips) chopped into small, uniform pieces. The smaller they are, the faster and more evenly they’ll melt. Less waiting, more eating, am I right?
- Heat the Cream & Butter: In a small saucepan, gently heat the heavy cream and butter over medium heat until it just begins to simmer around the edges. Don’t let it boil vigorously – scorched cream is not a good look, or taste.
- Melt the Magic: Remove the hot cream mixture from the heat and immediately pour it over your chopped chocolate in a heatproof bowl. Let it sit undisturbed for about 5 minutes. This gives the hot cream time to work its melting magic.
- Whisk to Ganache: After its little spa session, gently whisk the chocolate and cream until completely smooth and glossy. If it’s a bit lumpy, pop the bowl over a saucepan of barely simmering water (a “double boiler”) for a minute, stirring constantly, until smooth. Stir in the vanilla and peppermint extract. Remember our earlier chat about peppermint extract? Go easy!
- Chill Out: Cover the bowl with plastic wrap, pressing it directly onto the surface of the ganache to prevent a skin from forming. Pop it in the fridge for at least 2-3 hours, or until it’s firm enough to scoop. **Patience, young grasshopper.** Trying to roll warm ganache will just give you chocolate soup hands.
- Roll ‘Em Up: Once firm, scoop out small amounts (about a tablespoon) and quickly roll them between your palms into bite-sized balls. Don’t overthink it; they don’t need to be perfect spheres. Your hands will get messy, but it’s a delicious kind of messy.
- Get Festive with Sprinkles: Roll each truffle in your crushed peppermint candies. Press gently to make sure they stick. You can also roll them in cocoa powder if you’re feeling a bit more traditional.
- Chill Again & Devour: Place the finished truffles on a parchment-lined tray and chill them again for about 15-30 minutes to firm up completely. Then, it’s time to reward yourself!
Common Mistakes to Avoid
We’ve all been there, making a rookie error that turns culinary dreams into sticky nightmares. Here are a few to steer clear of:
- Boiling the Cream to Oblivion: As mentioned, simmering is good, a rolling boil is bad. It can cause your ganache to split or have a weird texture.
- Not Chopping Your Chocolate Fine Enough: Big chunks mean uneven melting, which means lumpy ganache. Ain’t nobody got time for lumpy ganache.
- Impatience is NOT a Virtue Here: Seriously, don’t try to roll warm ganache. It’ll be a sticky, melted mess. Chill time is crucial for perfectly scoopable, rollable truffles.
- Overdoing the Peppermint Extract: This one is key. Start small. You can always add more, but you can’t take it out. **FYI**, a little goes a long way.
- Using Low-Quality Chocolate: The quality of your chocolate directly impacts the taste and texture of your truffles. Treat yo’ self to some decent stuff!
Alternatives & Substitutions
Feeling adventurous? Or just missing an ingredient? No worries, we can totally adapt!
- Chocolate Varieties: You can use all dark, all milk, or even a mix of both. White chocolate truffles are also divine, but they’re a bit sweeter so you might want to adjust the peppermint.
- Different Extracts: Not feeling peppermint? Try almond, orange, or even a hint of coffee extract for a different flavor profile. Get wild!
- Other Coatings: Cocoa powder (unsweetened, for a classic look), finely chopped nuts (pistachios, pecans), shredded coconut, edible glitter, or even a drizzle of melted white chocolate are all fantastic options.
- Dairy-Free Option: You can often substitute full-fat canned coconut cream (the thick part from the top) for heavy cream. Chill the can overnight for best results.
FAQ (Frequently Asked Questions)
Got questions? I’ve got (casual) answers!
- “Can I use regular milk instead of heavy cream?” Well, technically you can, but why hurt your soul like that? Heavy cream is essential for the rich, dense texture of truffles. Regular milk will make them too thin and they won’t set properly.
- “How long do these last?” Kept in an airtight container in the fridge, these bad boys will stay fresh for up to two weeks. If they last that long, IMO, you have incredible self-control.
- “Can I freeze them?” Absolutely! Place them on a parchment-lined tray until solid, then transfer to a freezer-safe bag or container for up to 2-3 months. Thaw in the fridge before serving.
- “Why is my ganache not firming up?” A couple of reasons: either it didn’t chill long enough, or your cream-to-chocolate ratio might be a bit off (too much cream or not enough chocolate). Pop it back in the fridge for a few more hours!
- “Do I *have* to use butter?” Not strictly, but it adds an amazing richness and silkiness to the truffles. It helps them stay smoother and melt beautifully in your mouth. So, highly recommended!
- “My truffles are too sticky to roll!” This means they’re not cold enough. Back to the fridge they go! Seriously, another 30-60 minutes can make all the difference.
Final Thoughts
See? I told you it was easy! You just whipped up some gourmet-level treats without breaking a sweat (or the bank). You totally nailed it! Now go impress someone—or yourself—with your new culinary skills. You’ve earned it! Grab a truffle (or five), put on some cozy socks, and pat yourself on the back. Thanks for hanging out in my virtual kitchen. Until next time, happy snacking!


