So you’re craving something tasty but too lazy to spend forever in the kitchen, huh? Same. Honestly, who has time for complicated culinary adventures when Netflix is calling and your couch is looking extra inviting? But also, your soul just whispered, “Chocolate… and berries.” Well, friend, you’ve come to the right place. We’re about to make some seriously swoon-worthy Chocolate Truffles with Berries that are so easy, they practically make themselves. (Okay, not really, but close enough!)
Why This Recipe is Awesome
Look, I get it. Life’s busy. You don’t have time for a culinary marathon. This recipe? It’s your secret weapon. It screams ‘I spent hours on this!’ when in reality, your biggest struggle was probably not eating all the chocolate chips directly from the bag. It’s **idiot-proof**, I swear. Even *I* didn’t mess it up, and my kitchen skills sometimes involve setting off the smoke detector with toast. Plus, it’s fancy enough to impress that special someone (or just yourself, because you deserve it!) and requires minimal fuss. We’re talking maximum deliciousness for minimum effort. Win-win, baby!
Ingredients You’ll Need
Gather ’round, my fellow lazy gourmands! Here’s the small, but mighty, squad you’ll need for this chocolatey escapade:
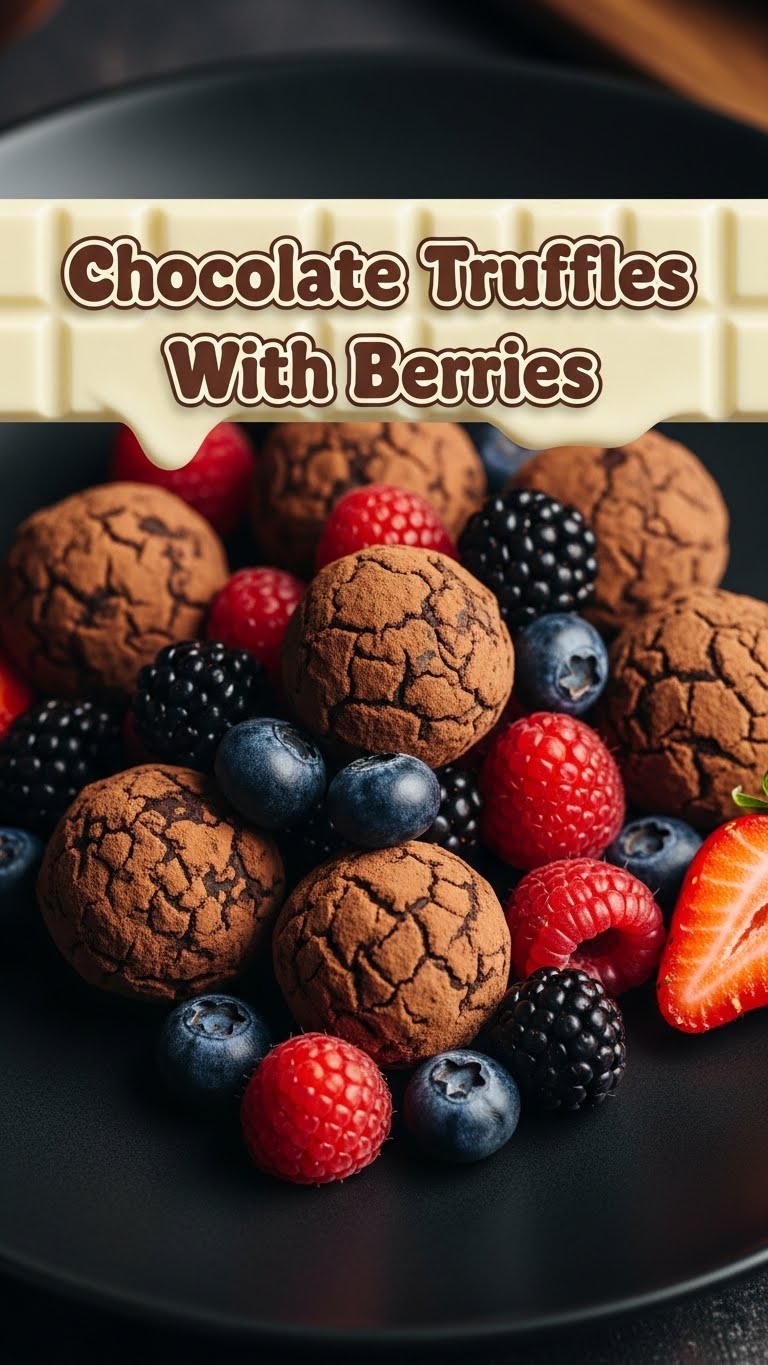
- 2 cups (about 12 oz) good quality Dark Chocolate: We’re not messing around here. Get the good stuff, 60-70% cacao is perfect. None of that wimpy, overly sweet milk chocolate unless you really want a different vibe.
- 1 cup Heavy Cream: This is where the magic happens. Your diet’s worst nightmare, your taste buds’ best friend. Don’t skimp, don’t substitute with low-fat anything. We want decadence!
- 2 tablespoons Unsalted Butter: Just a little bit, for that silky smooth texture and gorgeous sheen. Like a tiny, delicious secret.
- 1 teaspoon Vanilla Extract: Because vanilla makes everything better. It’s like the secret handshake of deliciousness.
- 1 cup Fresh Berries: Raspberries, strawberries (hulled and quartered if large), blueberries, blackberries. Pick your poison! These are the juicy hearts of our truffles.
- For Rolling (choose one or mix ’em up!):
- ½ cup Unsweetened Cocoa Powder: Classic, a little bitter edge to cut the sweetness.
- ½ cup Finely Chopped Nuts: Pistachios, almonds, hazelnuts – whatever tickles your fancy.
- ½ cup Shredded Coconut: To transport you to a tropical paradise (in your mouth).
- ½ cup Sprinkles: Because sometimes you just gotta be extra.
Step-by-Step Instructions
- Chop That Chocolate: Grab your chocolate bars (or chips, if you’re truly living the easy life) and chop them into small, uniform pieces. The smaller they are, the faster and more smoothly they’ll melt. Think tiny chocolate shards of joy.
- Heat the Cream: Pour your heavy cream into a small saucepan. Heat it over medium heat until it just begins to simmer around the edges. You don’t want a rolling boil; just little bubbles whispering sweet nothings. **Do not burn it!**
- Chocolate Bath Time!: Remove the hot cream from the heat and immediately pour it over your chopped chocolate in a heat-proof bowl. Let it sit for about 5 minutes without stirring. This gives the chocolate a chance to melt into gooey perfection.
- Stir Until Silky: After 5 minutes, grab a whisk or spatula and gently stir the chocolate and cream mixture until it’s completely smooth and glossy. This is your ganache, and it’s basically liquid gold.
- Butter Up & Vanilla In: Stir in the unsalted butter and vanilla extract until fully incorporated. It’ll make your ganache even more luxurious and fragrant. Trust me on this.
- Chill Out: Cover the bowl with plastic wrap and pop it in the fridge for at least 2-3 hours, or until it’s firm enough to scoop. If you’re impatient (like me!), you can speed things up in the freezer for about 30-45 minutes, but keep an eye on it!
- Scoop & Roll: Once your ganache is firm, use a small spoon or a mini ice cream scoop to scoop out roughly tablespoon-sized portions. Flatten each portion slightly in your palm.
- Berry Good Surprise: Gently press one fresh berry into the center of the flattened ganache. Carefully fold the ganache around the berry to encase it, then roll it into a neat ball between your palms. Repeat until you’re out of ganache (or berries!).
- Coat ‘Em Up: Pour your chosen coating (cocoa, nuts, sprinkles, etc.) onto a shallow plate. Roll each truffle in the coating until it’s evenly covered. This part is super satisfying!
- Final Chill & Devour: Place your beautiful truffles on a parchment-lined tray and pop them back in the fridge for another 30 minutes to firm up completely. Then, it’s go-time. Grab one (or five!), bite in, and experience pure, unadulterated bliss.
Common Mistakes to Avoid
Even though this recipe is practically foolproof, there are a few little snafus you might encounter. Fear not, I’ve made them all so you don’t have to!
- Not Chopping the Chocolate Small Enough: If your chocolate pieces are too big, they won’t melt evenly in the hot cream, leaving you with annoying lumps. Nobody wants lumpy truffles.
- Overheating the Cream: Boiling the cream too vigorously can cause it to separate or scorch the chocolate. Gentle is key here. Think of it as a warm hug, not a wrestling match.
- Not Chilling the Ganache Enough: Impatience is a virtue sometimes, but not here. If your ganache isn’t firm enough, you’ll end up with a sticky, shapeless mess that’s impossible to roll. **Chill it properly!**
- Using Low-Quality Chocolate: Seriously, don’t do this to yourself. The chocolate is the star of the show. Using cheap chocolate results in cheap-tasting truffles. Your taste buds deserve better.
- Forgetting the Butter: It’s a small amount, but it makes a big difference in the ganache’s texture and shine. Skip it and your truffles might be a little duller, a little less smooth.
Alternatives & Substitutions
Feeling adventurous? Or maybe you just ran out of vanilla (gasp!). Here are some easy peasy swaps and additions to customize your truffle game:
- Boozy Bites: Add a tablespoon or two of your favorite liqueur to the ganache with the vanilla extract. Think Kahlua for coffee notes, Cointreau for orange, or even a splash of rum. So fancy!
- Different Chocolates: While dark chocolate is king here, you can absolutely use milk chocolate for a sweeter truffle. White chocolate works too, but it’s a bit trickier as it can seize up more easily. Just be gentle!
- Nutty Centers: Instead of a berry, you could press a whole roasted hazelnut or almond into the center for a different kind of crunch.
- Other Coatings: Get wild! Try matcha powder for an earthy, vibrant green truffle. Crushed freeze-dried raspberries add a tart pop. Or even just a drizzle of contrasting melted chocolate. Your call, chef!
- Dried Fruit: No fresh berries? No problem! Use a piece of dried cranberry or cherry in the center for a chewier texture and concentrated fruit flavor.
FAQ (Frequently Asked Questions)
- “Can I use low-fat cream instead of heavy cream?”
Oh, bless your heart. Technically, you *could*, but why torture yourself like that? Heavy cream is essential for the rich, creamy texture we’re aiming for. Low-fat will give you a sad, watery ganache. Don’t do it. Your soul deserves better.
- “How long do these truffles last?”
If you can manage not to eat them all in one sitting, they’ll happily hang out in an airtight container in the fridge for up to a week. IMO, they taste best within 3-4 days.
- “Can I make them ahead of time for a party?”
Absolutely! Truffles are fantastic make-ahead treats. Make them a day or two before, store them in the fridge, and bring them out about 15-20 minutes before serving so they can soften slightly. Fancy!
- “What if my ganache is too runny to roll?”
You probably didn’t chill it long enough, my friend! Pop it back in the fridge. Seriously, another hour or two can make all the difference. Patience is a virtue, especially with chocolate.
- “Do I have to use fresh berries? Can I use frozen?”
Fresh berries are definitely preferred here because frozen berries release a lot of water when they thaw, which can make your truffles soggy. If you *must* use frozen, thaw them completely, then pat them super dry with a paper towel before using.
- “Is there a way to make these vegan?”
You bet! Use good quality vegan dark chocolate chips (check ingredients for dairy) and swap the heavy cream for full-fat canned coconut milk (refrigerate it overnight and scoop out the thick cream on top). Skip the butter, or use a vegan butter alternative. FYI, they’re still delicious!
Final Thoughts
So there you have it, folks! Your new favorite, ridiculously easy, and unbelievably delicious Chocolate Truffles with Berries. You just conquered the dessert world with minimal fuss and maximum flavor. Go ahead, pat yourself on the back. You’ve earned it. Now go impress someone—or yourself—with your new culinary skills. Just try not to eat them all in one sitting. (But also, I won’t judge if you do.) Happy truffle-making!


