So you’ve baked a chocolate sheet cake, huh? Or maybe, like me, you bravely bought one from the store and are now trying to pass it off as your own masterpiece. Hey, no judgment here! We all have our culinary secrets. Now comes the really fun part: making that plain, humble cake look like you actually *tried*. Like, really, really tried. Ready to turn a basic brown rectangle into a showstopper?
Why This “Decoration Recipe” is Awesome
Because let’s be real, a naked chocolate sheet cake is like a supermodel without her glam squad. Still great, but a little pizzazz makes all the difference! This “recipe” isn’t about sifting flour or preheating ovens; it’s about transforming “meh” into “OMG, did you *make* that?!” with minimal effort. Seriously, it’s **idiot-proof** – even I didn’t mess it up, and my artistic skills usually top out at stick figures. Plus, it’s a fantastic way to unleash your inner artist without the pressure of, you know, actual art school.
Ingredients You’ll Need
Think of these as your art supplies. Don’t worry, no turpentine required.
- Your Awesome Chocolate Sheet Cake: The star of the show! Make sure it’s completely cooled. We’re talking room temp, otherwise, you’re just making a frosting slip ‘n slide.
- A Tub of Your Favorite Frosting (or two!): Chocolate, vanilla, cream cheese, peanut butter… whatever makes your heart sing. Or if you’re feeling ambitious and have extra energy you didn’t know you possessed, whip up a homemade batch.
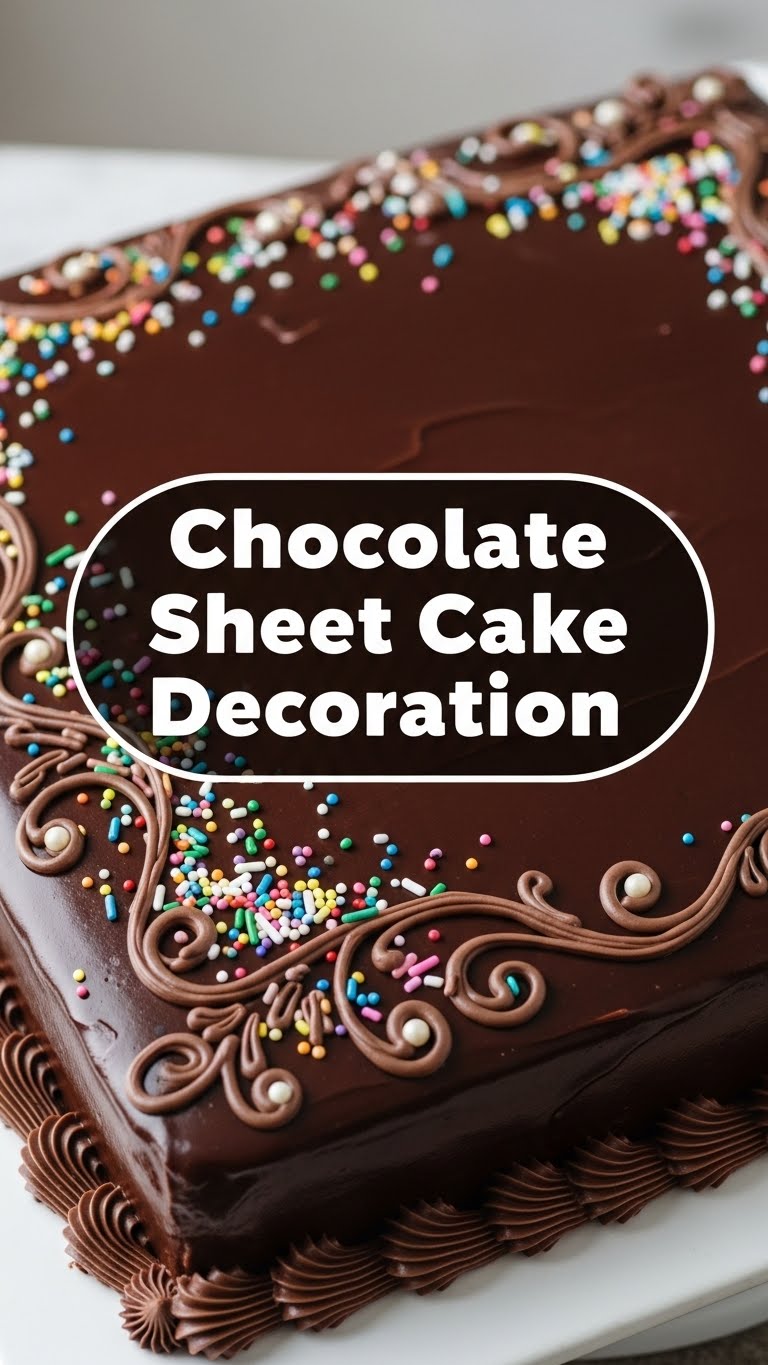
- Sprinkles, glorious Sprinkles! The more colors, the better. Think jimmies, nonpareils, confetti, even fancy metallic ones if you’re feeling bougie.
- Chocolate Shavings or Chips: Because more chocolate is always the answer, isn’t it? Grate a chocolate bar for fancy shavings or just grab a bag of chips.
- Fresh Berries: Strawberries, raspberries, blueberries. They add a pop of color and a touch of “I’m healthy, kinda” vibe.
- Optional Fun Stuff:
- Crushed Cookies: Oreos, anyone?
- Chopped Nuts: Pecans, walnuts, almonds. Adds a nice crunch.
- Small Candies: M&Ms, mini peanut butter cups, gummy bears (if you dare!).
- Whipped Cream: For extra dollops of joy, but be warned, it’s a diva and needs to be served fast!
Step-by-Step Instructions
Get ready to play with your food!
- Chill Out, Cake: Before you even think about frosting, make absolutely sure your cake is cool. Like, not-even-a-little-bit-warm cool. A warm cake and frosting are frenemies, and not the fun kind.
- Frosting Base Layer: Grab your frosting and a spatula (or a butter knife, no fancy tools needed here). Dollop a generous amount of frosting onto the center of your cake. Gently spread it evenly across the top, reaching all the edges. Don’t stress about perfection; this is just the foundation for your masterpiece.
- Smooth or Swirl?: Now’s your chance to get creative with the frosting! For a smooth finish, dip your spatula in hot water and glide it across the surface. Or, if you’re feeling fancy, make some lovely swirls with the back of a spoon or the tip of your spatula. Textured frosting hides a multitude of sins, FYI.
- Sprinkle Time! This is where the magic happens. Grab your sprinkles and go wild! You can sprinkle them all over, create a border, or even make patterns. **A key tip:** hold the sprinkles over the cake, not too high, and gently release them. Otherwise, you’ll have more on your counter than on your cake.
- Chocolatey Goodness: Next up, your chocolate shavings or chips. Scatter them strategically (or randomly, we don’t judge). They add depth, visual interest, and, let’s be honest, more chocolate.
- Berry Brightness: Arrange your fresh berries. They’re amazing for adding a pop of color and a fresh counterpoint to all that rich chocolate. You can make neat lines, clusters, or just toss ’em on for a rustic look.
- The Grand Finale (Optional): If you’re using crushed cookies, nuts, or candies, sprinkle them on top. For whipped cream, pipe some elegant dollops around the edges or in the center. Step back and admire your handiwork!
Common Mistakes to Avoid
Learn from my blunders, so you don’t have to!
- Decorating a Warm Cake: I’ve mentioned it, but it bears repeating. Your frosting will melt, slide, and create a hot mess that even your dog won’t want. Don’t be that person.
- Going Overboard with Frosting: While more frosting can be good, too much in one go can make it difficult to spread evenly. Start with a moderate amount, spread, and add more if needed. It’s easier to add than to take away (especially from a finished cake!).
- Overthinking It: This isn’t a professional pastry competition, honey. It’s a fun cake. Embrace the imperfections, they make it unique!
- Using Stale Sprinkles: Yes, sprinkles go stale. They lose their crunch and vibrant color. If they’ve been in your pantry since last Christmas, it might be time for a fresh batch. **Always check the expiration date** (if they even have one!).
- Forgetting the Sides: Don’t neglect the sides of your cake! Even a simple smear of frosting or a light dusting of sprinkles can make a huge difference to the overall presentation.
Alternatives & Substitutions
Don’t have exactly what I listed? No prob, chief. Get creative!
- Different Frosting Flavors: Not a chocolate-on-chocolate person? Swap the chocolate frosting for vanilla buttercream, cream cheese frosting, or even a tangy lemon curd for a delightful contrast. The world is your oyster!
- Topping Swaps:
- Nuts for Sprinkles: If you’re not a fan of sprinkles, a generous sprinkling of toasted chopped nuts (almonds, pecans, walnuts) adds a sophisticated crunch.
- Zest for Berries: No fresh berries? A vibrant citrus zest (orange, lemon, lime) can add both color and a lovely aroma.
- Dried Fruit: Dried cranberries, cherries, or apricots can be a great alternative to fresh berries, offering a different texture and concentrated sweetness.
- Edible Flowers: Feeling fancy? A few delicate, food-safe flowers can elevate your cake to a whole new level. Just make sure they’re actually edible, IMO.
- Homemade vs. Store-Bought: Don’t feel guilty about using store-bought frosting or pre-baked cakes. Life’s too short, and the goal here is fun, not stress.
FAQ (Frequently Asked Questions)
- Can I use whipped cream instead of frosting? Well, technically yes, but why hurt your soul like that? Whipped cream is notoriously unstable and will weep and deflate quickly. It’s best for last-minute decorations or if you plan to serve the cake immediately.
- My frosting is too stiff! What do I do? A little warmth can work wonders! Microwave a small amount (about 1/4 cup) for 5-10 seconds, stir it into the main batch, and repeat if needed. Or add a tiny splash of milk or cream and stir well.
- What if my frosting is too runny? Oh dear. This usually means it’s too warm. Pop it in the fridge for 15-30 minutes, then stir. If it’s still too runny, you might need to add a bit of powdered sugar to thicken it up.
- Do I need any special tools for this? Nope! A butter knife or a regular kitchen spatula will do the trick for spreading. For piping, a ziploc bag with the corner snipped off works perfectly. Save the fancy stuff for when you’re feeling *extra*.
- How long can a decorated sheet cake last? If decorated with frosting, it usually lasts 3-4 days at room temperature (covered) or up to a week in the fridge. If you used fresh fruit, it’s best consumed within 1-2 days as the fruit can spoil or make the cake soggy.
- Can I just dump all the toppings on? Absolutely! If you’re going for the “explosion in a candy factory” or “chef’s surprise” look, be my guest. Sometimes chaos is beautiful.
Final Thoughts
So there you have it, superstar! You’ve just transformed a humble chocolate sheet cake into a masterpiece worthy of applause (and maybe an Instagram post or two). This isn’t just about baking; it’s about the joy of creating something beautiful and delicious, even if it’s just for yourself. Remember, the best part is eating it, so don’t stress too much about perfection. Now go impress someone – or yourself – with your new culinary decorating skills. You’ve earned it!


