So you’ve got a cake, right? And it’s probably looking pretty good already, but maybe, just maybe, it needs that *oomph*. That little sprinkle of “I’m fancy but I also just rolled out of bed” vibe. Well, my friend, you’ve stumbled upon the easiest, most impressive cake decoration hack known to humankind: Chocolate Shards! Forget piping bags and intricate designs that require the steady hand of a surgeon. We’re going rogue. We’re going delicious. We’re making edible art out of pure, unadulterated laziness and genius.
Why This Recipe is Awesome
Okay, let’s be real. This isn’t really a “recipe” in the traditional sense, it’s more of a “method to look like you tried way harder than you actually did.” And isn’t that the dream? It’s **idiot-proof**, truly. I’ve messed up boiling water, and even I managed to make these look spectacular. They add instant elegance, a satisfying crunch, and frankly, make any cake look like it just sashayed out of a high-end patisserie. Plus, it’s a great way to use up that half-eaten bar of chocolate you’ve been eyeing. Win-win-win!
Ingredients You’ll Need
- **Chocolate, your favorite kind!** (About 8-10 oz / 200-250g). Dark, milk, white – the world is your oyster. Or, you know, your chocolate. Pick a good quality one; it really does make a difference, IMO.
- **A baking sheet or flat surface** (like the back of a cookie sheet or a cutting board).
- **Parchment paper or silicone mat.** Non-negotiable, unless you like scraping chocolate off things for hours.
- **An offset spatula, butter knife, or spoon.** For spreading. Whatever you have that’s flat and won’t scratch your surface.
Step-by-Step Instructions
- **Melt Your Chocolate:** Break up your chocolate into small, manageable pieces. You can do this in a microwave-safe bowl in 30-second bursts, stirring vigorously after each, until smooth. Or, use a double boiler (a bowl over a pot of simmering water) if you’re feeling fancy and traditional. **Don’t overheat it!** Burnt chocolate is a tragedy.
- **Prepare Your Canvas:** Lay your parchment paper or silicone mat flat on your baking sheet. Make sure it’s nice and smooth; wrinkles mean weirdly shaped shards, which can still be cool, but just a heads-up.
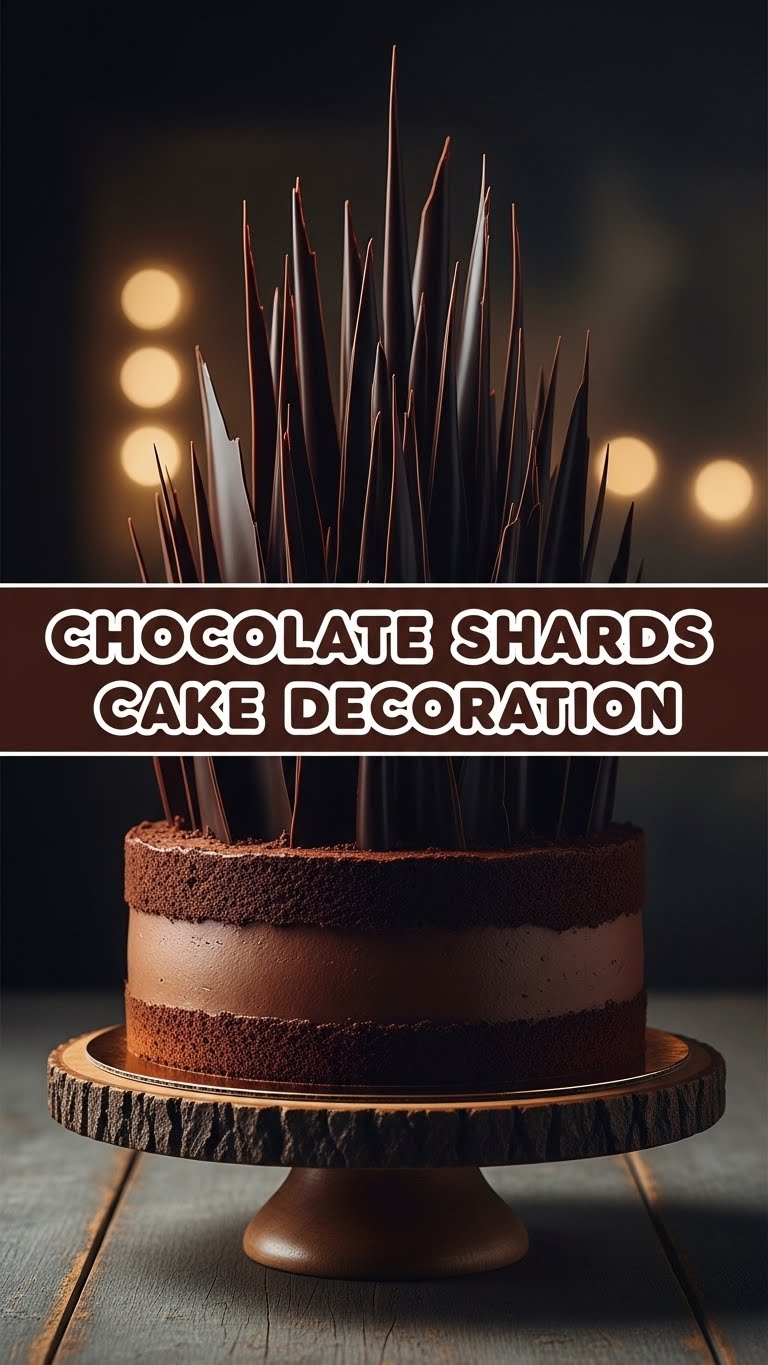
- **Spread it Out:** Pour your beautifully melted chocolate onto the prepared paper. Grab your offset spatula (or chosen spreading tool) and spread that chocolate as thin and even as you can get it. We’re aiming for a thin layer, like a very luxurious paint job. The thinner it is, the more delicate and shard-like your pieces will be.
- **Chill Out:** Pop that baking sheet into the fridge for about 15-20 minutes, or the freezer for 5-10 minutes. You want the chocolate to be completely firm and snap-able, but not rock hard and brittle to the point of shattering into dust.
- **Break it Up:** Once chilled, pull out your chocolate slab. Now for the fun part! You can gently peel the parchment paper back and then break the chocolate by hand into organic, rustic shards. Or, use a sharp knife (carefully!) to make more uniform, angular pieces. Embrace the imperfection; that’s the charm!
- **Decorate Away:** Carefully place your glorious chocolate shards onto your frosted cake. You can stick them around the sides, pile them high on top, or arrange them artfully. There are no rules, only chocolatey possibilities.
Common Mistakes to Avoid
- **Overheating the Chocolate:** This is probably the biggest no-no. Burnt chocolate tastes bitter and seizes up, becoming grainy and unusable. Go low and slow with melting!
- **Spreading it Too Thick:** While thick shards are still tasty, they might not give you that elegant “shard” look. Aim for thin, delicate layers for maximum visual impact.
- **Not Chilling Enough:** If your chocolate isn’t fully firm, it’ll just smear and bend when you try to break it. Patience, young padawan, patience.
- **Thinking You Need to Temper It:** For this simple decoration, **you absolutely do not need to temper your chocolate.** Tempering makes chocolate super shiny and stable at room temp, but for cake decorations that will be eaten relatively quickly, it’s an unnecessary faff.
Alternatives & Substitutions
Feeling adventurous? Here are some ways to spice up your shard game:
- **Flavor Infusion:** Stir a few drops of peppermint extract, orange zest, or even a tiny pinch of cayenne pepper into your melted chocolate before spreading. Mind. Blown.
- **Texture Play:** Sprinkle some chopped nuts, desiccated coconut, sea salt flakes, or colorful sprinkles onto the wet chocolate before chilling. Instant gourmet upgrade!
- **Marble Magic:** Melt two different kinds of chocolate (e.g., dark and white). Drizzle one over the other after spreading the first, then lightly swirl with a toothpick for a cool marbled effect. Très chic!
- **Chocolate Type:** Experiment with white chocolate dyed with food coloring (oil-based, please!) for vibrant, party-ready shards. Or use a high-quality baking chocolate for extra richness.
FAQ (Frequently Asked Questions)
**”Do I really not need to temper the chocolate?”** Yes! You read that right. For this quick cake decoration, tempering is overkill. Just melt, spread, chill, and break. Why complicate perfection?
**”My chocolate seized up! What did I do wrong?”** Oh, the horror! Usually, this means it got too hot, or a tiny drop of water snuck into your bowl. Chocolate and water are NOT friends. Keep that bowl dry, my pal!
**”What kind of chocolate is best?”** Honestly, whatever you love to eat! A good quality bar of eating chocolate works wonders. Chocolate chips are okay, but sometimes they contain stabilizers that can make them less smooth.
**”Can I make these ahead of time?”** Absolutely! Once broken, store your chocolate shards in an airtight container at room temperature for a few days, or in the fridge for a week or two. Just keep them away from extreme heat or humidity.
**”My shards look more like blobs… help?”** Sounds like your chocolate might have been spread a bit too thick, or it wasn’t chilled enough. Next time, aim for a thinner layer and give it a bit more time in the cold. But hey, chocolate blobs are still delicious, right?
Final Thoughts
And there you have it! Your ticket to instant cake decorator stardom, with minimal effort and maximum deliciousness. You’ve transformed simple chocolate into something visually stunning and delightfully crunchy. Now go impress someone—or yourself—with your new culinary “skills.” You’ve earned it! Seriously, pat yourself on the back. Then grab a shard. You know you want to.


