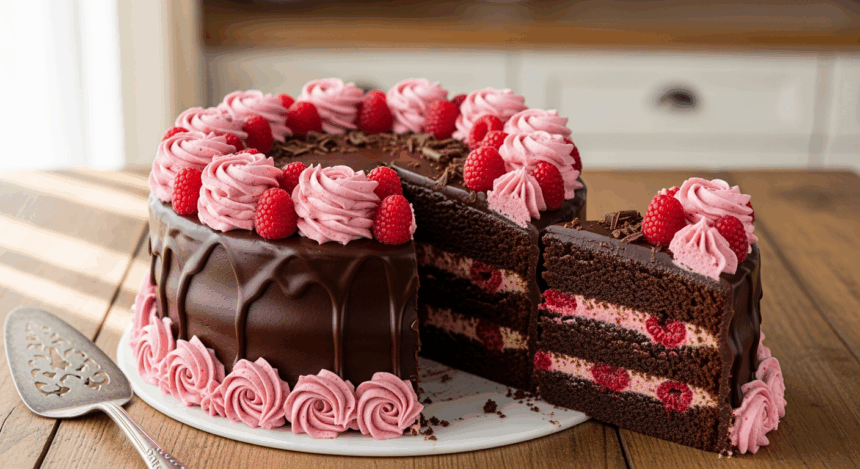
Ever found yourself standing in your kitchen thinking, “I want to make something that looks fancy but won’t have me crying into my mixing bowl three hours later?” Well, grab your apron and cancel your therapy session, because this Chocolate Raspberry Cake with Rosettes is about to become your new emotional support dessert!
Why This Recipe is Awesome
Look, I could tell you this cake is “delightful” or “scrumptious” like every other food blog, but let’s get real. This cake is awesome because it looks like you spent all day on it when you absolutely did not. Those rosettes? They’re basically just swirls with a fancy name. And the chocolate-raspberry combo? It’s like the Ryan Gosling and Emma Stone of flavor pairings – they just work together, no questions asked. Plus, the “wow factor” is off the charts, making people think you’re some sort of pastry wizard when you’re really just following directions like a functional adult.
Ingredients You’ll Need
For the Cake:
- 2 cups all-purpose flour (the regular stuff, nothing fancy)
- 1¾ cups granulated sugar (yes, that much – we’re not making health food here)
- ¾ cup unsweetened cocoa powder (the darker, the better – like your soul after 2020)
- 1½ teaspoons baking powder (the stuff that makes things rise, unlike your motivation)
- 1½ teaspoons baking soda (not to be confused with the box in your fridge)
- 1 teaspoon salt (just regular salt, save your Himalayan pink stuff for showing off)
- 2 large eggs (room temperature, because cold eggs are apparently cake saboteurs)
- 1 cup buttermilk (or regular milk with a splash of vinegar if you’re not the buttermilk-buying type)
- ½ cup vegetable oil (keeps it moist, unlike those conversations with your in-laws)
- 2 teaspoons vanilla extract (the real kind, not that imitation nonsense)
- 1 cup hot coffee (hot, like your temper when someone touches your thermostat)
For the Filling:
- 2 cups fresh raspberries (plus extra for decorating if you’re feeling extra)
- ¼ cup granulated sugar (to take the edge off those tart little berries)
- 1 tablespoon lemon juice (freshly squeezed, if you’re not lazy like me)
For the Frosting:
- 1½ cups unsalted butter, softened (that’s 3 sticks – don’t judge, just enjoy)
- 4 cups powdered sugar (approximately one small mountain)
- ½ cup unsweetened cocoa powder (for that chocolatey goodness)
- 3-4 tablespoons heavy cream (because we’re already in this deep)
- 1 teaspoon vanilla extract (again, the real deal)
- Pinch of salt (to make the sweetness less “I’m having an existential crisis” intense)
- Food coloring (pink/red for those fancy-pants rosettes)
Step-by-Step Instructions
For the Cake:
- Preheat your oven to 350°F (175°C). This step is non-negotiable, even if you think your oven “runs hot.” Grease and line two 8-inch cake pans with parchment paper.
- In a large bowl, whisk together all the dry ingredients: flour, sugar, cocoa powder, baking powder, baking soda, and salt. Make it look like a desert landscape.
- In another bowl, mix the wet ingredients: eggs, buttermilk, oil, and vanilla. Whisk until they’re playing nice together.
- Slowly pour the wet mixture into the dry ingredients, mixing as you go. It’ll look like mud at first – that’s normal, not a disaster.
- Add the hot coffee last, stirring gently. Yes, the batter will be thin. No, you haven’t messed up. The coffee enhances the chocolate flavor without making it taste like your morning brew.
- Pour the batter evenly into your prepared pans. Bang them on the counter a few times to release air bubbles (and any kitchen frustrations).
- Bake for 30-35 minutes, or until a toothpick inserted comes out mostly clean. If you overbake, I will find you. Chocolate cake should be moist!
- Let the cakes cool in pans for 10 minutes before transferring to a wire rack. If you skip this step, your cake might fall apart, and then you’ll have to call it “deconstructed.”
For the Raspberry Filling:
- In a saucepan, combine raspberries, sugar, and lemon juice. Cook over medium heat until the berries break down (about 5-7 minutes), occasionally smashing them with your spatula to release your pent-up emotions.
- Let the mixture cool completely. It will thicken as it cools, kind of like how your arteries will after eating this cake. Worth it.
For the Frosting:
- Beat the butter until it’s fluffy and questioning its life choices (about 3-4 minutes).
- Gradually add powdered sugar and cocoa powder, alternating with splashes of heavy cream. If your mixer sounds like it’s going to take flight, you’re doing it right.
- Add vanilla and salt, beating until the frosting is smooth and velvety. Set aside about 1 cup and mix in your food coloring for the rosettes.
Assembly (The Moment of Truth):
- Level your cake layers with a serrated knife if they’ve domed. Eat the scraps – that’s chef’s privilege.
- Place one layer on your cake stand. Pipe a dam of chocolate frosting around the edge to prevent raspberry filling jailbreak.
- Spread the raspberry filling inside the dam. No double-dipping that spatula!
- Place the second cake layer on top, press down gently, then frost the entire cake with the chocolate frosting. It doesn’t need to be perfect – we’re covering part of it anyway.
- Put your colored frosting in a piping bag with a 1M star tip. Pipe rosettes around the border and maybe a few on top. The technique? Just start in the center and swirl outward. If a three-year-old can draw a spiral, you can pipe a rosette.
- Add fresh raspberries between some rosettes for that “I totally planned this artistic arrangement” look.
Common Mistakes to Avoid
Let’s talk about how not to sabotage your masterpiece:
- Using cold ingredients – Your eggs and butter need to be room temp. I don’t care if you forgot and need to microwave them for 10 seconds. Just fix it.
- Opening the oven door too early – I know you’re excited, but your cake will sink faster than your hopes of fitting into last year’s jeans.
- Frosting a warm cake – Unless you want a frosting mudslide, be patient. No one has ever died waiting for cake to cool (though I’ve come close).
- Overbeating the cake batter – We’re making cake, not bread. Gluten development is not your friend here.
- Skipping the frosting dam – Unless you want raspberry filling oozing out like some sort of dessert crime scene.
Alternatives & Substitutions
Not everyone has a perfectly stocked pantry or wants to follow rules. I get it. Here are some workarounds:
- No buttermilk? Use regular milk with a tablespoon of lemon juice or vinegar. Let it sit for 5 minutes until it looks slightly curdled and questionable.
- Don’t like coffee? Use hot water instead. You’ll miss out on some flavor depth, but your cake won’t be a total disaster.
- Fresh raspberries not in season? Frozen work fine for the filling. In fact, sometimes they’re better because they’re frozen at peak ripeness, unlike your dating prospects.
- Gluten issues? Use a cup-for-cup gluten-free flour blend. The texture might be slightly different, but hey, at least you won’t need an EpiPen.
- No piping bag? A zip-top bag with the corner snipped off works in a pinch. Your rosettes might look more like abstract art, but you can call it “rustic” and no one will question you.
FAQ (Frequently Asked Questions)
Can I make this cake ahead of time?
Absolutely! The cake layers can be baked up to two days ahead and stored wrapped in plastic at room temperature. The filling can be made a day ahead and refrigerated. The fully assembled cake is best eaten within 1-2 days, but who are we kidding? It’ll be gone in hours.
Do I really need to use coffee in the cake?
Can you skip the coffee? Sure. Should you? No. The coffee enhances the chocolate flavor without making the cake taste like your morning Starbucks run. Trust the process.
My rosettes look like something my cat coughed up. Help?
Practice on a plate first! Start in the center and swirl outward with even pressure. If they still look rough, call them “artisanal” and act like you meant it. Confidence is key.
Can I use a different fruit?
You bet your sweet bippy you can! Strawberries, blackberries, or even cherry preserves would work beautifully. Just make sure whatever you use isn’t too watery, or you’ll have a soggy situation.
My cake layers didn’t rise much. Did I mess up?
Check if your baking powder and soda are fresh (they do expire, much like my patience). Also, make sure you didn’t overmix or use cold ingredients. If all else fails, just stack those flat layers and call it a “European-style torte.”
Can I make cupcakes instead of a layer cake?
Absolutely! Fill cupcake liners about 2/3 full and bake for approximately 18-22 minutes. Core the centers, add a bit of raspberry filling, and top with frosting. Boom—fancy cupcakes that didn’t require a second mortgage.
Final Thoughts
Look at you, standing there with flour in your hair and a gorgeous chocolate raspberry cake that looks straight out of a bakery window! Whether your rosettes are Pinterest-perfect or charmingly lopsided, you’ve created something both beautiful and delicious—which is more than most of us accomplish on an average Tuesday.
Remember, the best part about homemade cake isn’t just eating it (though that’s a close first)—it’s the smugness you feel when people ask, “You MADE this?” Now go slice into that beauty, take a ridiculous number of photos for social media, and enjoy every bite. You’ve earned it!
And if anyone asks for the recipe, send them a link but tell them it’s “pretty complicated”—even though we both know it’s not. Some kitchen secrets are worth keeping! 😉

