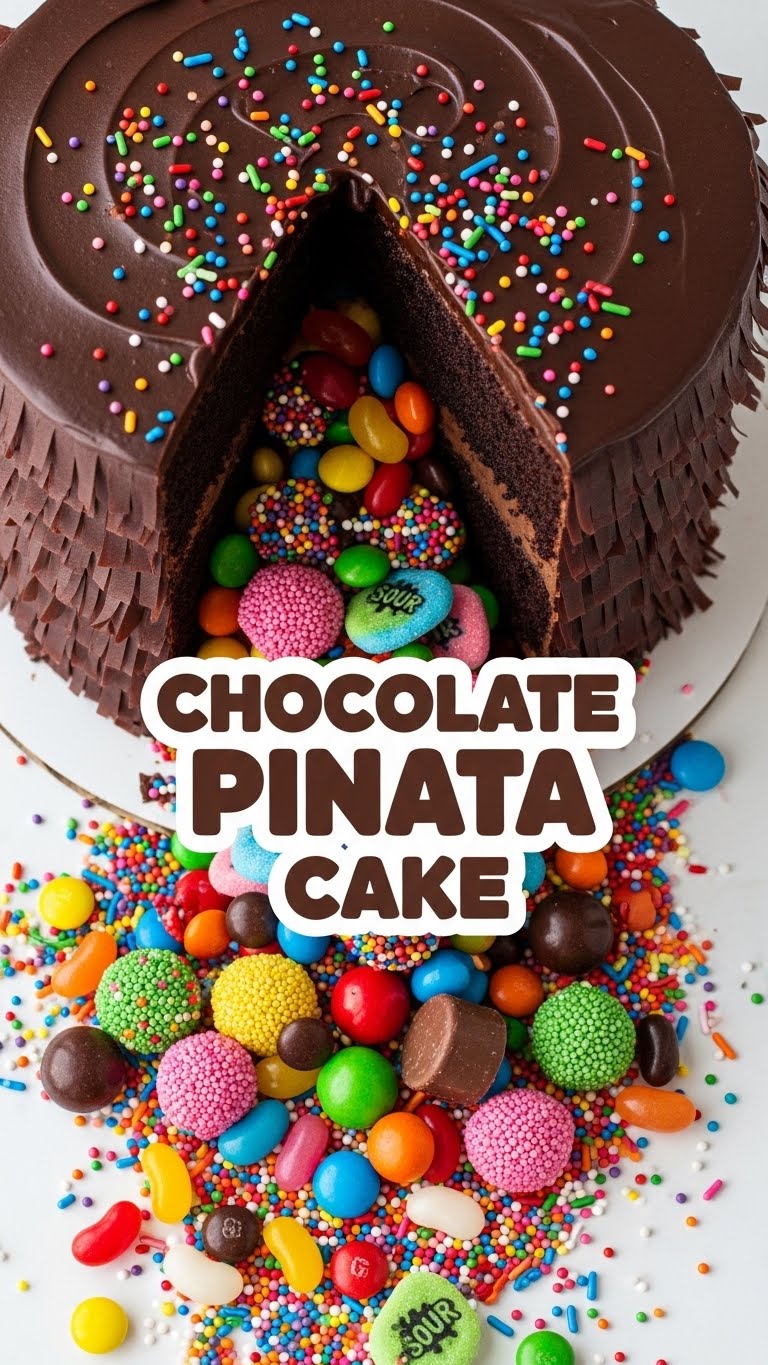
So, you’ve scrolled through enough Instagram reels of perfectly sliced cakes revealing a cascade of candy, and now you’re thinking, ‘I want that magic in my life, but, like, without the stress, please?’ You’ve come to the right place, my friend. We’re making a Chocolate Pinata Cake, and trust me, it’s easier than trying to get a toddler to share their cookies. It’s a party in cake form, literally!
Why This Recipe is Awesome
Let’s be real, you’re not just making a cake; you’re crafting an experience. And this experience? It’s awesome for a few reasons:
- It’s a showstopper without the show-off effort. People will think you spent hours, but shhh, that’ll be our little secret.
- It’s practically idiot-proof. I’ve made it, and I’ve set off smoke alarms boiling water before, so you know it’s legit.
- Chocolate. Candy. Need I say more? It’s basically two of life’s greatest joys combined into one delicious package.
- Instant party trick! Slice it, watch the smiles, and bask in the glory. Everyone loves a hidden treasure, especially when that treasure is M&Ms.
Ingredients You’ll Need
Gather your troops, er, ingredients! Don’t worry, nothing too fancy here.
For the Cake (because we’re not entirely cheating):
- 2 ½ cups all-purpose flour (the basic building block of joy)
- 1 cup unsweetened cocoa powder (the darker, the better, for that *oomph*)
- 2 teaspoons baking soda (our little lifter-upper)
- 1 teaspoon salt (just a pinch, don’t go full Salt Bae)
- 2 cups granulated sugar (sweetness overload, baby!)
- 4 large eggs, room temperature (because they play nicer)
- 1 cup full-fat milk (because we’re not dieting today)
- ½ cup vegetable oil (for ultimate moistness, nobody likes a dry cake)
- 2 teaspoons vanilla extract (the MVP of flavor)
- 1 cup hot water or hot brewed coffee (activates cocoa, makes it richer – pro tip!)
For the Frosting (because naked cakes are sad):
- 1 cup (2 sticks) unsalted butter, softened (not melted, big difference!)
- 4-5 cups powdered sugar, finely sifted (avoids lumps, trust me)
- ¾ cup unsweetened cocoa powder (again, for that rich chocolatey goodness)
- ½ cup heavy cream (for creaminess, duh)
- 1 teaspoon vanilla extract (again, can’t have enough)
- Pinch of salt (balances the sweet, it’s science!)
For the “Pinata” Filling (the real star):
- 2-3 cups of your favorite small candies (M&Ms, Smarties, mini chocolate eggs, gummy bears – go wild! No full-sized candy bars, please, unless you have a chainsaw.)
Step-by-Step Instructions
Alright, apron on, game face on. Let’s make some magic!
- Prep Like a Boss: Preheat your oven to 350°F (175°C). Grease and flour three 8-inch or 9-inch round cake pans. Don’t skip this; your future self will thank you.
- Dry Stuff First: In a large bowl, whisk together the flour, cocoa powder, baking soda, salt, and granulated sugar. Give it a good mix to combine everything evenly.
- Wet Stuff Next: In a separate bowl, whisk the eggs, milk, vegetable oil, and vanilla extract until well combined.
- Combine & Conquer: Pour the wet ingredients into the dry ingredients. Mix on low speed with an electric mixer (or by hand with a whisk) until *just* combined. Don’t overmix, or you’ll get a tough cake – and no one wants a cake that fights back.
- The Hot Secret: Carefully stir in the hot water or coffee. The batter will be thin, almost like soup – don’t panic! This is totally normal and will make your cake super moist.
- Bake Baby Bake: Divide the batter evenly among your three prepared cake pans. Bake for 28-32 minutes, or until a wooden skewer inserted into the center comes out clean. Let the cakes cool in the pans for 10-15 minutes, then invert them onto a wire rack to cool completely. Patience is a virtue here!
- Frosting Fun: While the cakes cool, make your frosting. In a large bowl, beat the softened butter until creamy. Gradually add the powdered sugar, cocoa powder, heavy cream, vanilla extract, and salt. Beat on medium-high speed until the frosting is light and fluffy, about 3-5 minutes. If it’s too thick, add a tiny bit more cream; too thin, add more powdered sugar.
- Assemble the Magic:
- Once cakes are completely cool (this is important!), level them with a serrated knife if needed.
- Place one cake layer on your serving plate or cake stand. Spread a generous ring of frosting around the edge of this layer, leaving the center open.
- Now, take *one* of the other cake layers and, using a 3-4 inch cookie cutter or a sharp knife, carefully cut a hole in its center. This is your candy chamber! Stack this “holey” layer on top of the first layer, aligning the edges. Frost another ring around the edge of this layer.
- Pour your chosen candy treasure into the empty hole you just created. Fill it up!
- Finally, place the third, uncut cake layer on top, sealing in all that delicious surprise. Give it a gentle press.
- Crumb coat the entire cake with a thin layer of frosting to lock in any stray crumbs. Chill for 15-20 minutes, then apply your final, thicker layer of frosting.
- Decorate (or don’t, it’s your cake): Add extra candy on top, sprinkles, or whatever makes your heart sing. Or just leave it perfectly chocolatey. It’s already a star!
Common Mistakes to Avoid
We all make mistakes, but let’s try to avoid these cake-ruining ones, shall we?
- Not cooling your cakes completely: You’ll end up with a sliding, melting, frosting-gooey mess. Seriously, wait it out.
- Overmixing the batter: Hello, brick cake! Mix until just combined, no more.
- Forgetting to grease AND flour your pans: Enjoy scraping cake off the bottom of the pan. It’s a sad sight.
- Cutting the hole in the *wrong* layer: Only the middle layer gets the hole! Unless you want a very flat pinata, which defeats the purpose.
- Trying to fill with jumbo candy: Seriously, it won’t work. Stick to small bits that will cascade out beautifully.
Alternatives & Substitutions
Feeling creative? Or just missing an ingredient? No worries, we’ve got options!
- Coffee for Hot Water: This is my favorite **pro tip**. Definitely use hot brewed black coffee instead of hot water. It doesn’t make the cake taste like coffee, but it seriously amplifies the chocolate flavor. Trust me on this one; it’s a game-changer, **IMO**.
- Dairy-Free? For the cake, you can often substitute a good quality plant-based milk (like almond or oat) for regular milk. For the frosting, a good vegan butter alternative and plant-based cream can work wonders.
- Different Frosting: Not a chocolate-on-chocolate person? (Who are you?! Just kidding!) You can totally use a vanilla buttercream, cream cheese frosting, or even a luscious ganache.
- Candy Choices: The world is your oyster! Skittles, mini Reese’s Pieces, colorful sprinkles, even small, wrapped chocolates. Just ensure they’re small enough to fit and don’t get soggy.
FAQ (Frequently Asked Questions)
Got questions? I’ve got (casual) answers!
- Can I use boxed cake mix? Oh, you *can*, but where’s the adventure in that? If you absolutely must, no judgment here. Just follow the box directions for three layers, then proceed with the pinata part.
- How do I get my cakes to be level? A long serrated knife and a steady hand work well. For extra precision, some people use a fancy cake leveler. **Chill your cakes in the fridge first; it makes leveling so much easier!**
- My frosting is too thin/thick! Help! Too thin? Add more powdered sugar, a tablespoon at a time. Too thick? A tiny splash more heavy cream (or milk). Adjust slowly until it’s perfect.
- How far in advance can I make this? The cake layers can be baked a day ahead, wrapped well in plastic, and stored at room temp. The frosting can also be made a day ahead and refrigerated (let it come to room temp and re-whip before using). Assemble the day you plan to serve for maximum candy surprise effect!
- Can I put something other than candy inside? Sure, get creative! Small, clean toys (if for a kid), a special note, a tiny gift. Just ensure whatever you put in is food-safe and won’t spoil or affect the cake’s taste.
- What if I only have two cake pans? No problem! Bake two layers, let them cool, then wash and reuse one pan for the third layer. It just adds a little extra baking time.
Final Thoughts
And there you have it, folks! Your very own Chocolate Pinata Cake, ready to bring smiles, gasps, and probably a few messy but happy faces. You’ve conquered the chocolate mountain and unearthed a candy treasure. Now go impress someone—or yourself—with your new culinary skills. You’ve earned it! Don’t forget to take a pic before it all disappears. Happy baking (and eating!)!


